![NEW_PlanHub_Logo_Navy.png]](https://knowledgebase.planhub.com/hs-fs/hubfs/Design/PH%20Logos/NEW%202024%20PH%20Logos/NEW_PlanHub_Logo_Navy.png?height=40&name=NEW_PlanHub_Logo_Navy.png)
Takeoffs for plumbing jobs are quick and straightforward using Planhub’s Takeoff tools.
Prerequisites: You need a subscription or trial that includes Takeoff to measure plans, export a plan into TakeOff, and set the scale. Then you can begin measuring.
How to Begin a Takeoff In PlanHub
Map Pipes Using Linear | Line
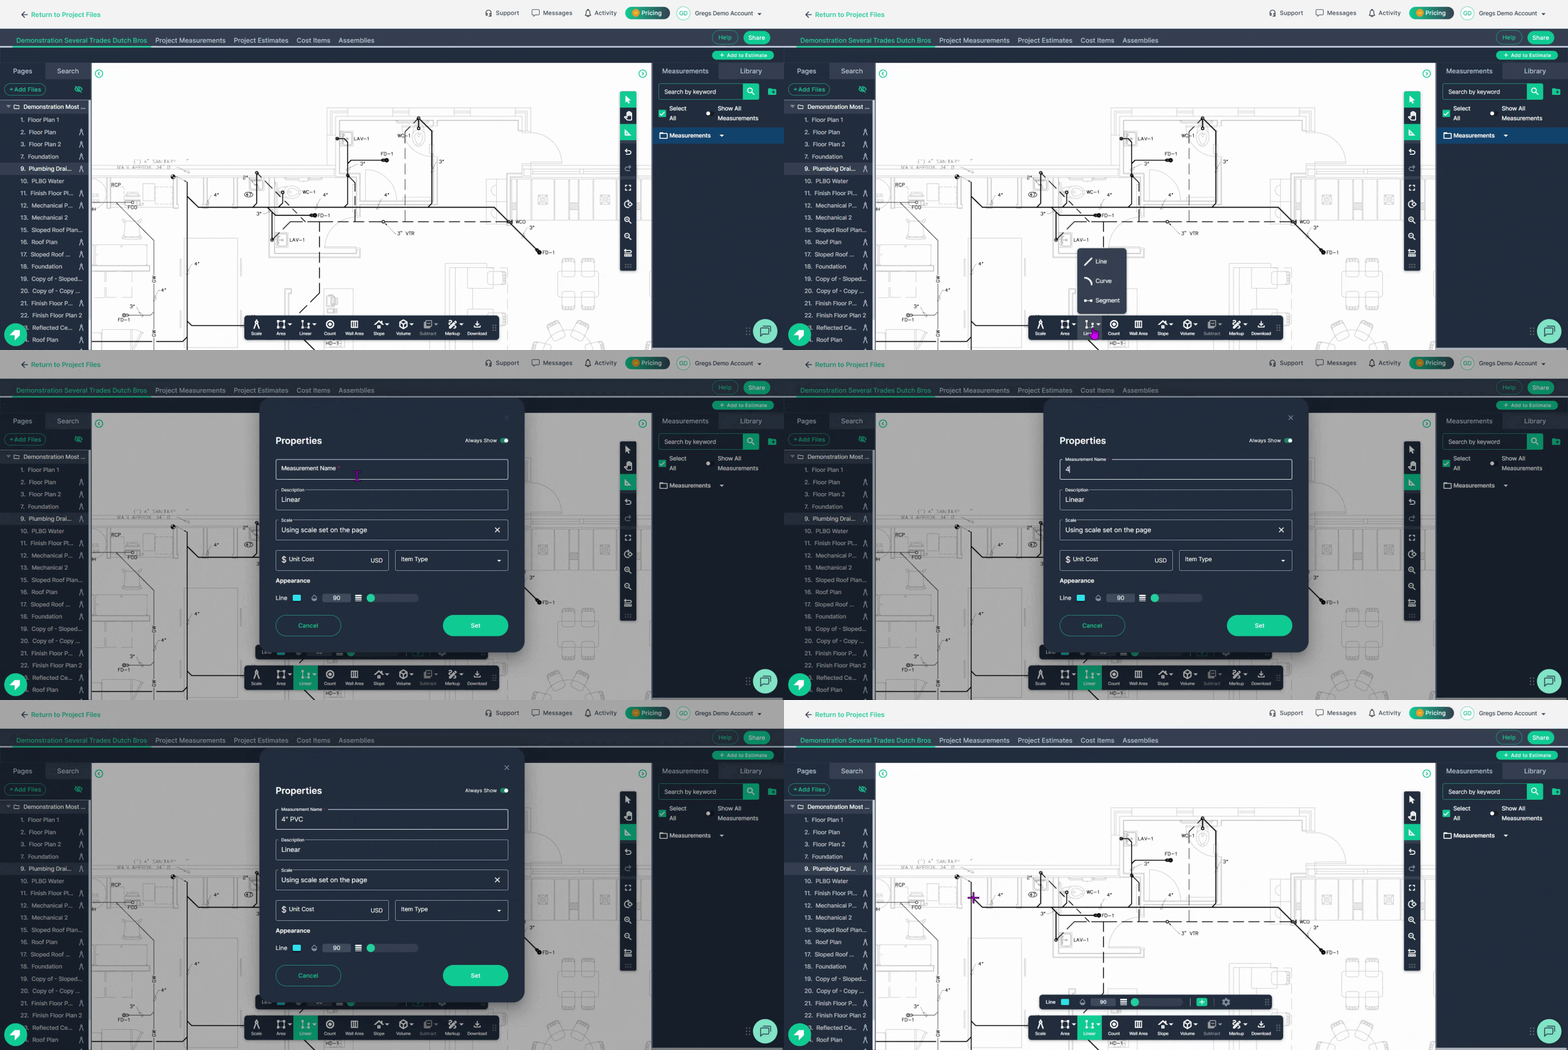
Step 1: Engage the Linear Line tool
-
Click on the Linear Tool to begin a new measurement.
-
Select Line from the menu.
-
Name the tool based on the pipe size, for example, "4-inch PVC"
-
Adjust the line color to align with your preference
-
Click Set.
Step 2: Map the pathway of the pipe
-
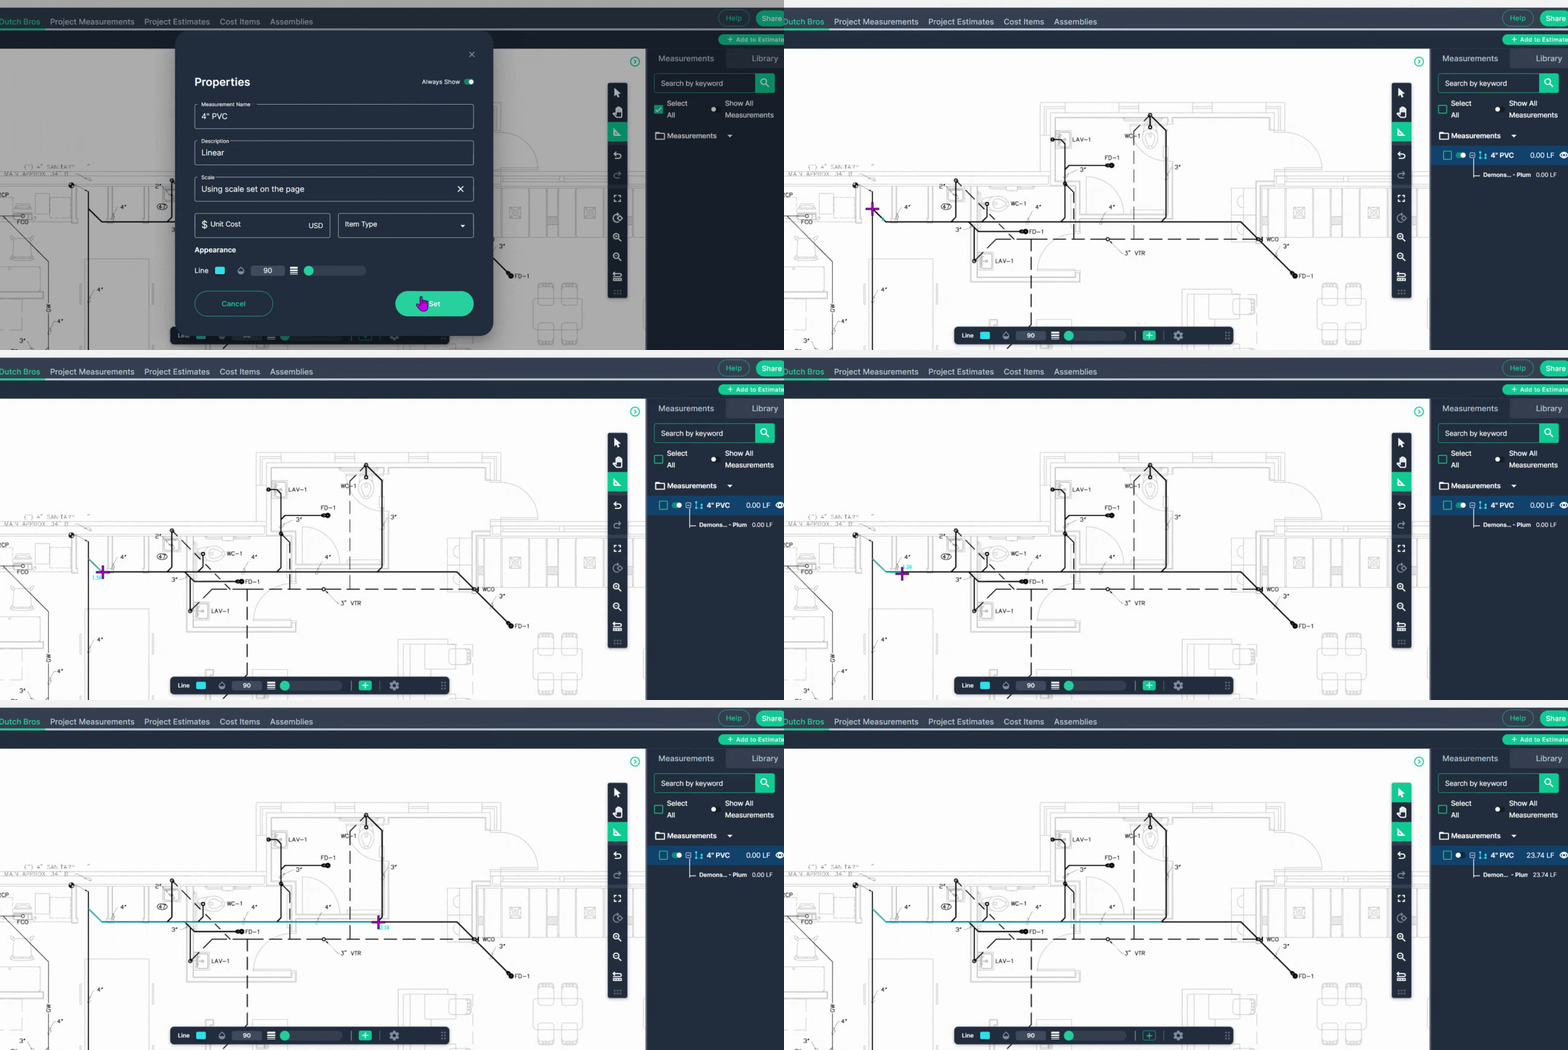
Left-click once at the start of your 4-inch PVC run
-
Move your cursor to where the pipe changes direction or ends and left-click once.
-
Left-click once again at each turn. This lets you change direction/add turns to the line measurement.
-
Continue tracing the pipe until it reduces in size or ends.
-
For angles that don’t match the Snap-to-Angle increments, hold down the spacebar while measuring.
-
When you reach the point that changes or ends, double-click to end that section.
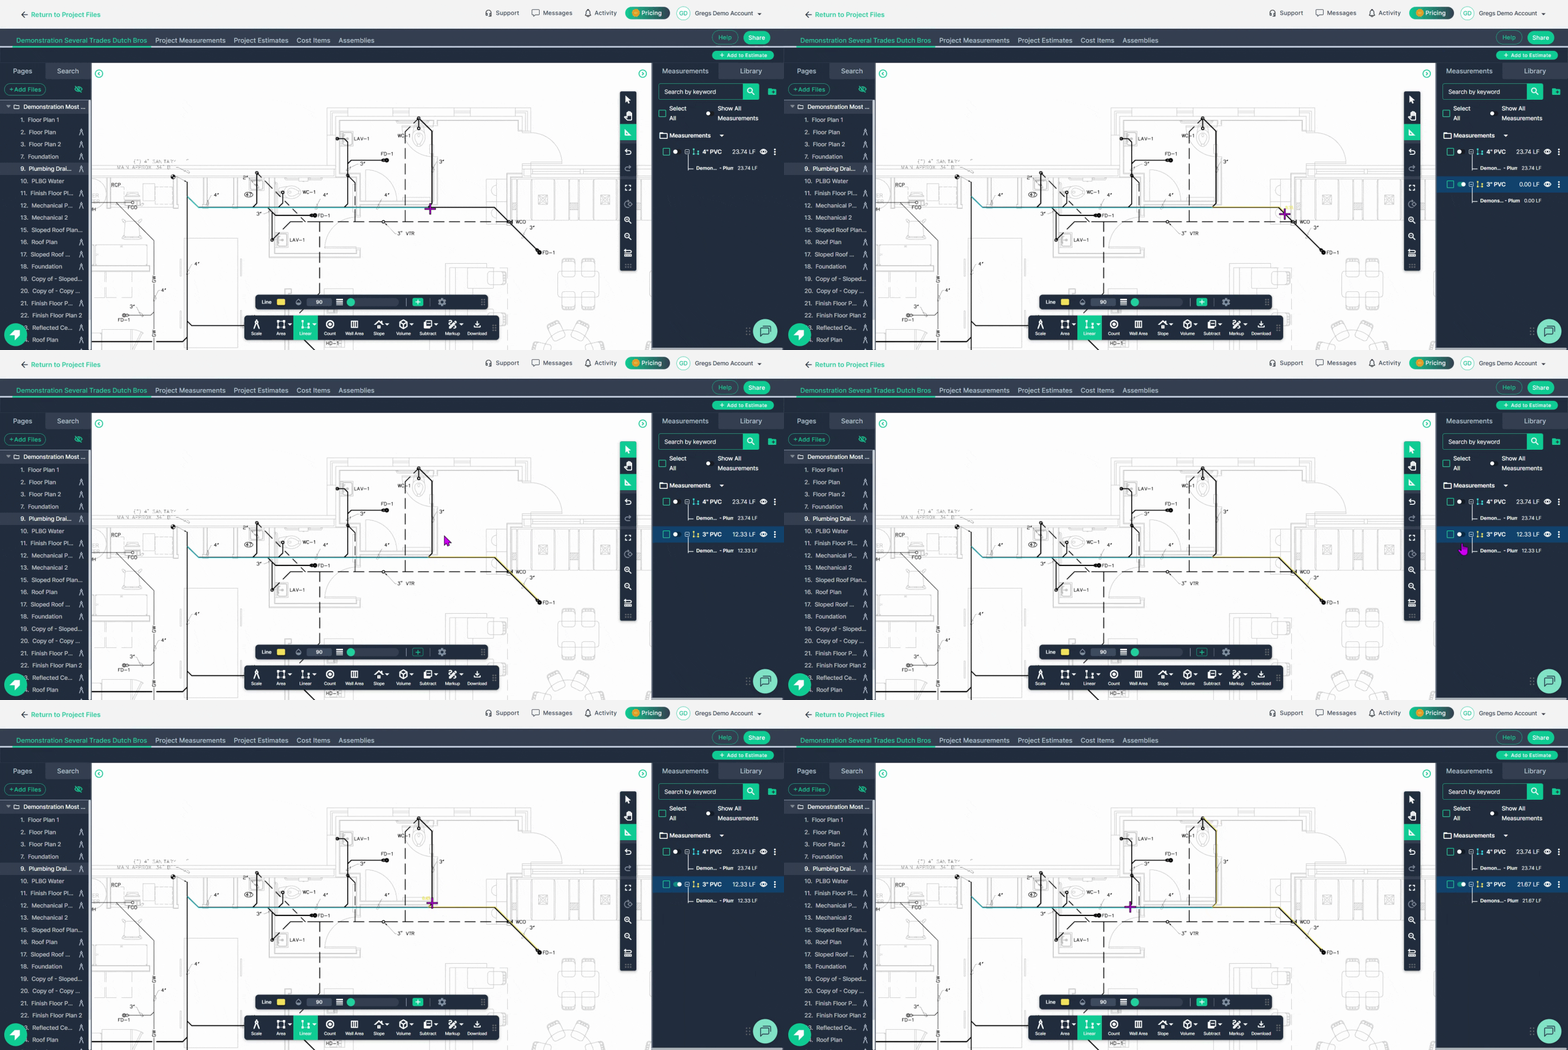
Step 3: To measure the next section, say "3-inch PVC".
-
Click Linear again
-
Select Line
-
Follow the same steps outlined in Steps 1- 2, starting the line from where you left off, click once, then follow the route as before.
-
Double-click to finish each measurement when you reach the end of a section.
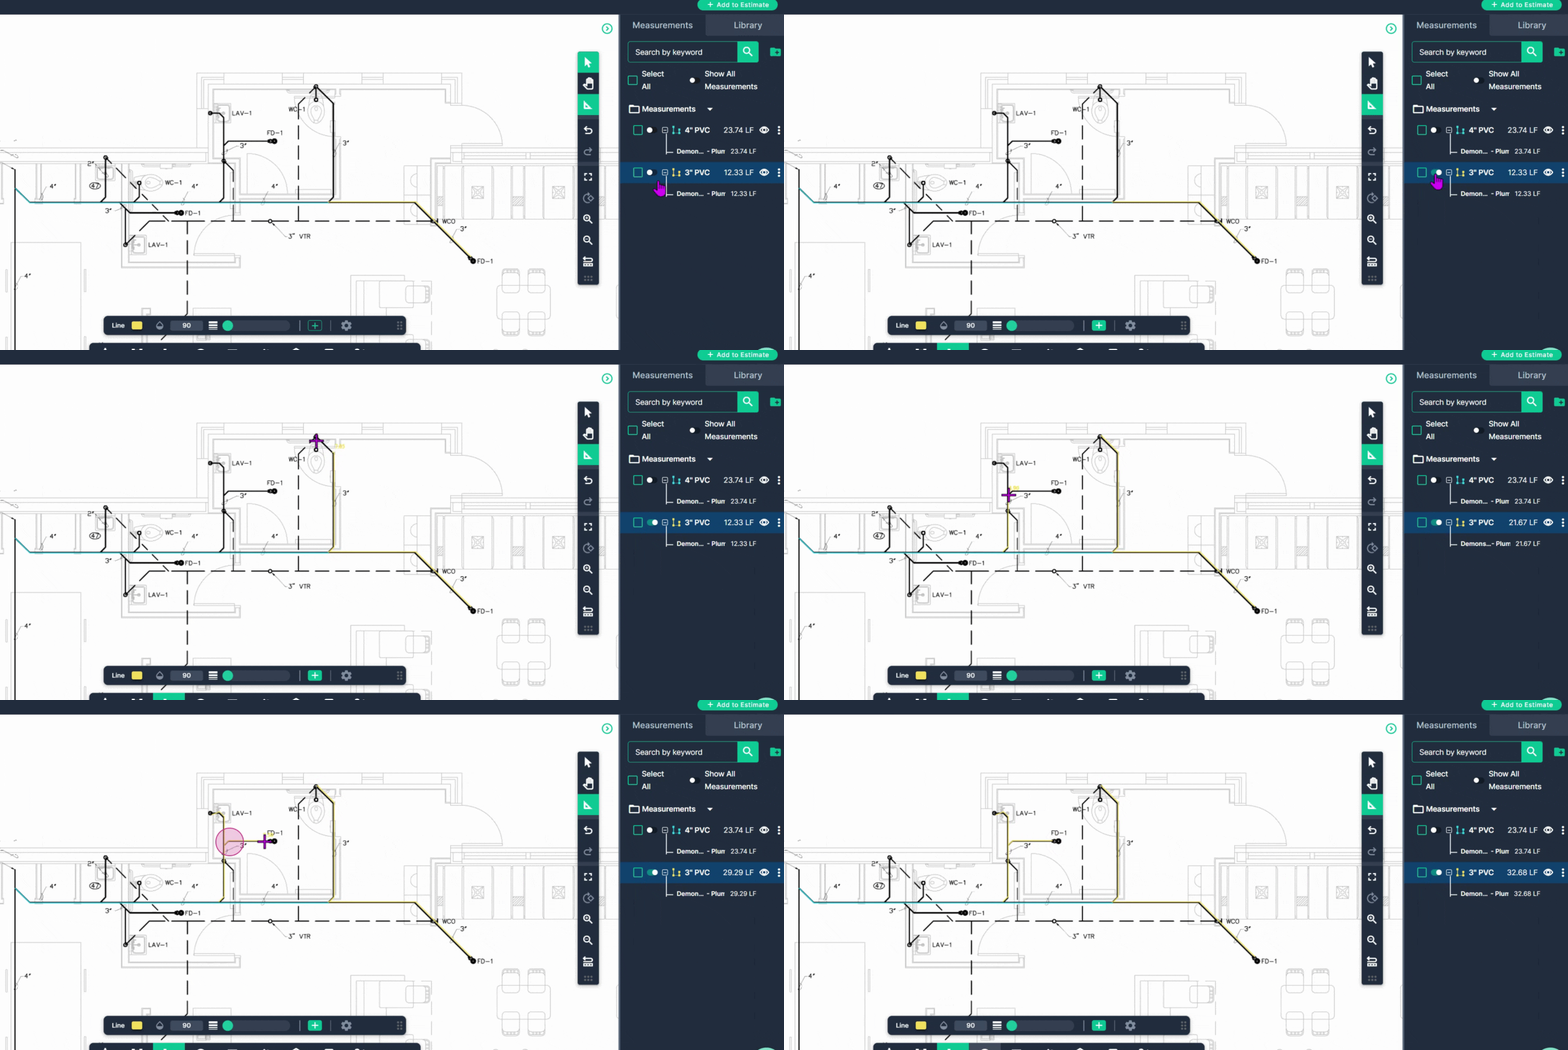
Step 4: Add to a measurement value using the Continue Toggle switch
-
To continue adding value to any measurement, use the Continue switch.
-
This re-enables the tool so you can start measuring more pipe lengths, following turns, and finishing by double-clicking at the end of each segment.
-
Click on the Continue Toggle again to turn off a measurement and stop adding value to it.
Counting Fittings Using the Count Tool
Once you’ve measured the pipes, it’s time to count the fittings.
Step 1: Engage the Count tool
-
Click the Count Tool on the toolbar.
-
Enter a name for the fitting you want to count, like "4 inch PVC 45".
-
Choose a color and, optionally, a shape to mark fittings on the plan.
-
Click Set to begin counting fittings of that type.
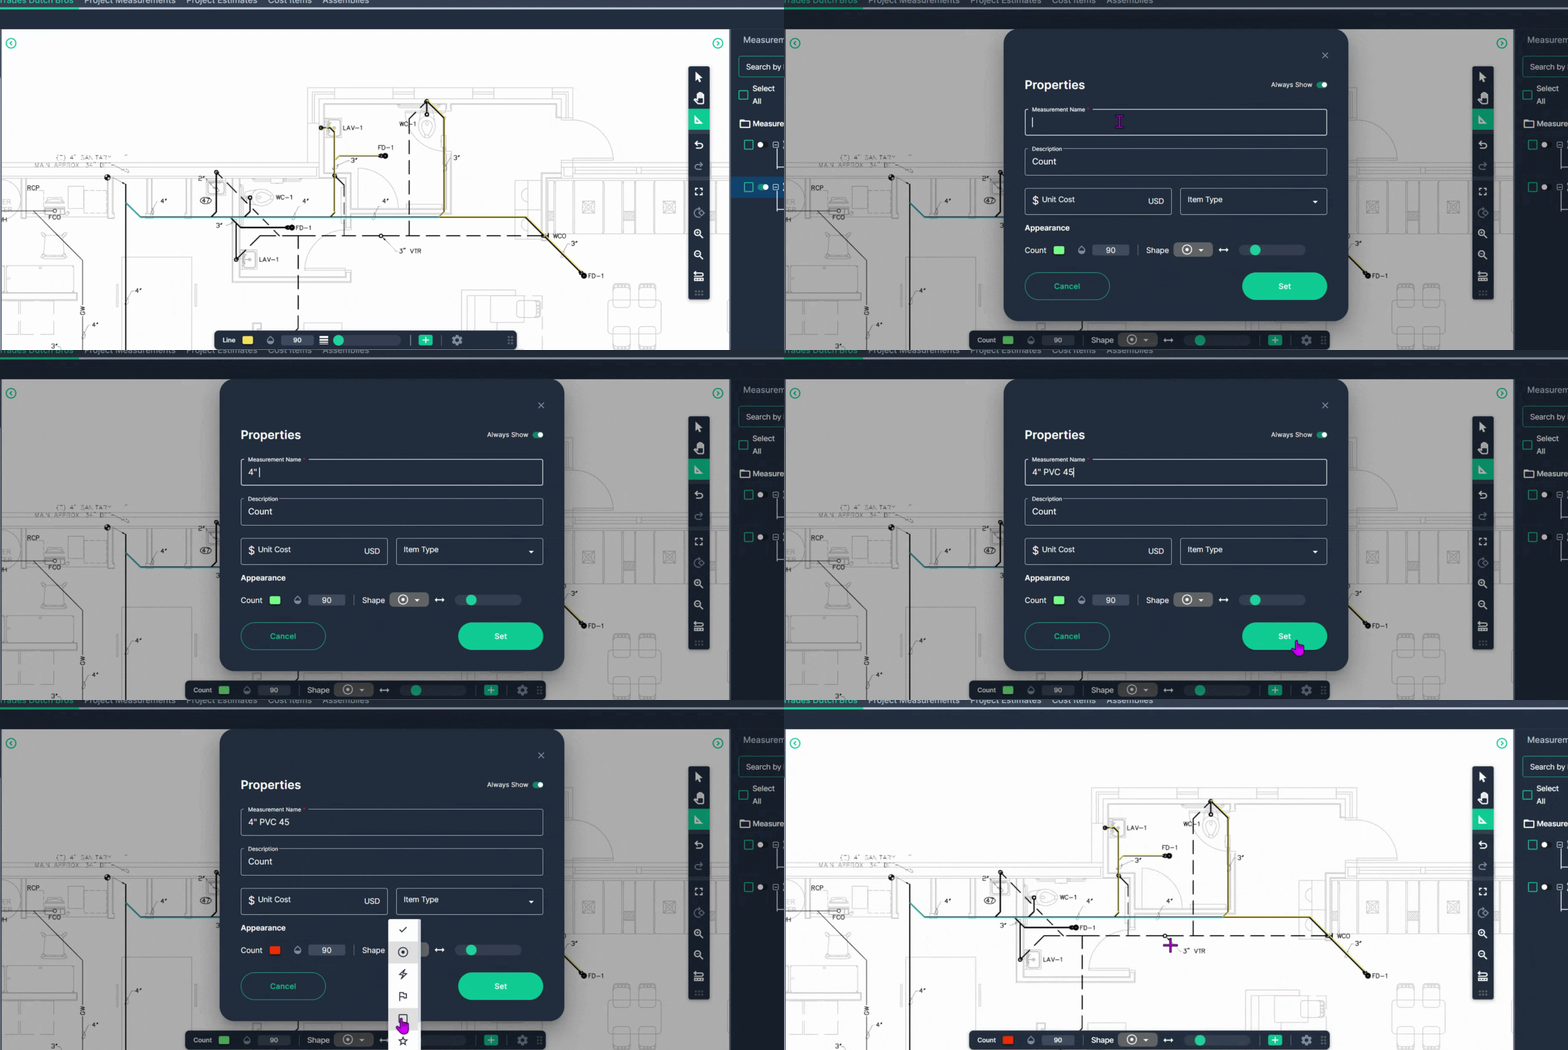
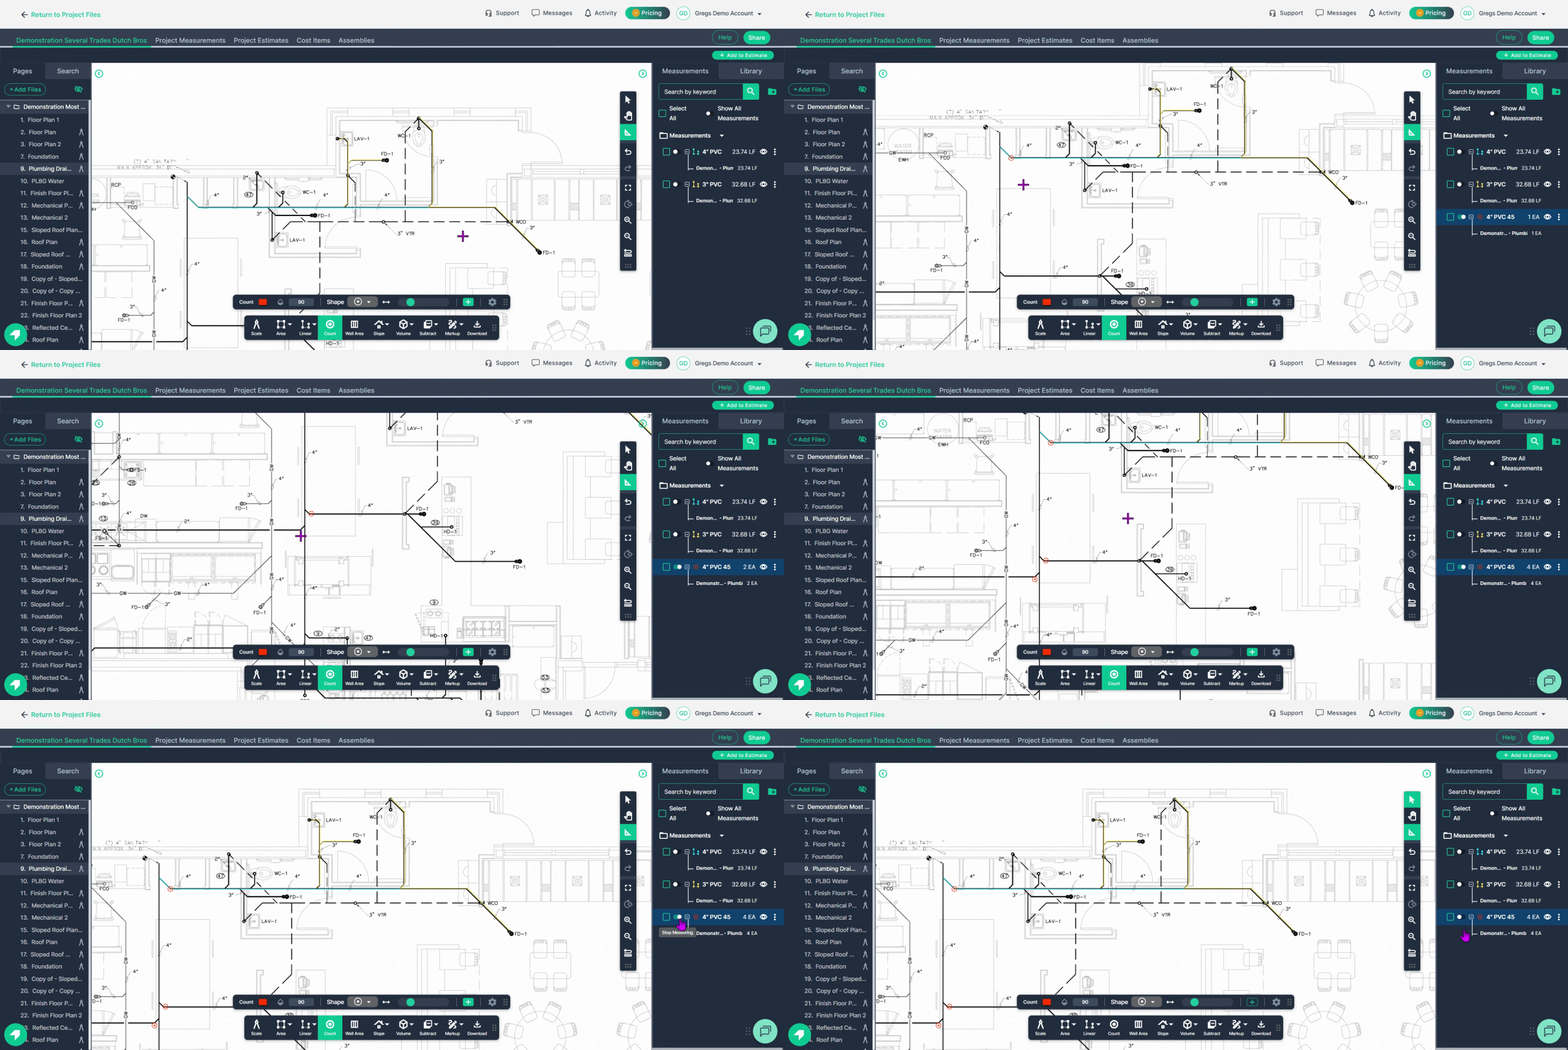
Step 2: Count the items, like "4 inch PVC 45".
-
Left-click once at every location where that fitting is required.
-
Each click places the count symbol on the drawing.
-
Pan the page with a right-click and drag, and click the next corner.
-
Monitor your tally in the Measurements panel on the right side of the window.
-
Turn off the current fitting counter by clicking the Continue Toggle switch for this measurement
Step 3: Creating another Count for other fittings or products.
-
Then, start a new count for the next fitting type, such as "3 inch 45".
-
Give the new count a name, click Set, and mark each instance of the new fitting just as before.
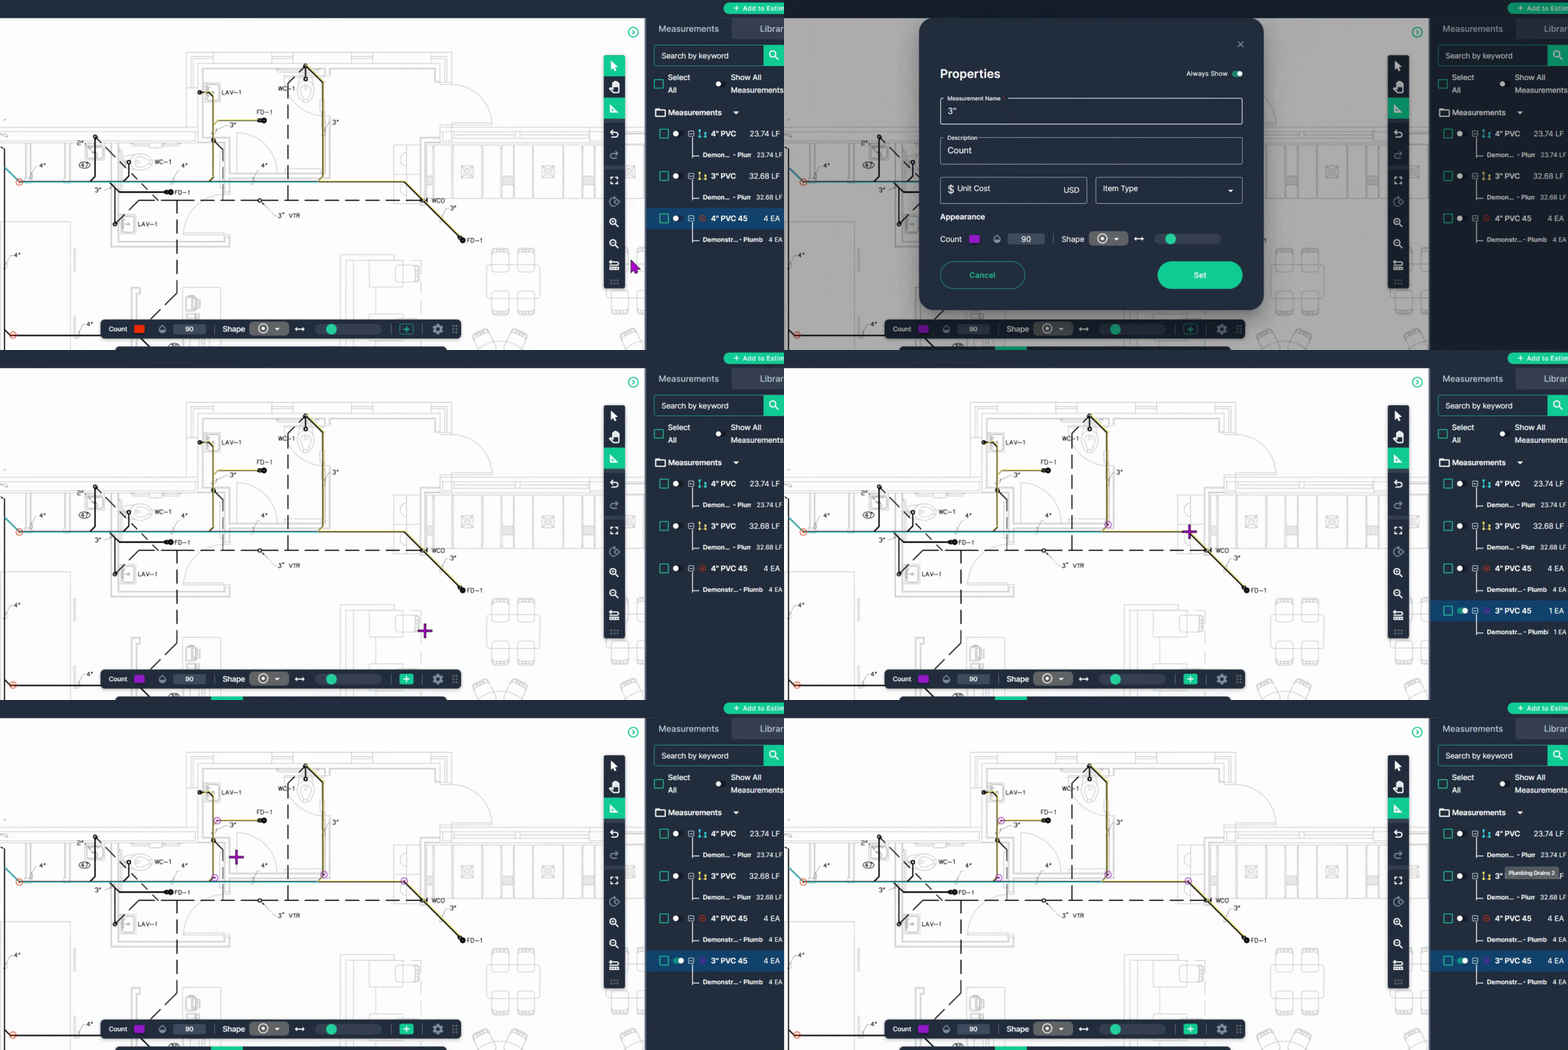
Repeat this process for every pipe size and fitting type required in your plan.
Use Planhub’s tools as shown, and you’ll have accurate, organized takeoffs for all your plumbing needs.
Next Steps
Once you have completed taking all your measurements, you can:
-
Download the measurements in a table from the Project Measurements page
-
Add a legend and download the PNG of your takeoff page
-
If you have purchased the Estimation add-on tool, send measurements into the Project Estimate page or push them into an Assembly you have built.
-
Share your Takeoff with anyone using the Share button in the upper right-hand corner.
Troubleshooting
Contact us if you need assistance or to report an issue:
-
PlanHub Contact Page: https://planhub.com/contact/
-
Customer Facing Support Ticket Link: https://knowledgebase.planhub.com/knowledge/kb-tickets/new
-
Schedule a Free 1-on-1 Takeoff Training: https://meetings.hubspot.com/zac-low/takeoff-and-estimation