Takeoff Page
1. Navigate to your PlanHub account.
In the menu bar to the left, you can click on "Takeoff" to view a list of all project leads you have added to the Takeoff tools.

2. Use the search field to search for projects that you have pushed into takeoff by name.

3. You can filter the list of projects in the Takeoff Project list page by:
Project Location
Takeoff Status
Project Type
Created Date
Bid Due Date
Hidden Projects
To add a filter, click the Filters button; to clear your filters, click Clear Filters.

4. When you access your filters, a slide-out will appear with the filter options. Select your filters and click "Save" to apply them.

5. You can sort your list of projects by using the small arrows next to the title of each column.

6. To see a list of all the documents associated with a project, click the small arrow to the right of the project.

7. Each project has an Actions menu, you can use this to Hide a project, View the Project's Details page, or Open this Project's Takeoff.

8. To open the takeoff for a project file, click the "Open in Takeoff" button or click on the project name.

9. If you have many takeoffs, you can scroll through the pages using the arrows or the number field.

Sending files to Takeoff
Import a Project
1. To add your project and documents from your desktop or locally sourced (non-PlanHub-provided documents) to Takeoff, navigate to the Takeoff page, in the menu to the left, click the "Import Project" button.

- You can also import a project on the "Bid Board".

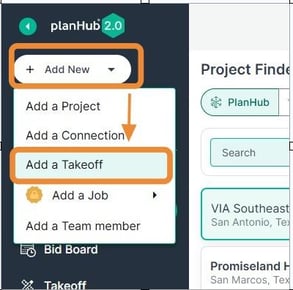
- Or from the + Add New Menu in your navigation bar.
2. Fill in the project information and upload any plans or documents you want to attach to this project.
Note: The red asterisks (*) indicate required fields.

3. You can add more project information in the Project Details section. This section is optional.
*This helps your Team stay in the loop and have all the information they need.

4. You can add Contact details for the General Contractor or the contact you got these plans from. This section is optional.
*This helps your Team stay in the loop and have all the information they need.

5. Click "Import"

6. Once imported, you will see the project on your Takeoff projects page, expand the project files, then click on the file name you wish to open in Takeoff.

Sending PlanHub Project files to Takeoff
1. You can access or send project files to the takeoff in the project details page by clicking on the "Project Files" icon.

2. Click the "Start Takeoff" icon or the "Exported to Takeoff". If you have not already exported the takeoff, it will export and then open up in a new tab.

3. Recommended: If you would like to preview the document before you send it to Takeoff, click the "File Viewer" icon.

4. In the File Viewer, once you have found the pages you desire to send to takeoff or if you wish to send the full file, click "Send to Takeoff" in the upper right-hand corner.

5. Then select if you want to send just the page you are currently looking at (click on "Export current page") or the whole file (click "Export file").
Once export is complete, click "Open in Takeoff" in the upper right-hand corner to open the takeoff.

Troubleshooting
Contact us if you need assistance or to report an issue:
- PlanHub Contact Page: https://planhub.com/contact/
- Customer Facing Support Ticket Link: https://knowledgebase.planhub.com/knowledge/kb-tickets/new