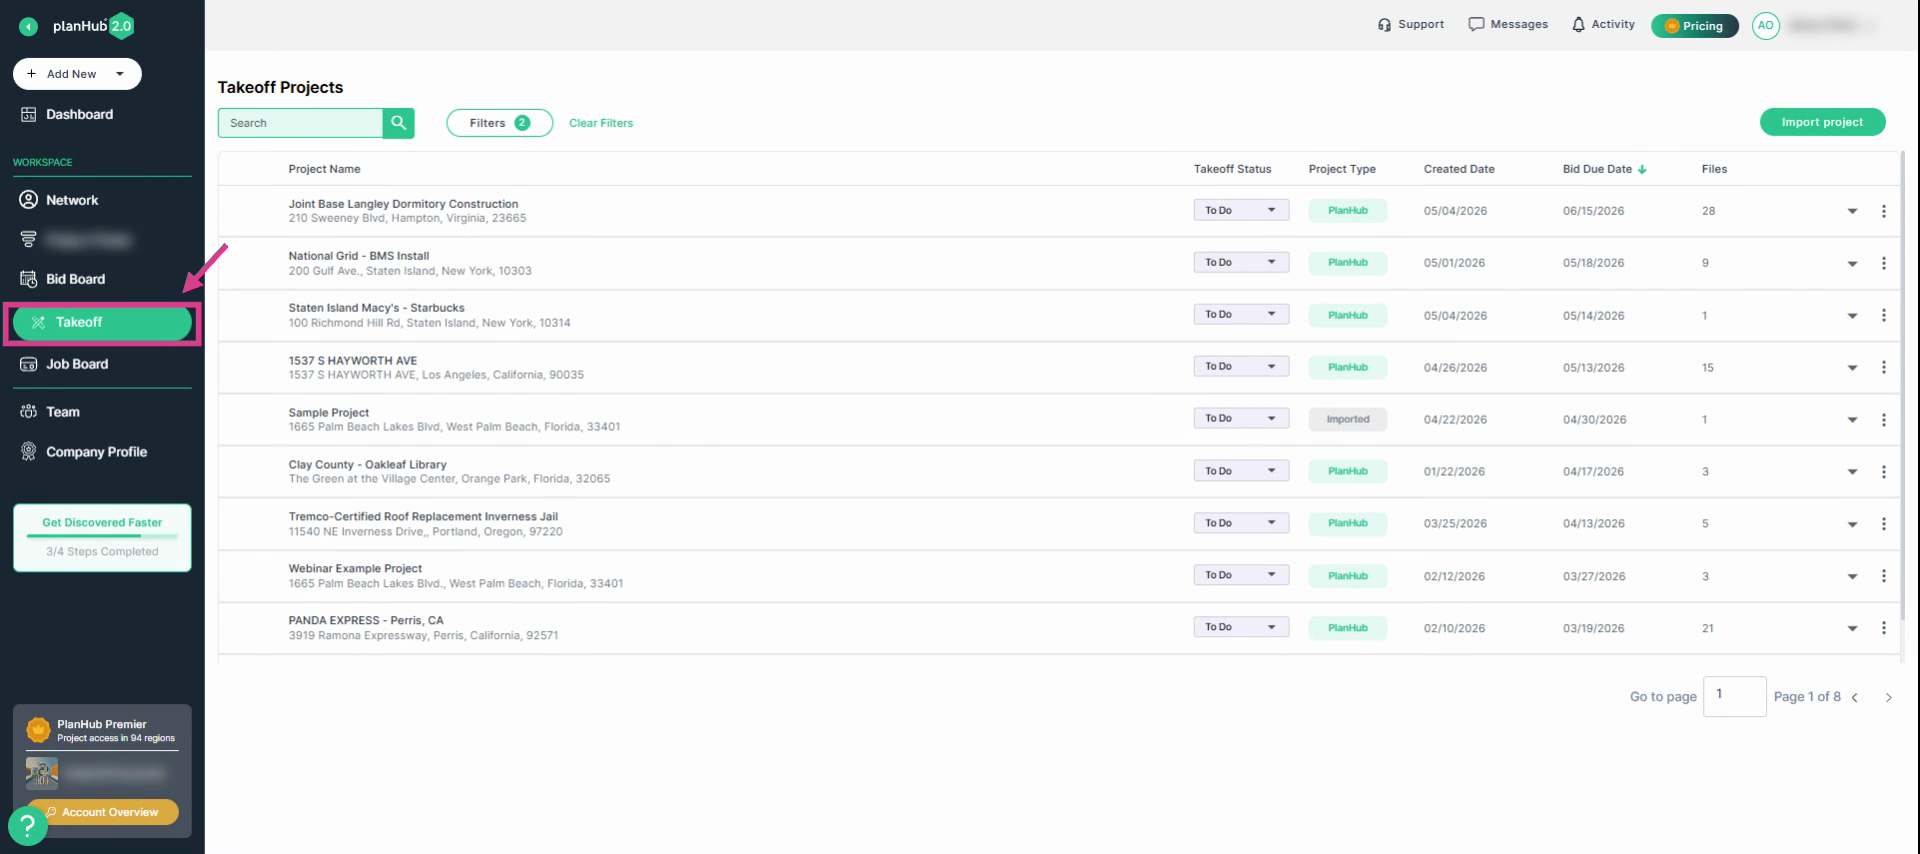
Step 1: Log in and Access the Takeoff home page
Log into your planHub account. Navigate to the main left panel and select Takeoff.
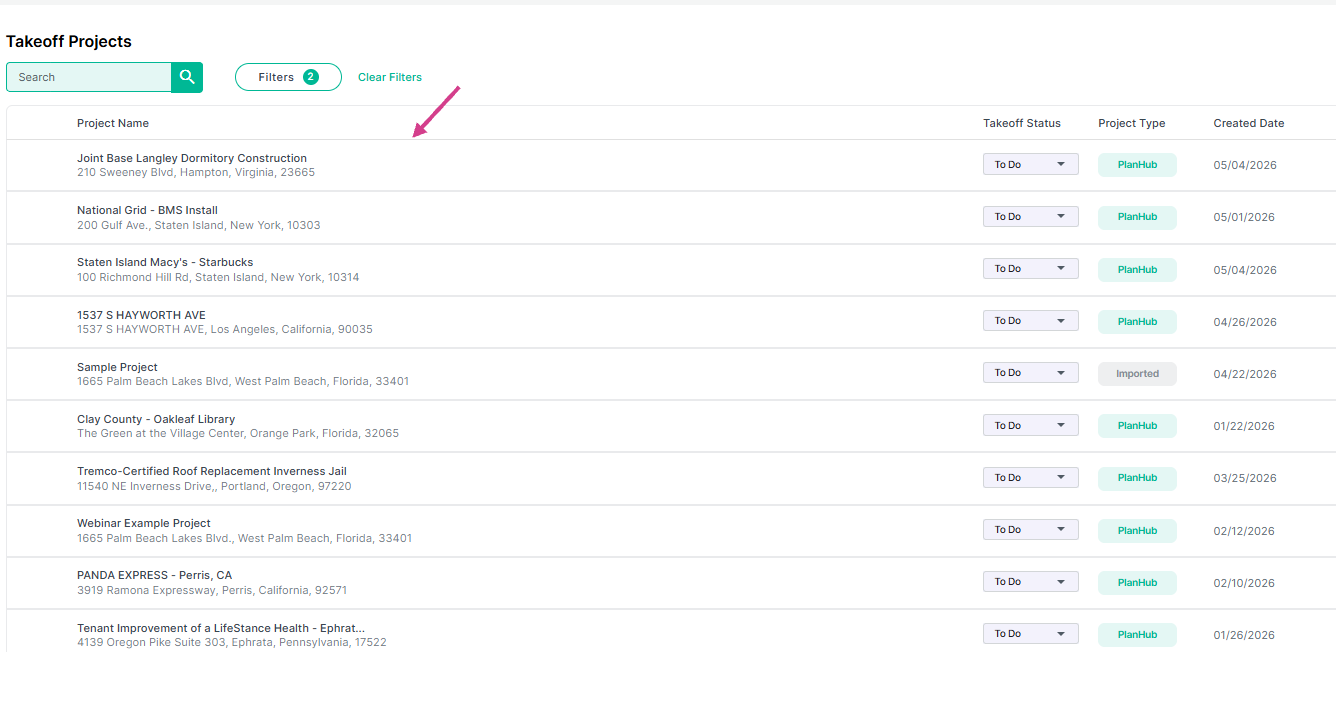
From the Takeoff homepage, click on the project you want to begin working on to enter the takeoff workspace.
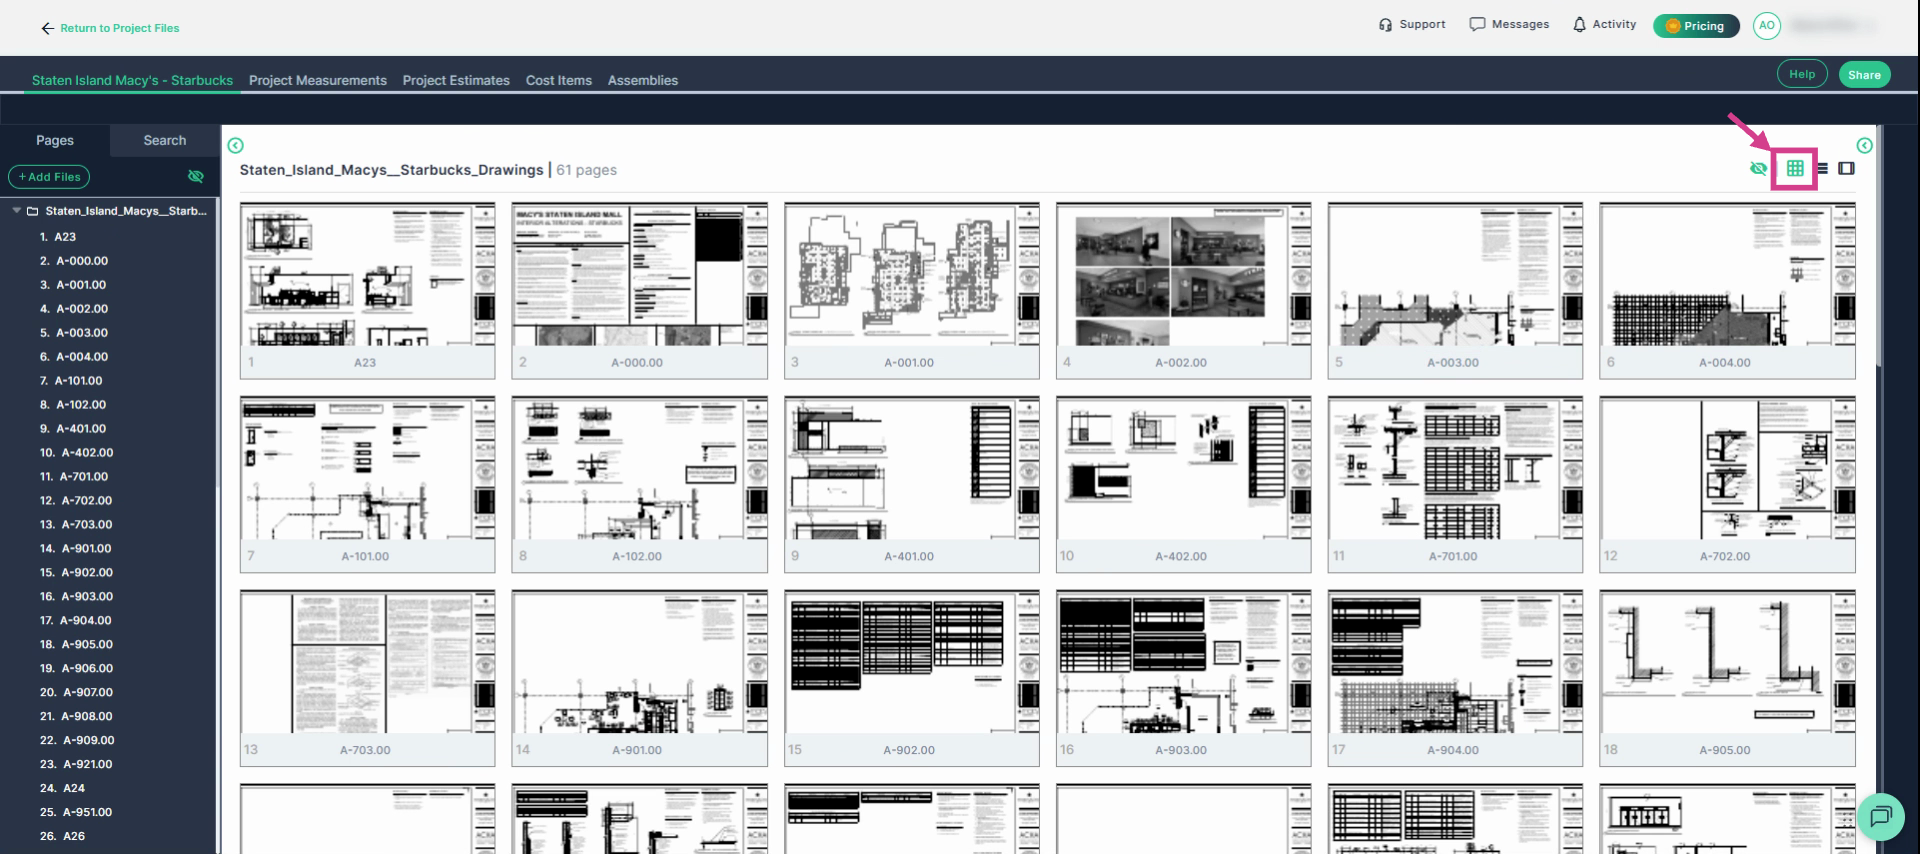
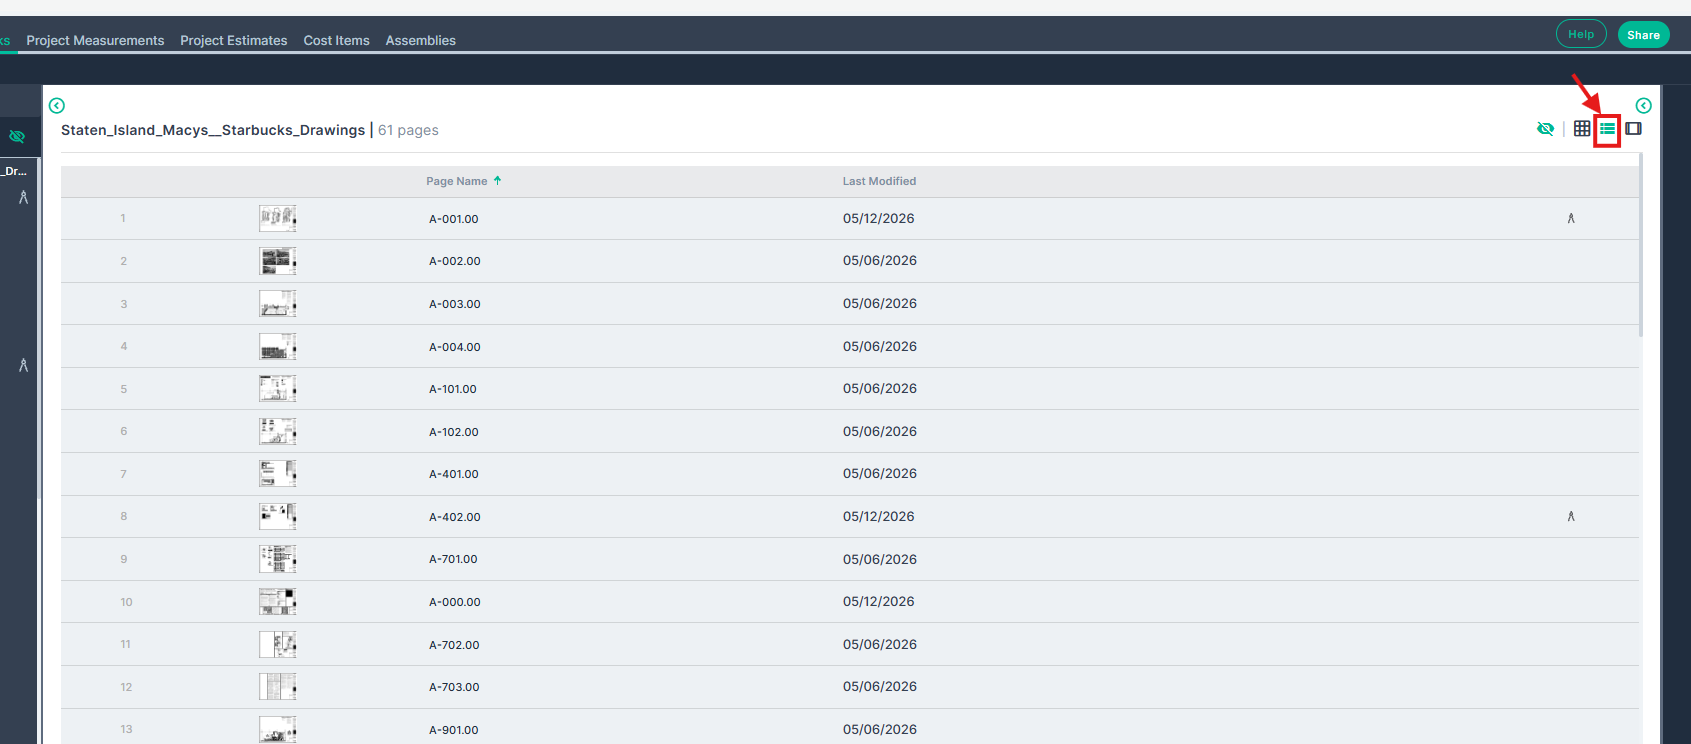
Step 2: Manage Plans and Pages
Switch between different plan sheet views for what suits you best:
- Thumbnail View: See all plans as thumbnails.
- List View: Display sheets as a list.
- Single Page View: Focus on one sheet at a time.
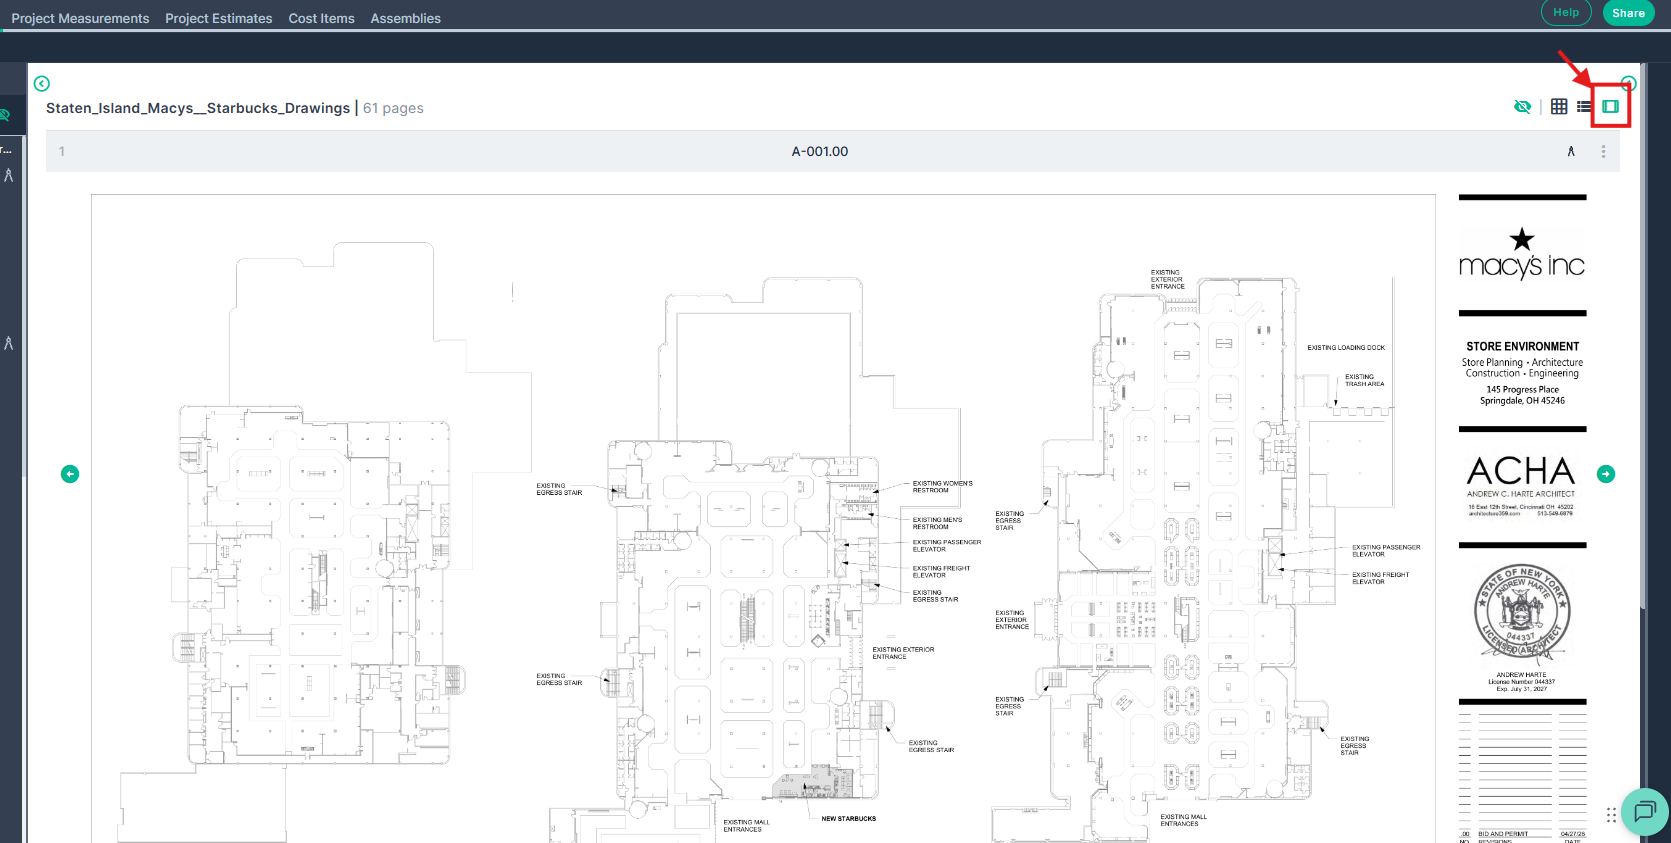
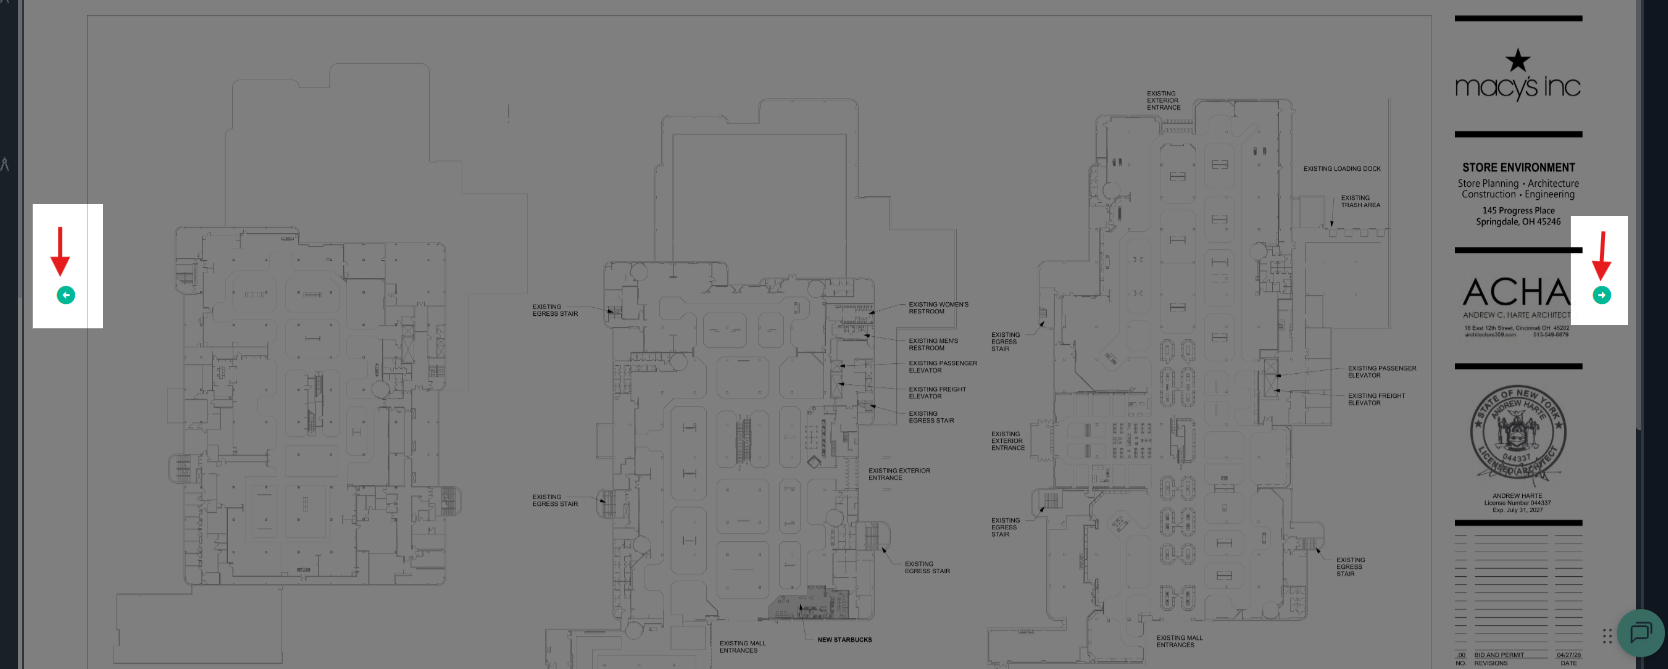
- Navigate single sheets by using the arrows on each side or by clicking on any sheet in the panel.
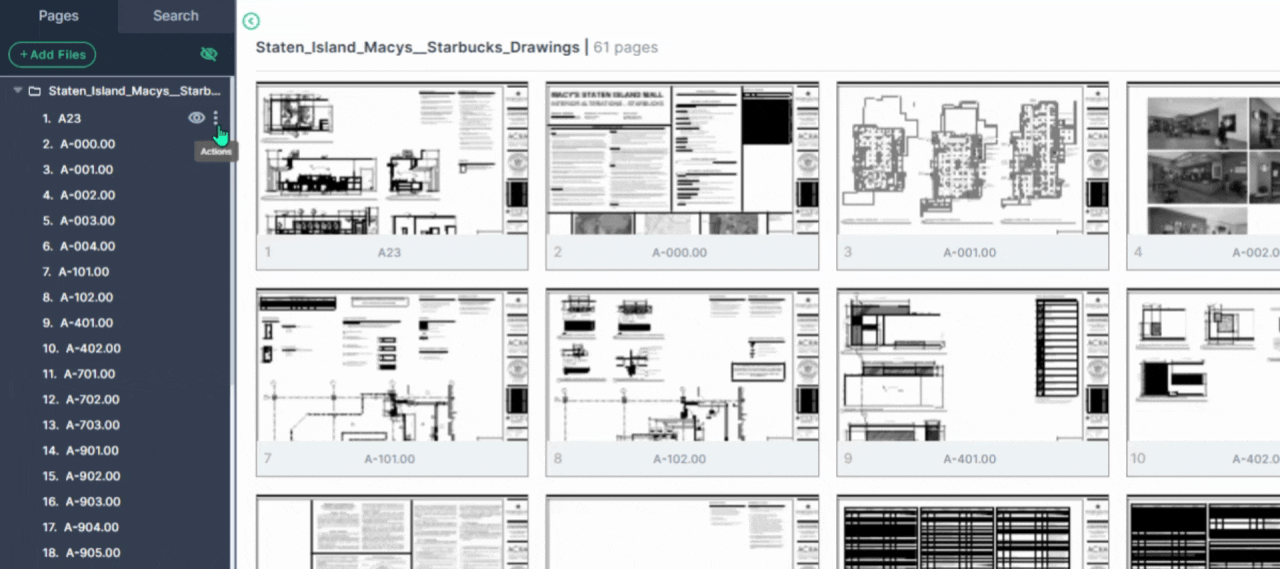
- To organize, drag and drop pages to reorder, right-click on the plan page and drag to the location in the column where you would like it placed then release the mouse button

- Use the three dots action menu on the right side for options to: Open a page, Duplicate a page, Hide a page, Download it, or Rename a page.
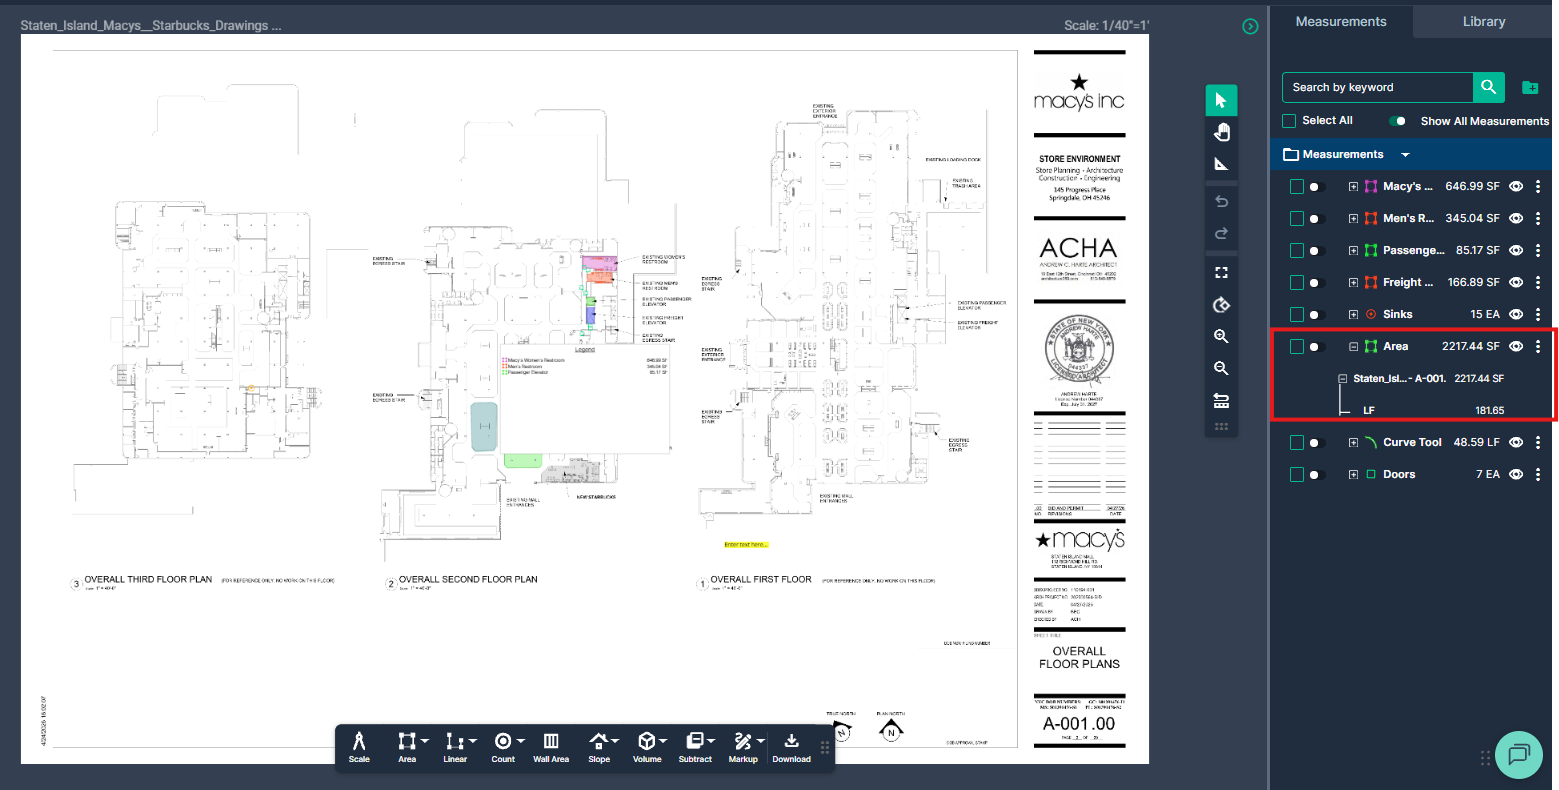
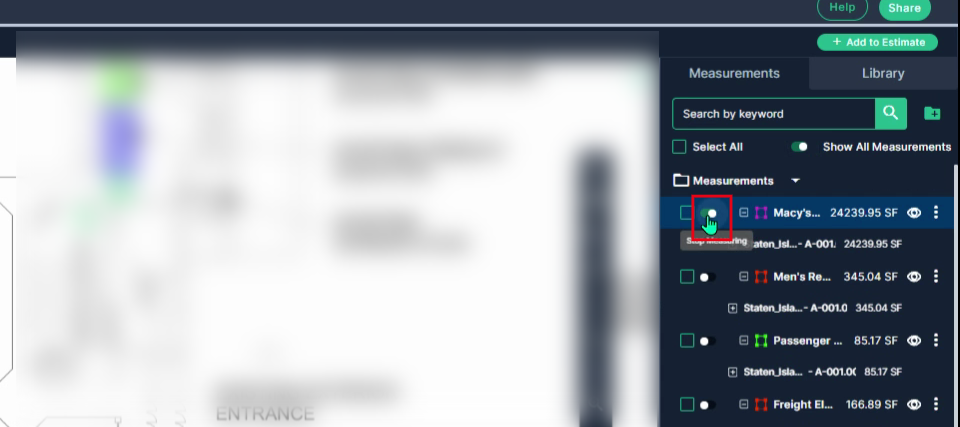
Step 3: Use the Measurements Panel
The Measurements Panel helps keep all measurements organized. Create folders to group measurements for different pages or projects.

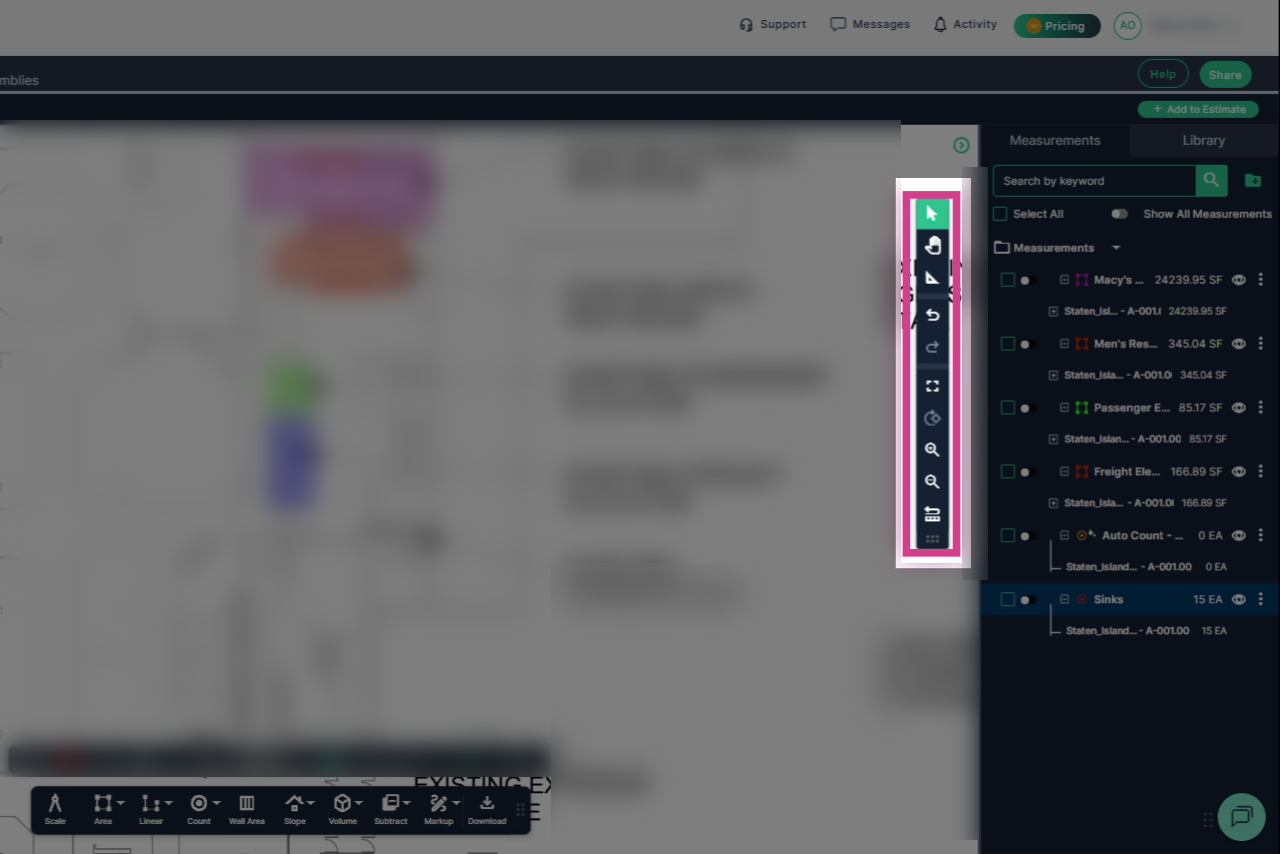
Step 4: The Shortcuts Toolbar
When you open a page in Takeoff, the toolbars appear. Use them to manage the view and perform measurement actions.
The vertical toolbar shows:
- the Select tool - which is used to click, highlight, move, edit, or manage existing takeoff measurements and markups on the plan sheet.
- The Pan tool - used to move around the plan sheet. You can also pan the page by holding down the right-mouse button.
- The snap to angle tool. When on, it snaps to a 22 & ½ degree angle to give that perfect 90 degree angle alignment. When off, the line can move freely. To turn it off as you measure, hold the space bar down or click on the snap to angle to deactivate the tool.
- Undo/Redo - undo or redo the last action
- Full screen mode (hit ESC on the keyboard to exit full screen mode)
- Rotate Tool - The rotation is disabled when takeoff measurements exist. Rotate the page prior to beginning your measurements.
- Zoom in / Zoom out - click each magnifying glass to zoom in or out
- Reset the toolbars to their original location - If the toolbars have been moved, simply click the reset option to move the toolbars back to their original location.
You can move the toolbars by hovering over the six dots at the end of the toolbar and then left click and hold the mouse button to drag them where needed.
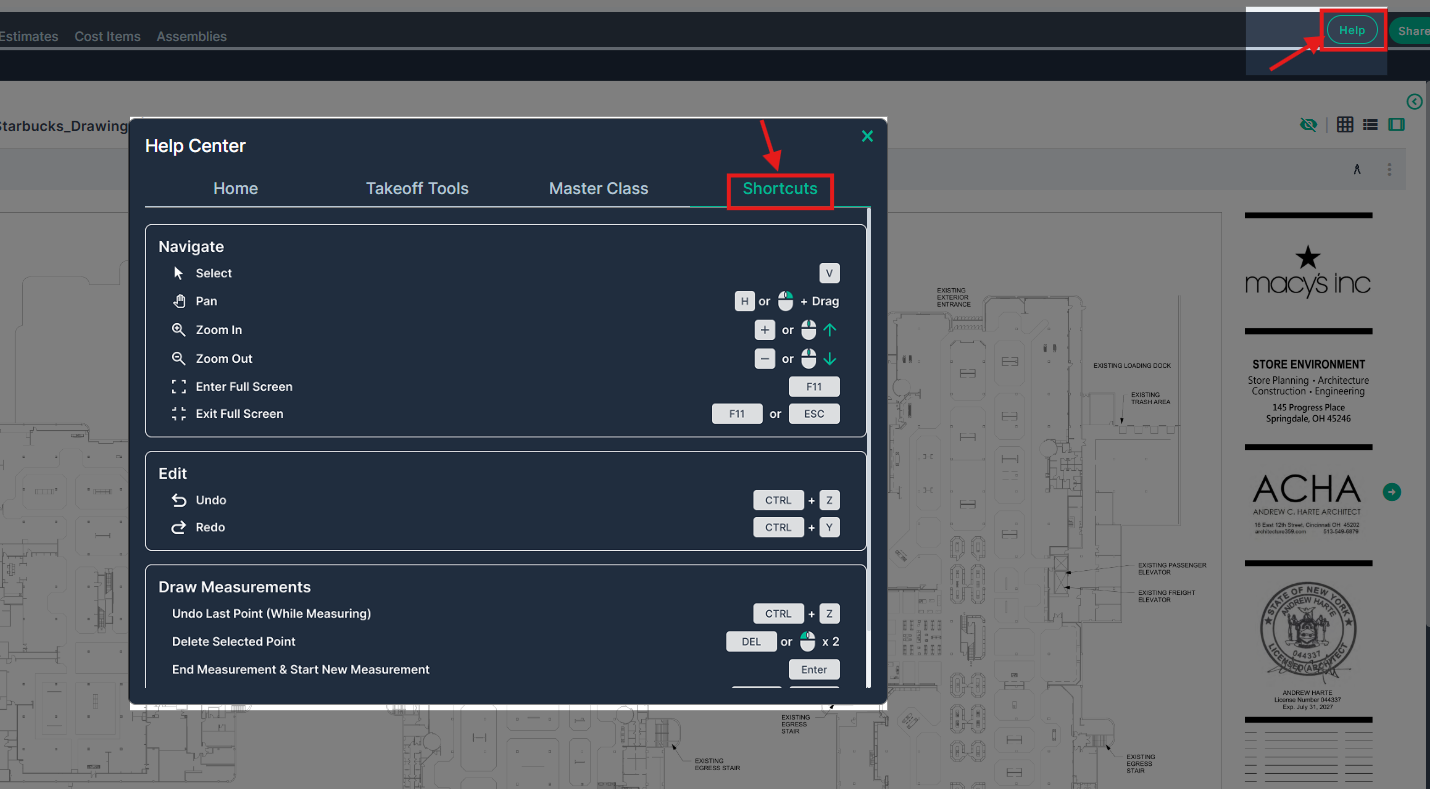
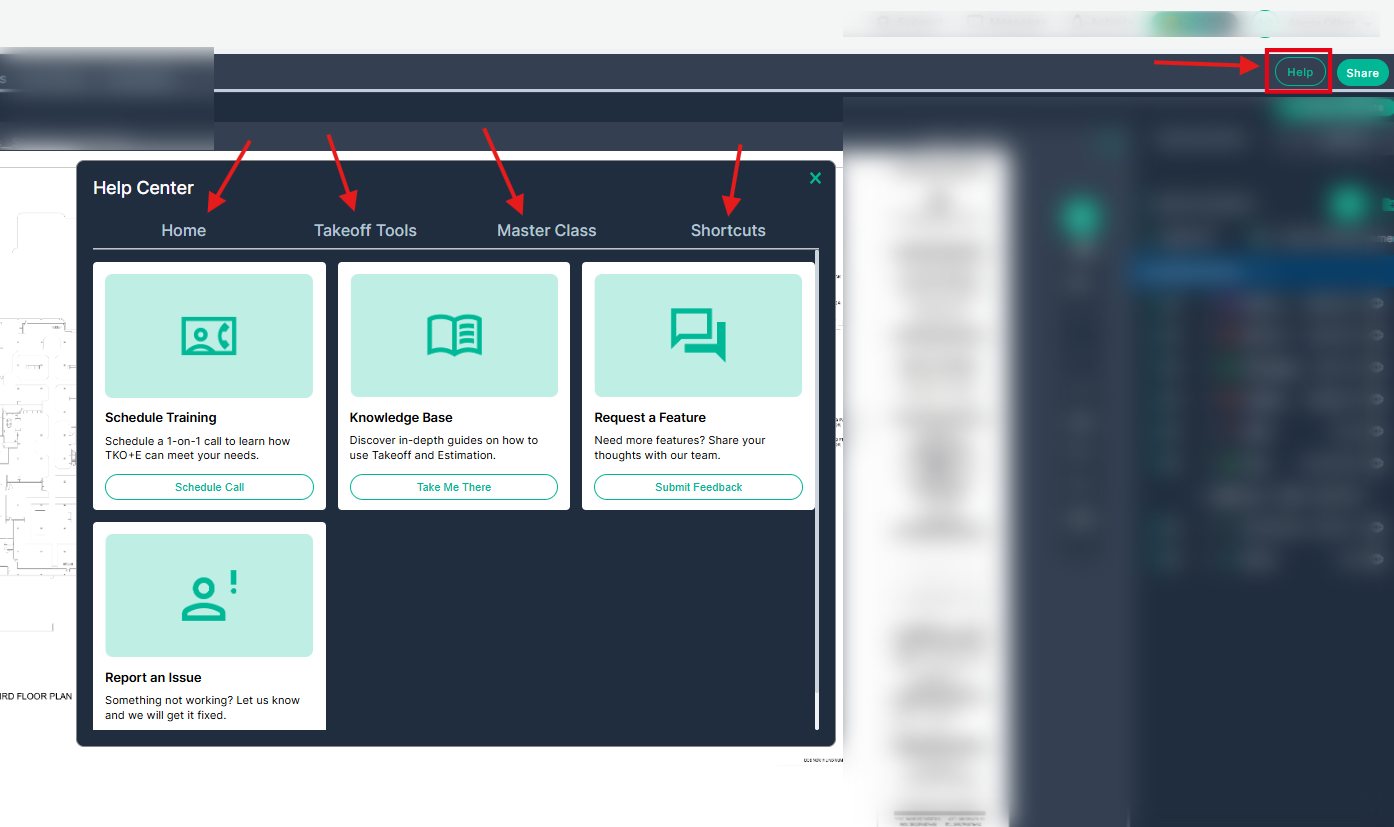
For keyboard and mouse shortcuts, click on the Help button in the upper right corner of your Takeoff page and select the Shortcuts tab.
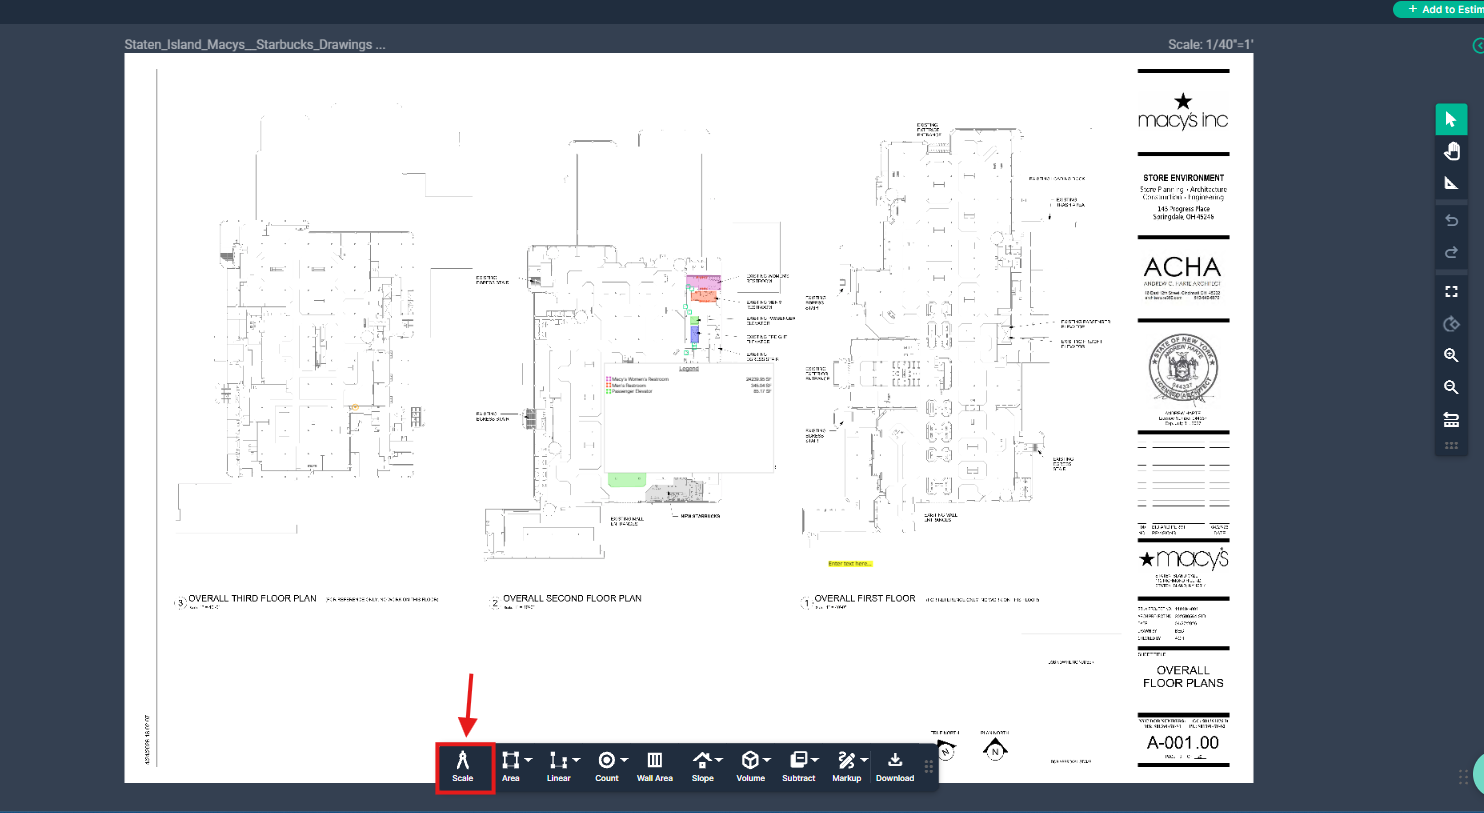
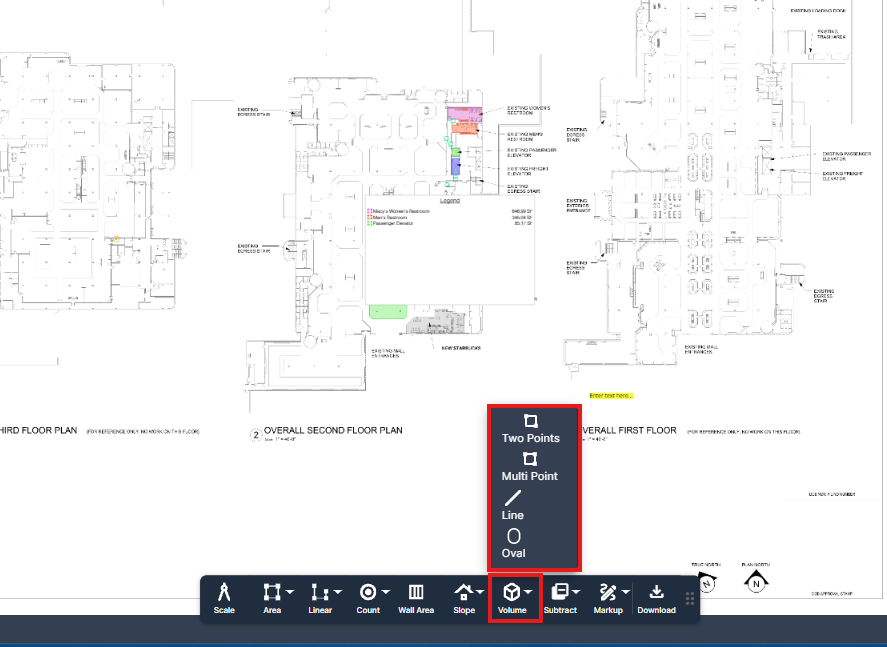
Step 5: The horizontal toolbar contains the measurement tools used to measure and mark up your plans. Use these tools to begin your Takeoff.
Set the Scale for Accurate Measuring
Always set your scale before measuring! In the measurements toolbar, use the Scale Tool:
- For standard scales, select the correct scale from the list and click Set.
- To calibrate manually, use a known measurement on your plan page. Enter its length, then draw the line to calibrate the scale on the page.
- To learn more about setting the scale, view the Knowledge Base Article: How to Set the Scale in PlanHub Takeoff
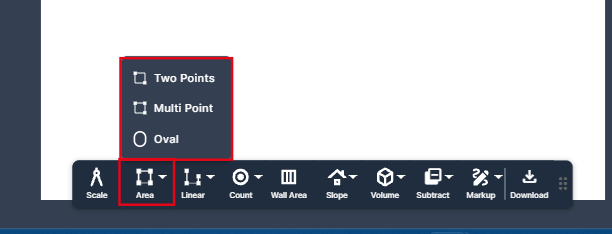
Measure Areas on Your Plans
Use the Area Tool in the measurements toolbar for square footage and Linear Feet of the perimeter. Select a folder if you’re using them:
- Two-point: For rectangles/squares (just two clicks)
- Oval (and circles): For Oval and Circular shapes
- Multi-point: For complex shapes (multiple clicks)
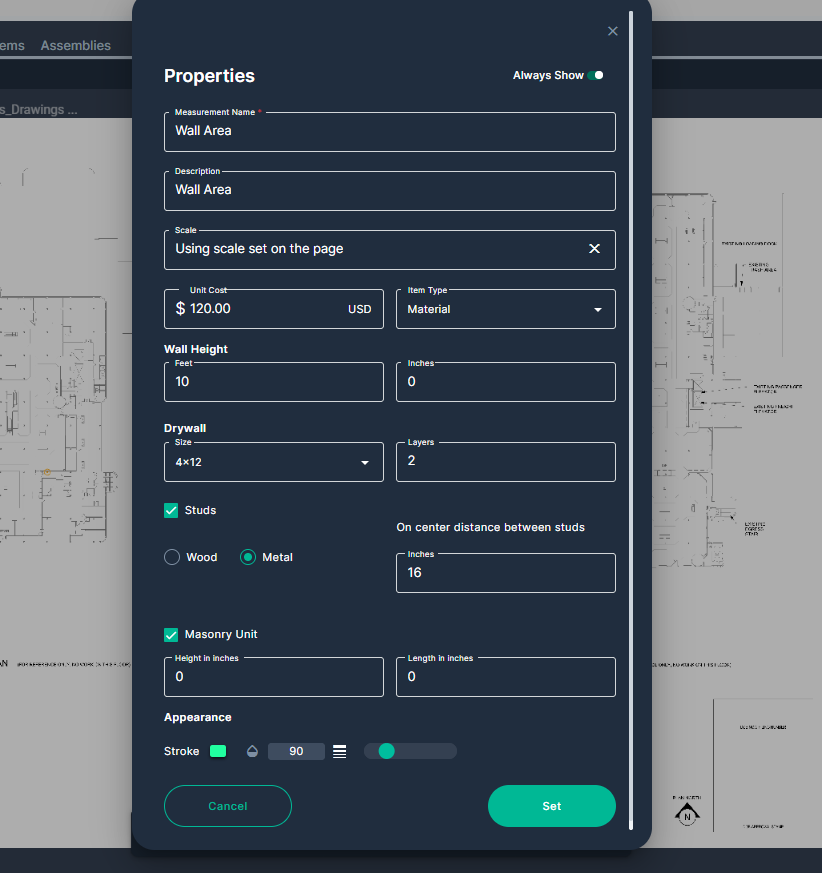
Fill out the properties box: Measurement name, description, (update scale if different section of plan sheet shows a different scale) unit cost, item type, fill color and opacity, stroke color and opacity, stroke line thickness, then click Set to start your measurement. Complete the measurement by double-clicking the left mouse button or clicking the left mouse button once and hitting Enter on the keyboard. To learn more about the area tool, view the Knowledge Base article: How to use Area Tool in TakeOff
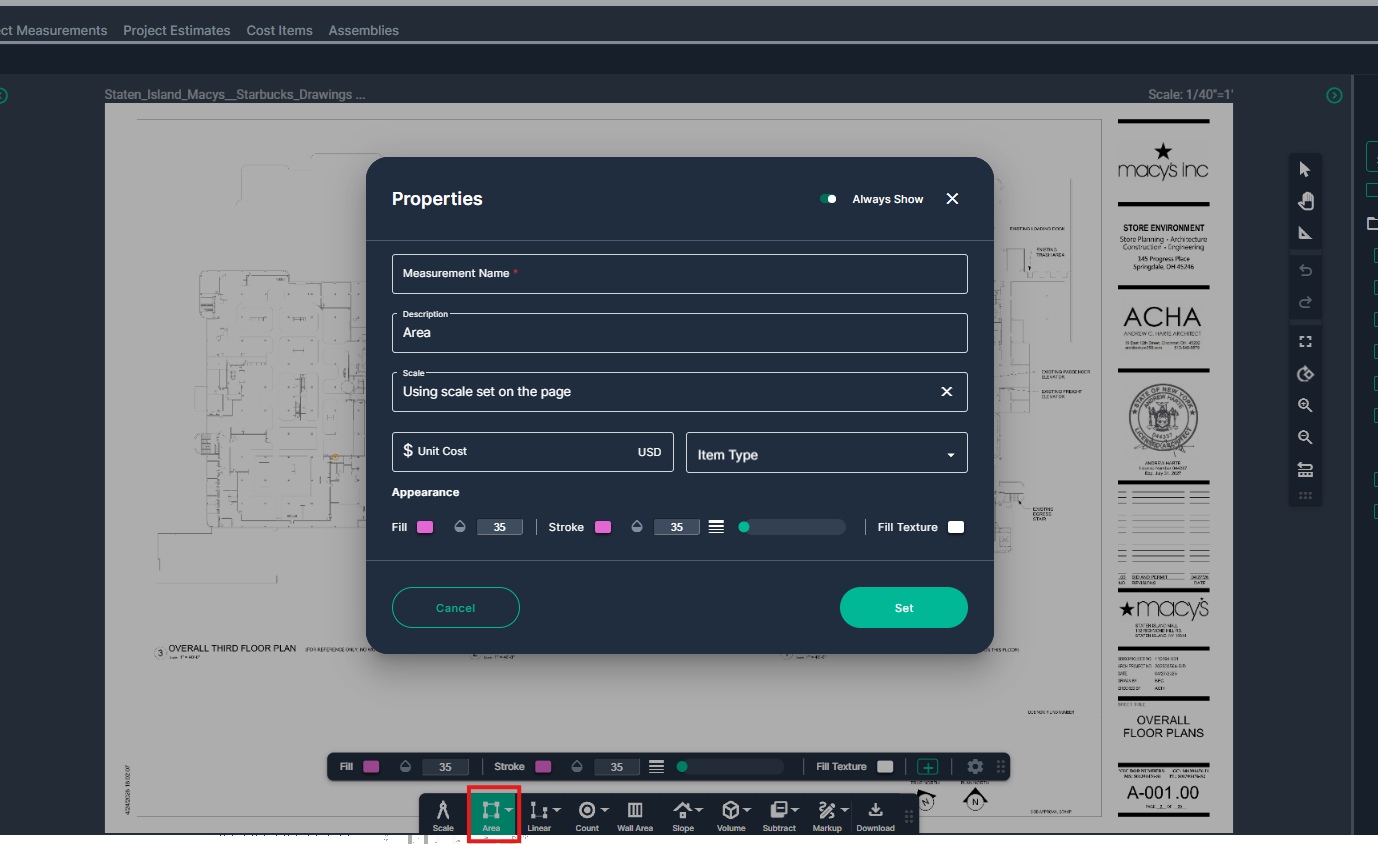
- View your calculated area and linear feet in the Measurements Panel.
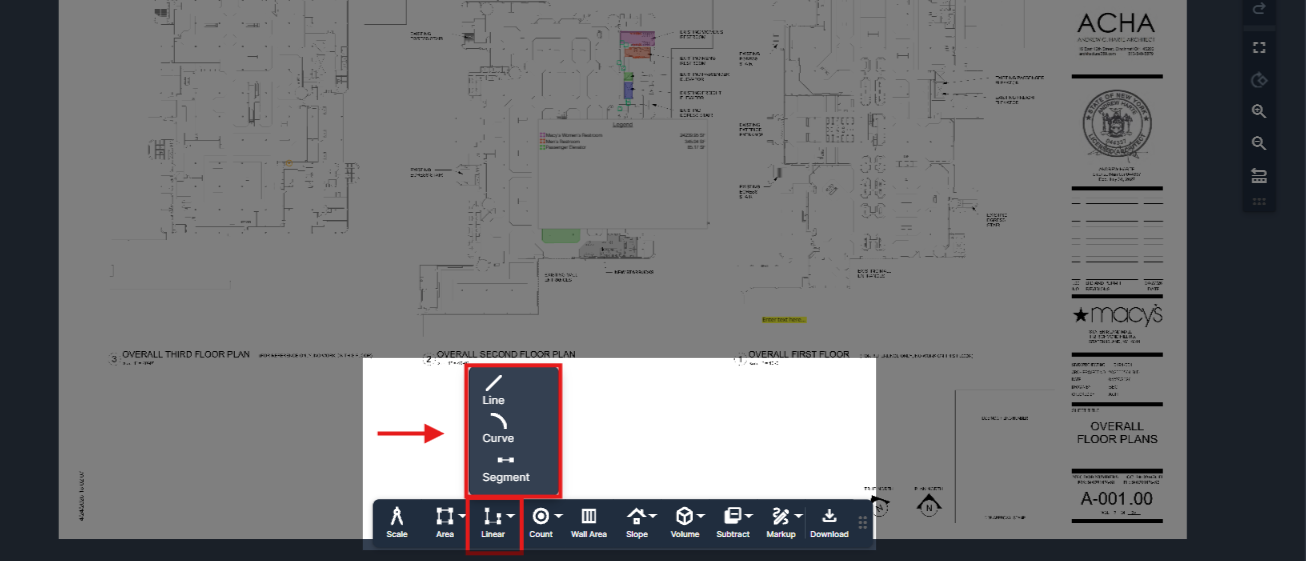
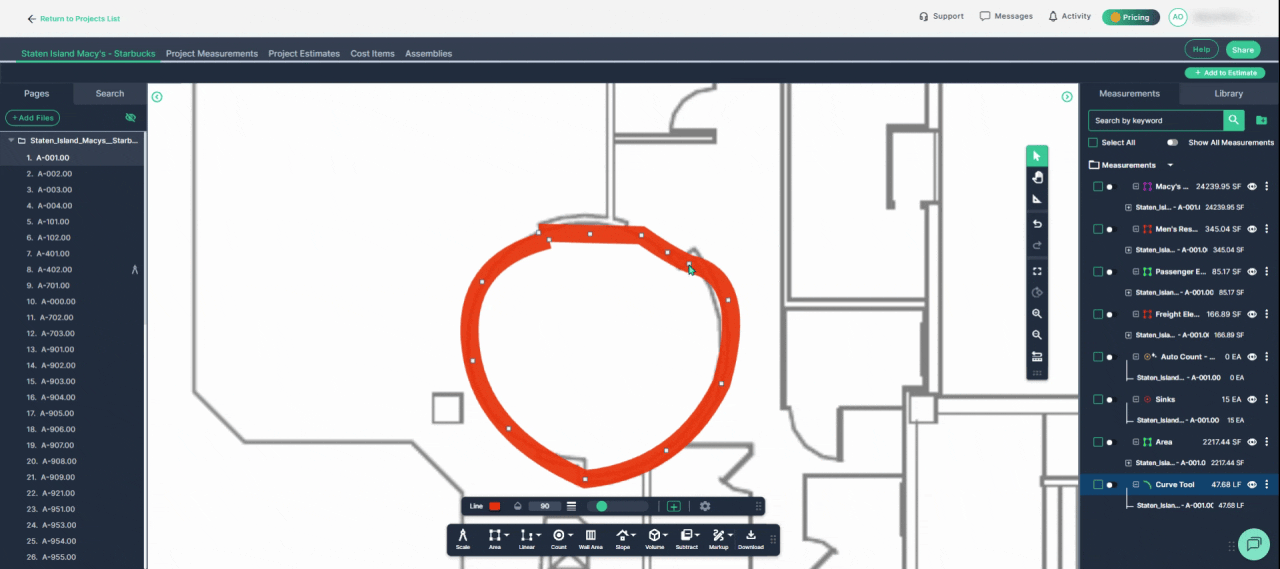
Measure Linear Distances
Switch to the Linear Tool for widths or lengths. Choose the Line tool for straight or angular lines. Use the Curve tool for measuring curved and straight continuous lines. Use the Segment tool for measuring individual straight-line segments that do not involve corners or changes in direction.
Enter the details: measurement name, color, opacity, stroke thickness, then click set.
NOTE: Adjust the measurement lines by hovering the mouse over the line and clicking on the left mouse button. Then, hover the mouse cursor over each square while holding the left mouse button to move the line into place. Double-click the lines to add additional points. Review the total linear footage in the measurement panel to view the updated measurement.
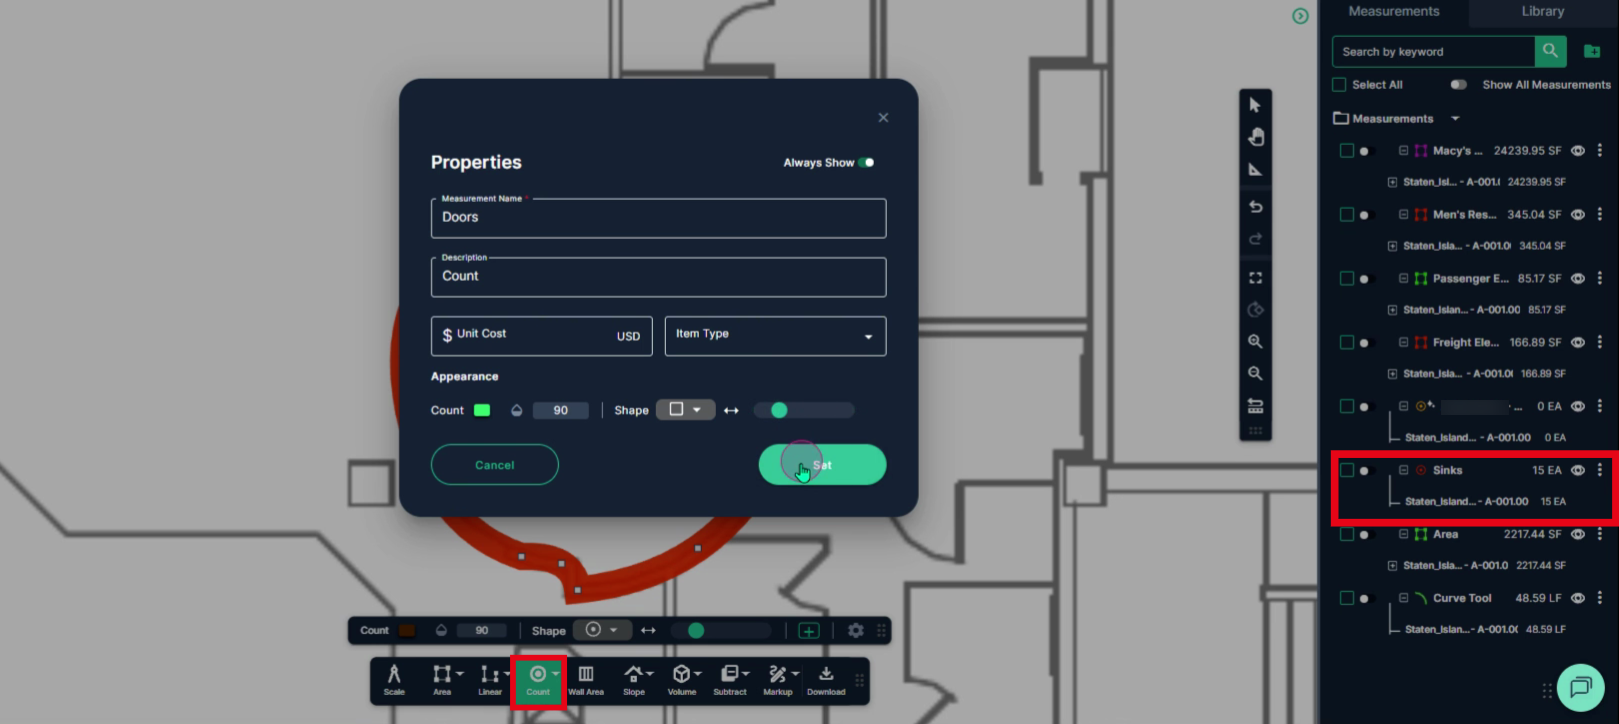
Count Items
The Count Tool allows you to tally fixtures, windows, doors, or other objects. Complete the fields in the properties box: measurement name, description, unit cost, item type, color, opacity, shape, and stroke thickness. Click Set and then left-click once on each item on the plan page to begin counting. Your total appears in the Measurements Panel.
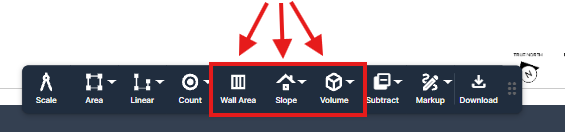
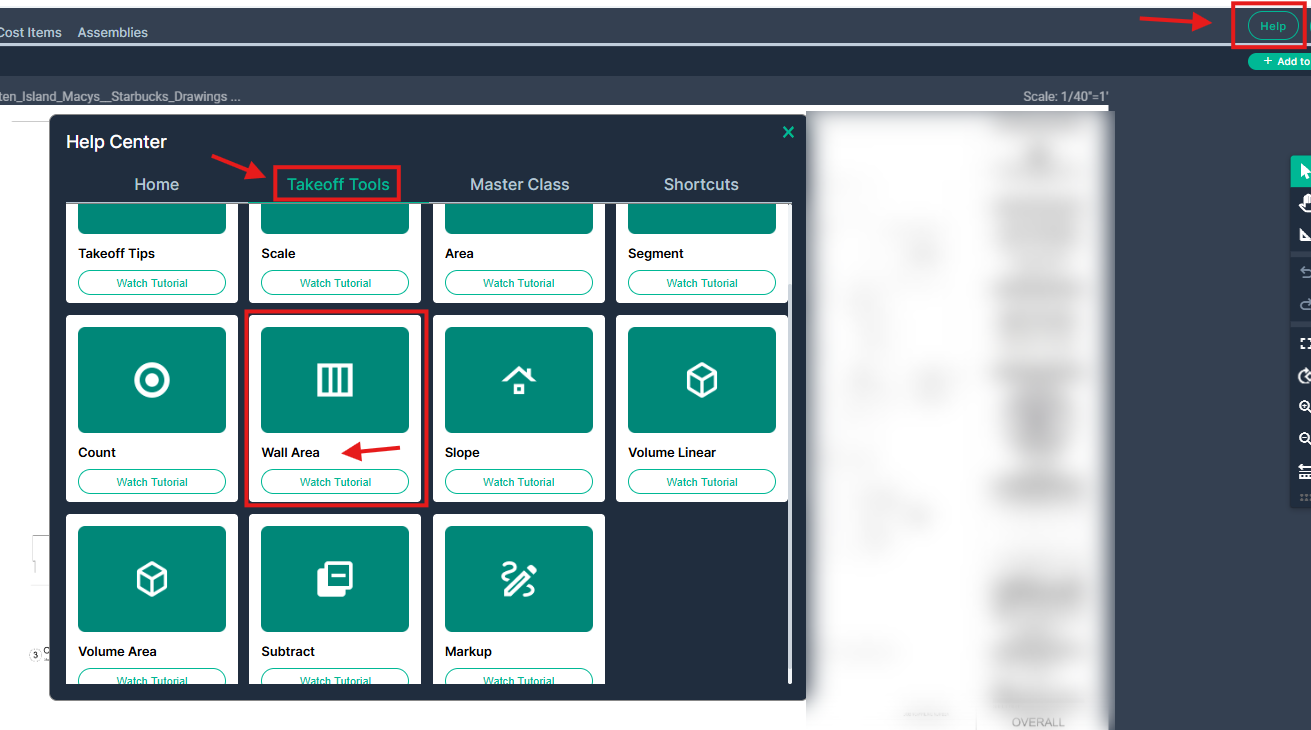
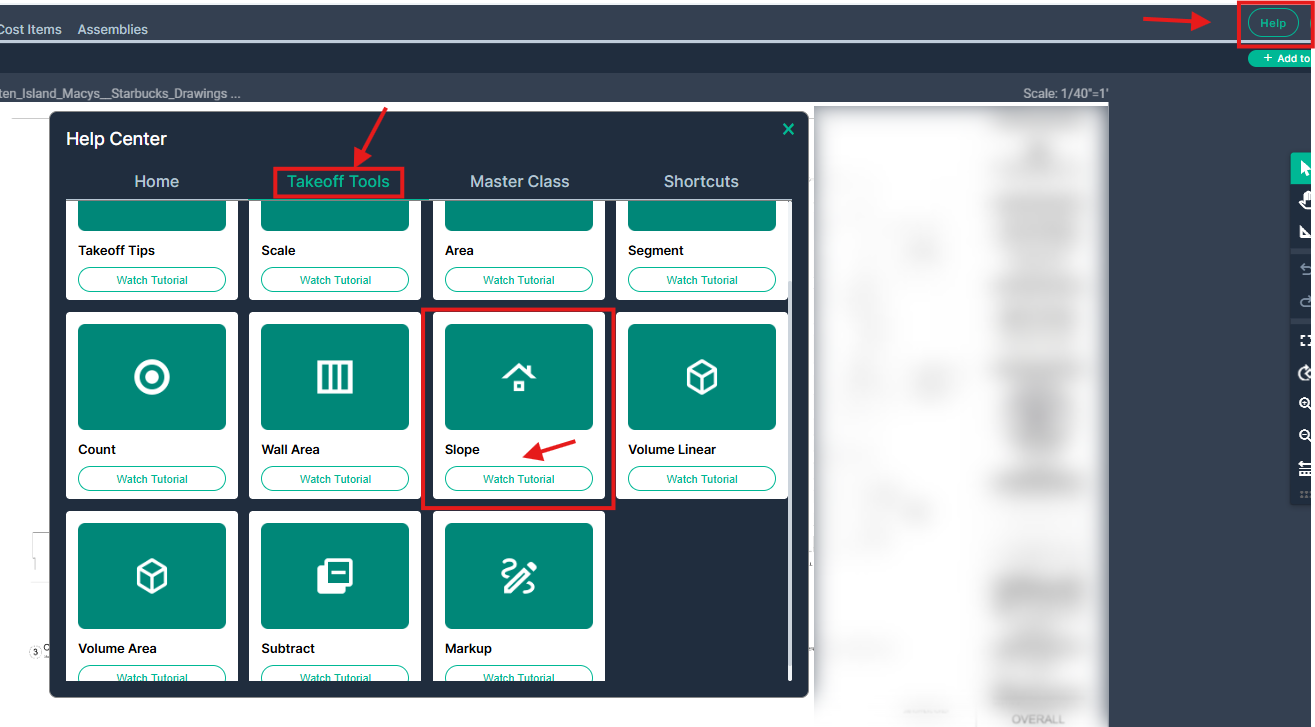
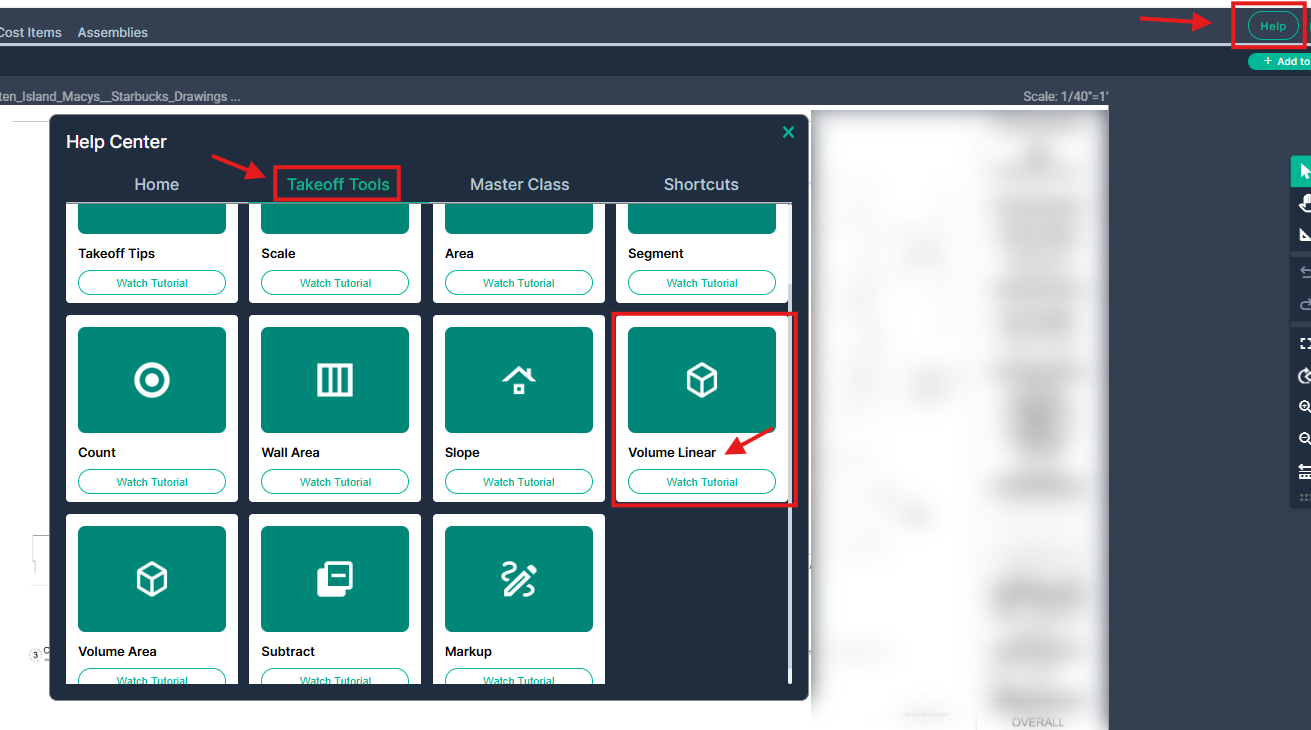
Advanced Tools—Wall Area, Slope, and Volume
- Wall Area Tool: Measures wall surfaces.
- For a short tutorial, select the Help button in the upper right corner of the Takeoff page then click on the Takeoff Tools tab and select the Wall Area Tutorial.
- Slope Tool: Ideal for roofing, set the slope factor in properties to measure area or lengths with rise/run.
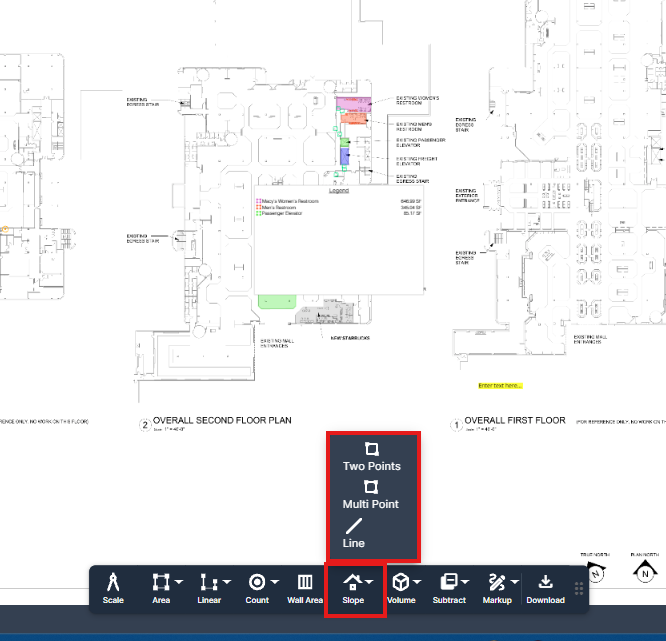
- For a short tutorial, select the Help button in the upper right corner of the Takeoff page then click on the Takeoff Tools tab and select the Slope Tutorial.
- Volume Tool: Use for areas or lines with depth (great for concrete/landscaping). Choose the best option, then fill in the properties window, then click set to begin measuring.
- For a short tutorial, select the Help button in the upper right corner of the Takeoff page then click on the Takeoff Tools tab and select the Volume Tutorial.
Step 6: Continue Mode for Measurements
Continue any measurement across multiple sheets. From the Measurements Panel, toggle on the button to Continue measuring using a previous measurement.

You can also, hover the mouse over the measurement and Right-click, or use the action menu (3 dots), and select the continue measuring option from the menu.
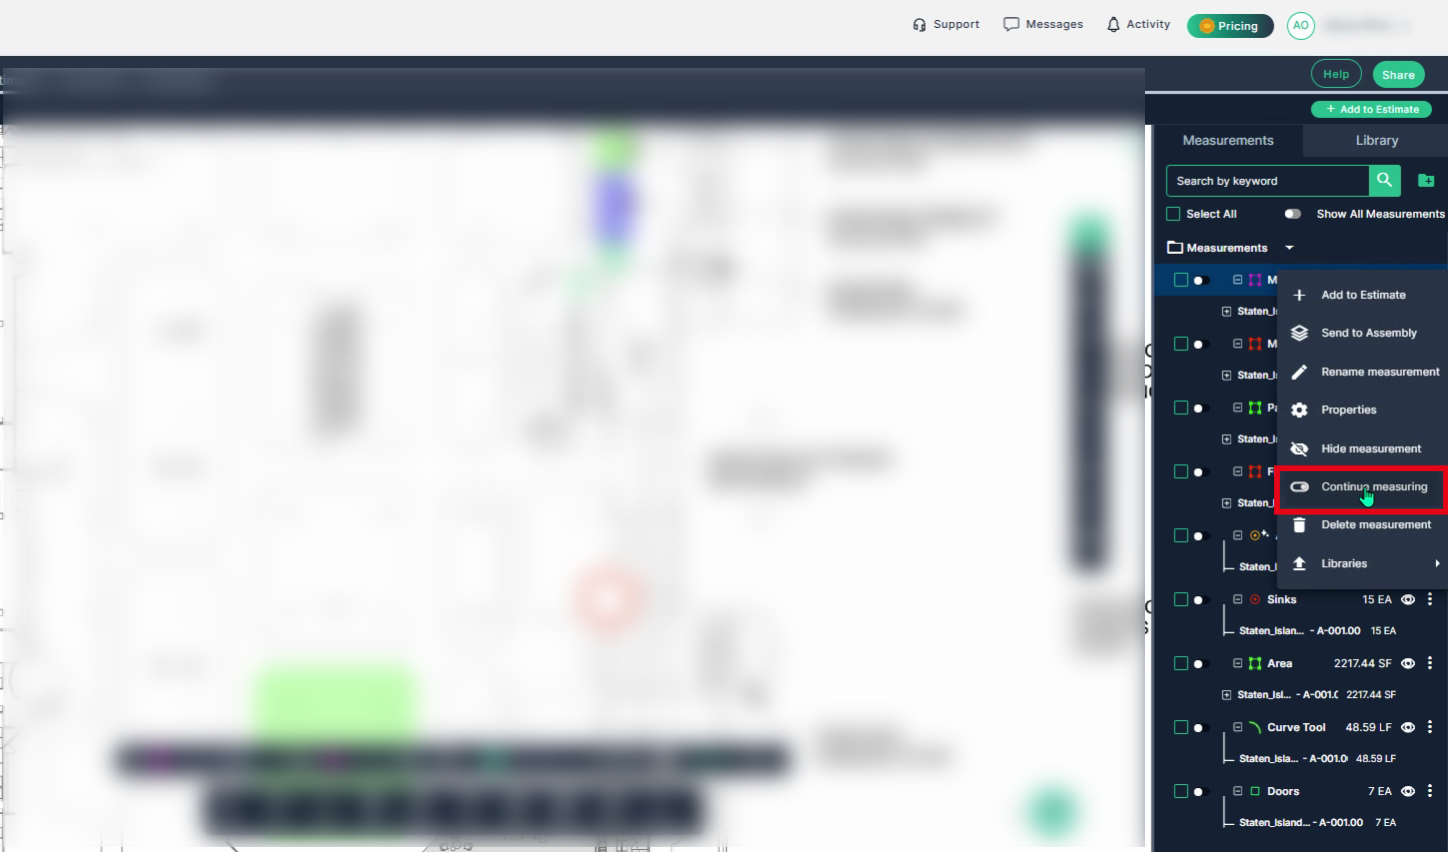
Activate the Show all measurements toggle to extend the measurement onto another page.
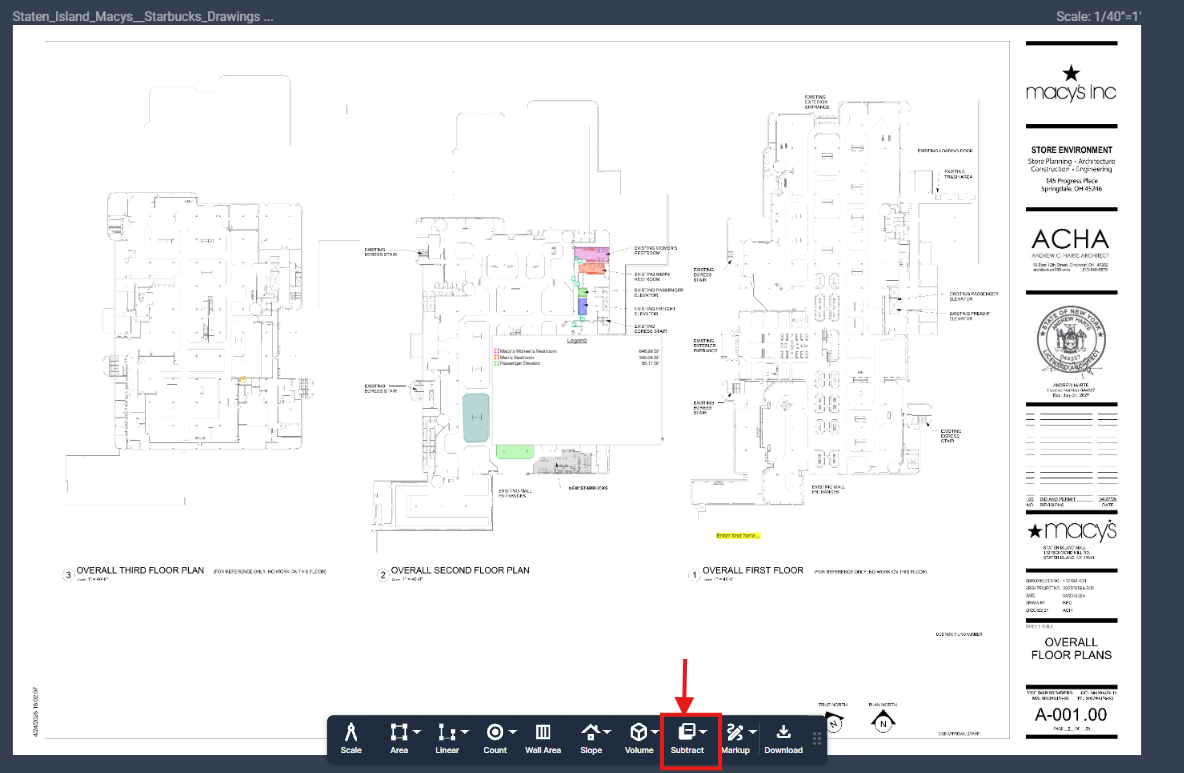
Step 7: Subtract Tool
Use the subtract tool to remove areas within a measurement that should not be included in the total calculation. To learn more about the Subtract tool, view the Knowledge Base article: How to use the Subtract Tool
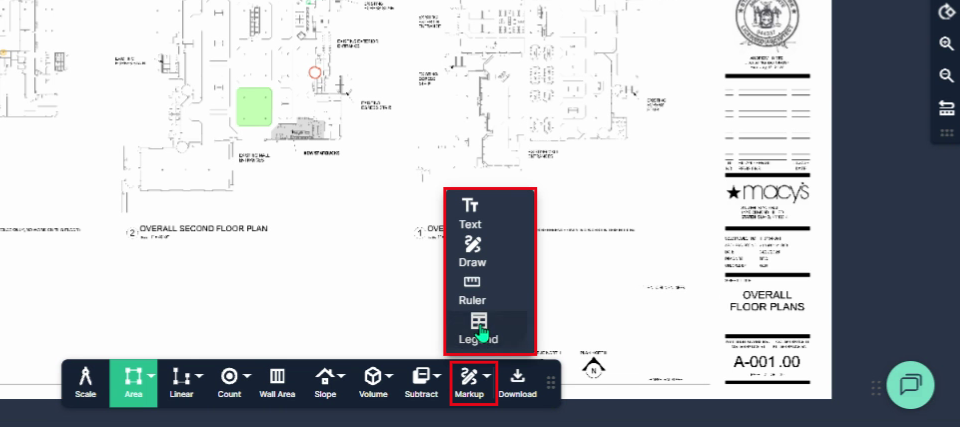
Step 8: Add Markups and Download Files
After measuring, use the Markup Tools menu to add a legend, use the ruler, draw on the plan sheet, and add text:
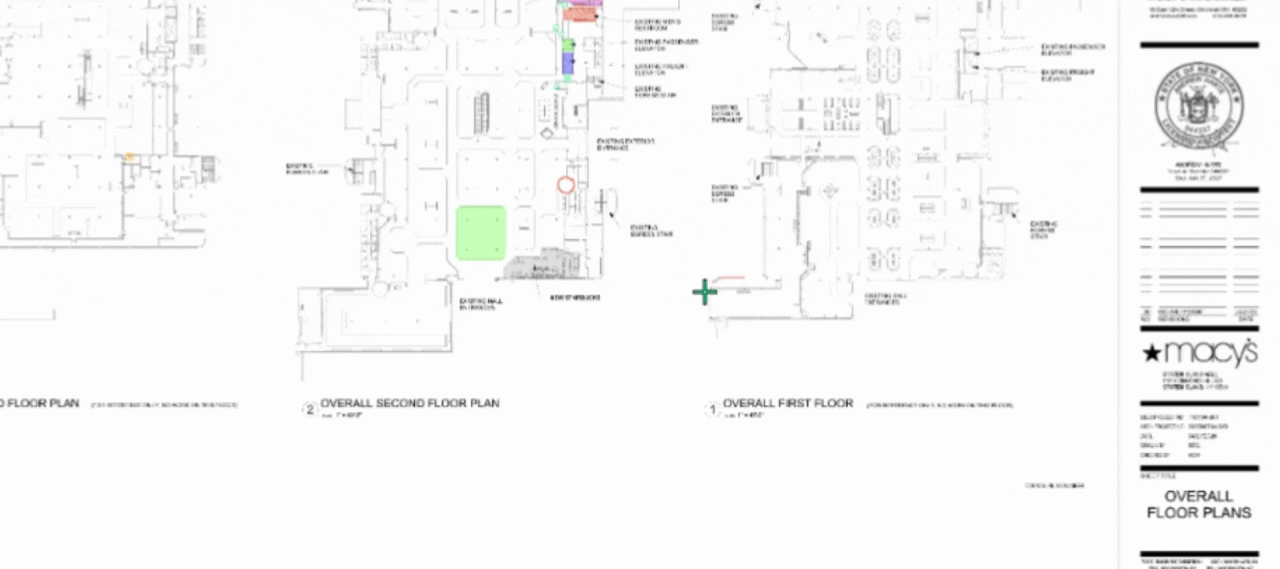
- Add a legend by selecting the legend option from the menu, then add the measurements by adding a check mark in the box next to each measurement. Save the legend by clicking save in the bottom right corner. You can select and move the legend anywhere on the page. To learn more about the legend, view the Knowledge Base article: Using Legend Markup in Takeoff
- Use the drawing tool to add callouts directly on the plan sheets, and add text notes with a background color for improved viewing.
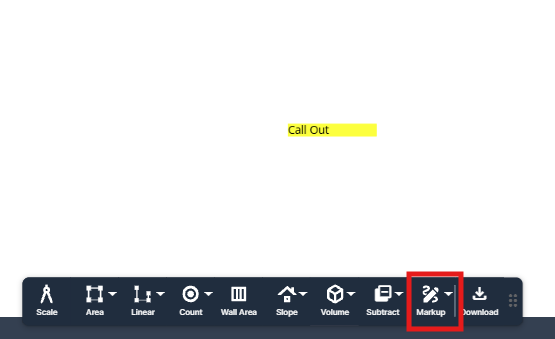
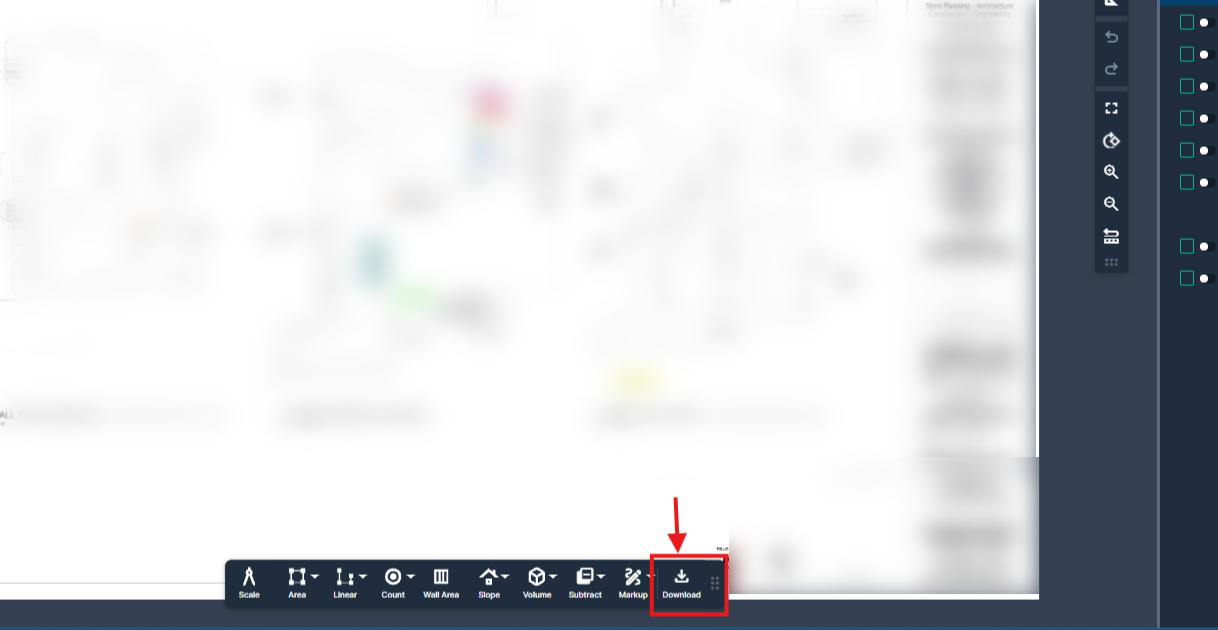
When finished, click Download to save the file to your computer.
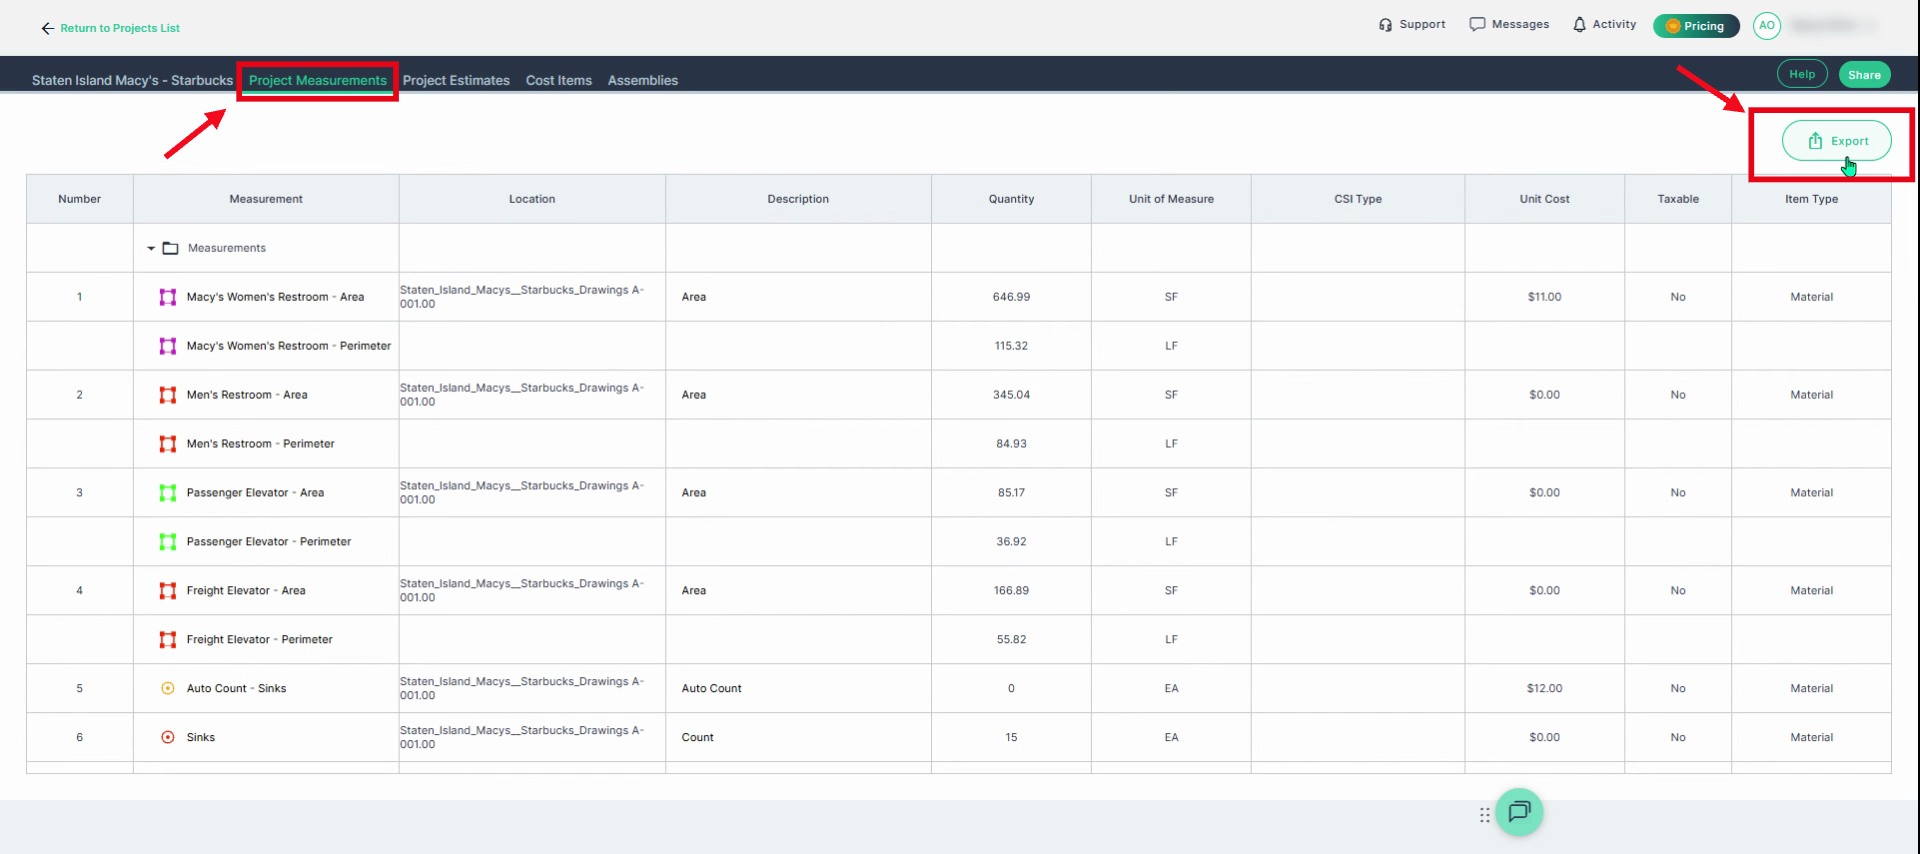
For a CSV Google Sheet, or Excel Spreadsheet file list of all measurements, navigate to the Project Measurements Tab and click Export. To learn more about exporting the file, view the Knowledge Base article: How To Download Project Measurements From Takeoff
Step 9: Get More Help
Need further assistance? Click Help in the upper right corner of the Takeoff page. From the pop-up window, you can schedule training, browse the Knowledge Base for "How-To" articles. For a general overview of Takeoff, view our Knowledge Base article: How to Use Takeoff: A General Overview
PlanHub’s Takeoff add-on feature helps you work faster and more accurately by centralizing measurements, improving organization, and reducing manual effort. It streamlines the entire takeoff process so you can produce more consistent, reliable estimates with greater efficiency.
Next Steps
To learn more about Takeoff, schedule your Free one-on-one training: Click Here to Schedule
Once you have completed taking all your measurements, you can:
- Download the measurements in a table from the Project Measurements page
- How To Download Project Measurements From Takeoff
Add a legend and download the PNG of your takeoff page - Using Legend Markup in Takeoff
If you have purchased the Estimation add-on tool, send measurements into the Project Estimate page or push them into an Assembly you have built. - Estimation - Exporting a Measurement from TakeOff to Estimation
- Estimation | How to Create an Assembly
- Share your Takeoff with anyone using the Share button in the upper right-hand corner.
Troubleshooting
Contact us if you need assistance or to report an issue:
- PlanHub Contact Page: https://planhub.com/contact/
- Customer Facing Support Ticket Link: https://knowledgebase.planhub.com/knowledge/kb-tickets/new
- Schedule a Free 1-on-1 Takeoff Training: https://meetings.hubspot.com/zac-low/takeoff-and-estimation