---
title: How-to Manage & Use Your PlanHub Drive
description: PlanHub Drive
---
[Skip to content](https://knowledgebase.planhub.com/knowledge/how-to-manage-use-your-planhub-drive#main-content)
English
Show submenu for translations
[Submit a Ticket](https://knowledgebase.planhub.com/knowledge/kb-tickets/new?hsLang=en)
![NEW\_PlanHub\_Logo\_Navy.png\]](https://knowledgebase.planhub.com/hs-fs/hubfs/Design/PH%20Logos/NEW%202024%20PH%20Logos/NEW_PlanHub_Logo_Navy.png?height=40&name=NEW_PlanHub_Logo_Navy.png)
- [Have an Issue? Submit a Ticket](https://knowledgebase.planhub.com/knowledge/kb-tickets/new)
Open main navigation
Close main navigation
- [Have an Issue? Submit a Ticket](https://knowledgebase.planhub.com/knowledge/kb-tickets/new)
- English
Show submenu for translations
- [Submit a Ticket](https://knowledgebase.planhub.com/knowledge/kb-tickets/new)
What can we help you with?
- There are no suggestions because the search field is empty.
1. [Knowledge Base](https://knowledgebase.planhub.com/knowledge?hsLang=en)
2. [Subcontractors](https://knowledgebase.planhub.com/knowledge/subcontractors?hsLang=en)
3. [Account & Settings](https://knowledgebase.planhub.com/knowledge/subcontractors?hsLang=en#account-settings)
# How-to Manage & Use Your PlanHub Drive
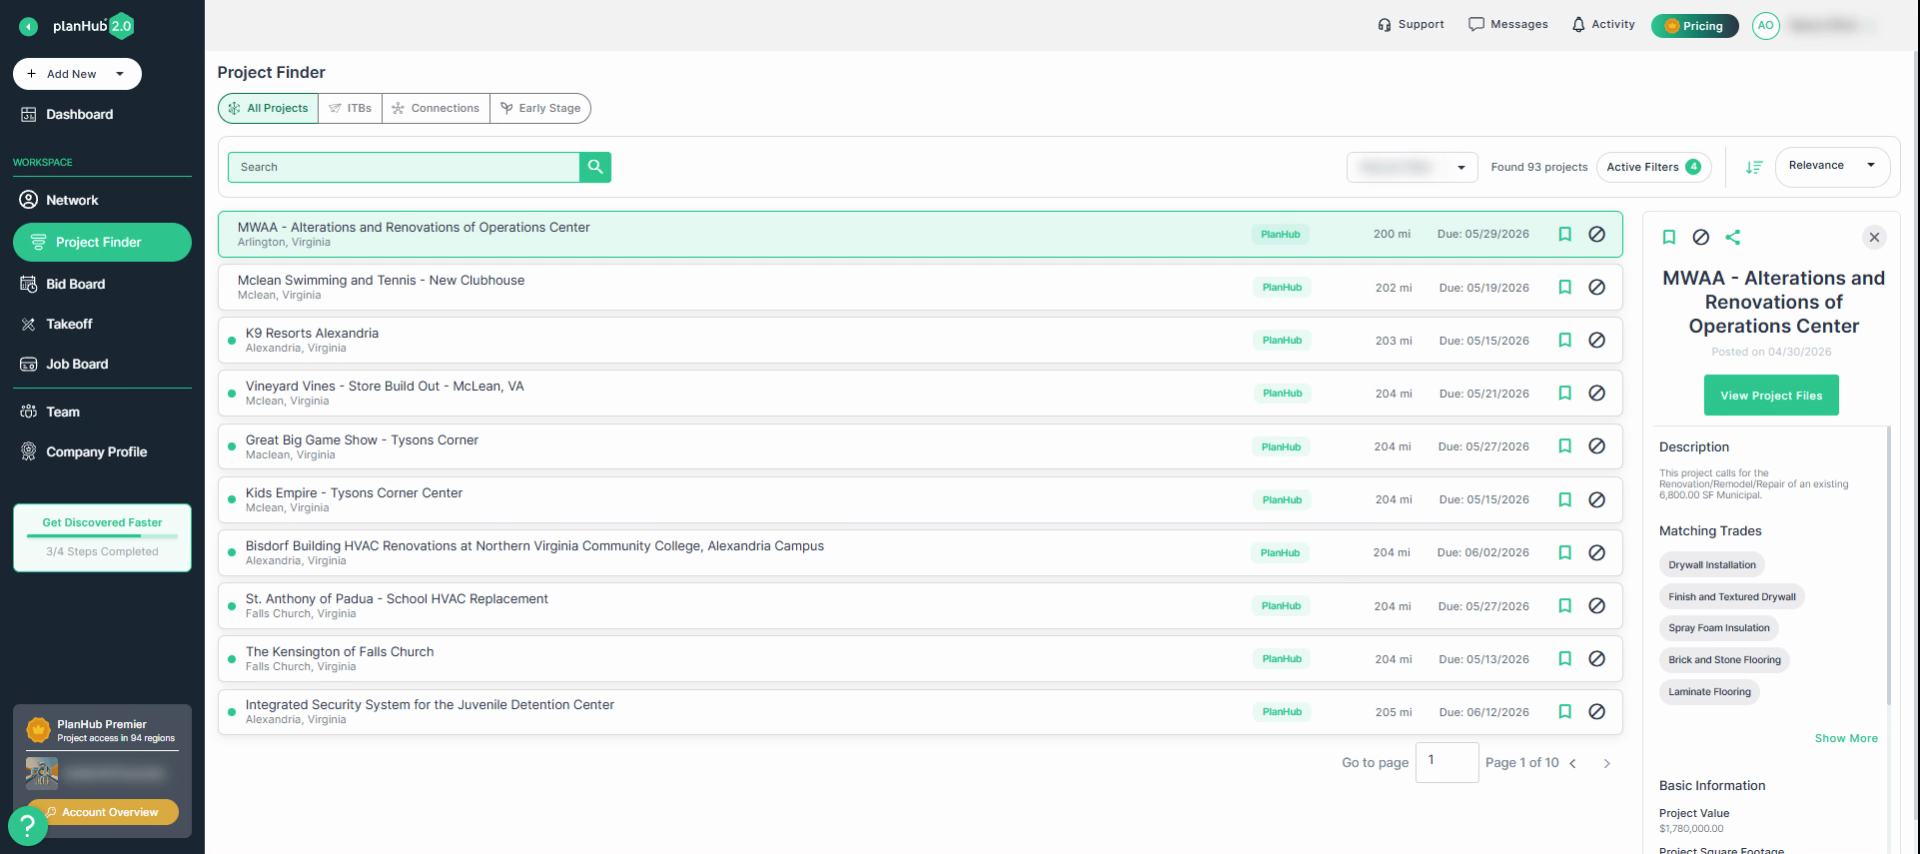
## Keep your company’s project documents securely organized and always accessible when you need them during the bidding process with PlanHub Drive. Subcontractors can easily store, manage, and share files with their team so they’re ready to use at any time. Here’s how to manage your PlanHub Drive and attach stored files when bidding on projects.
**Step 1:** Log into your **PlanHub** Subcontractor account.
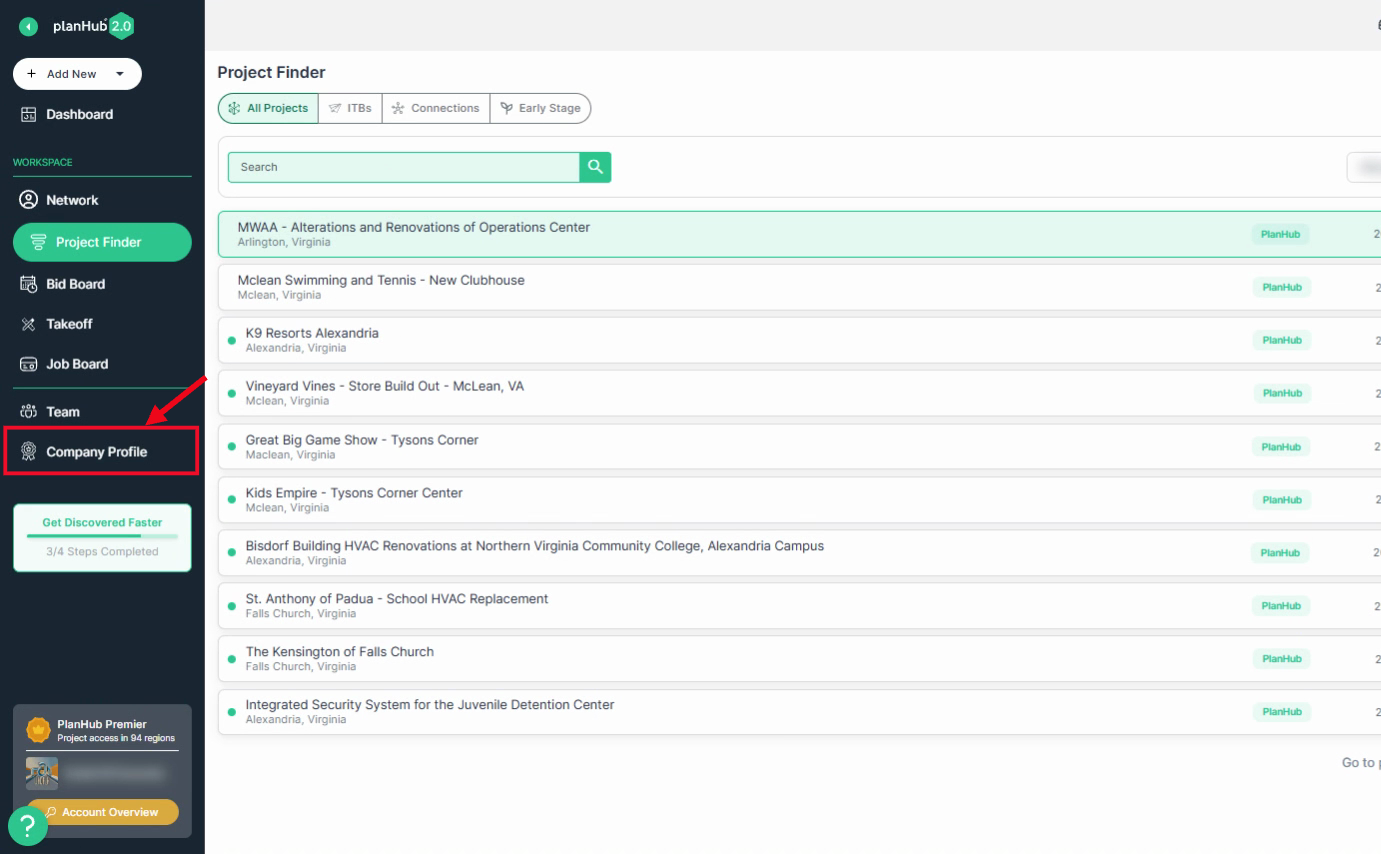
**Step 2:** Navigate to your **Company Profile** from the main panel on the left side.
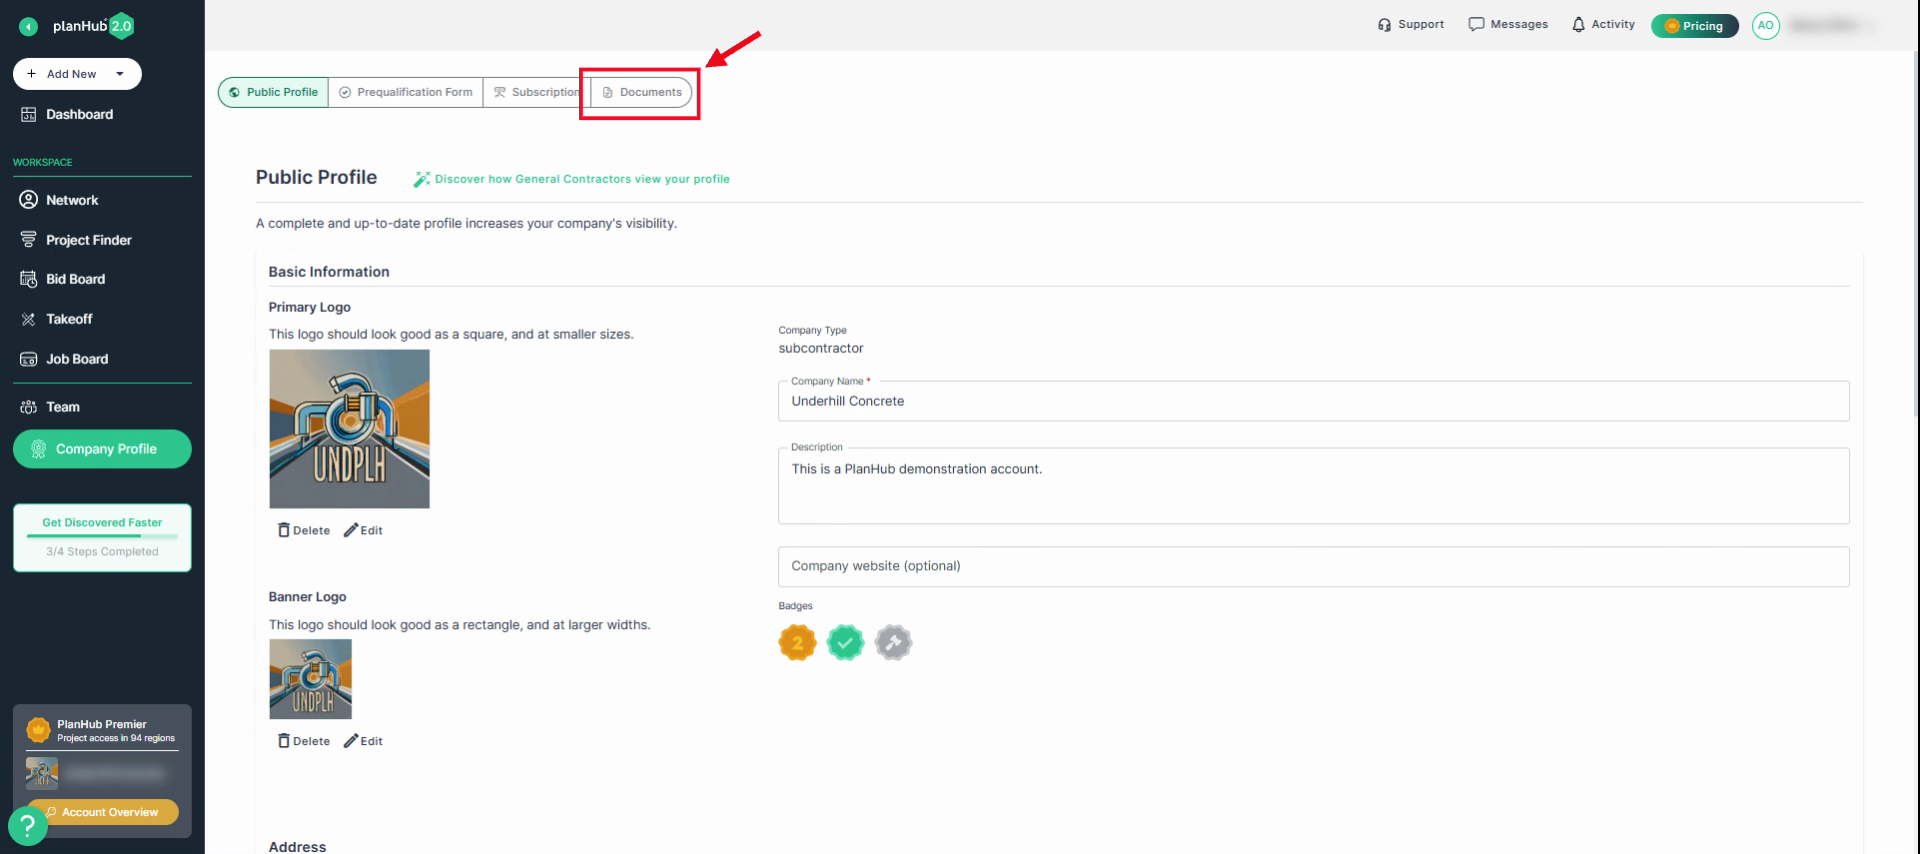
**Step 3:** Click the **Documents** tab to open your company’s private PlanHub Drive.
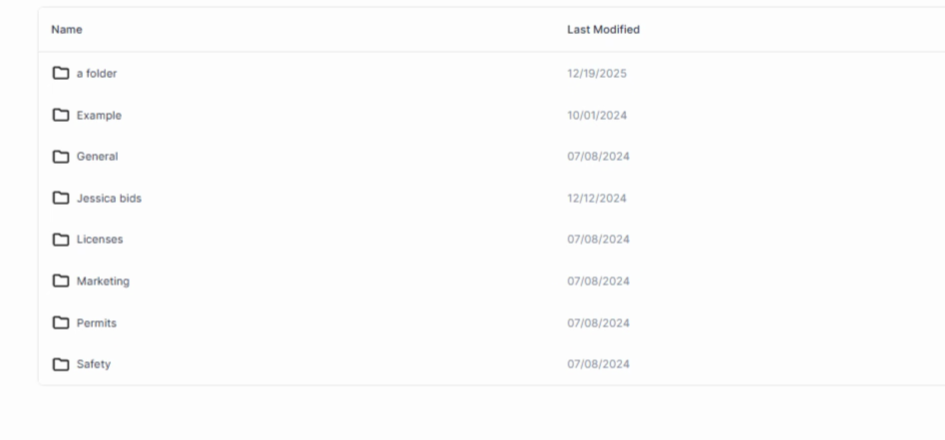
**Step 4:** Review the default folders set up for you.
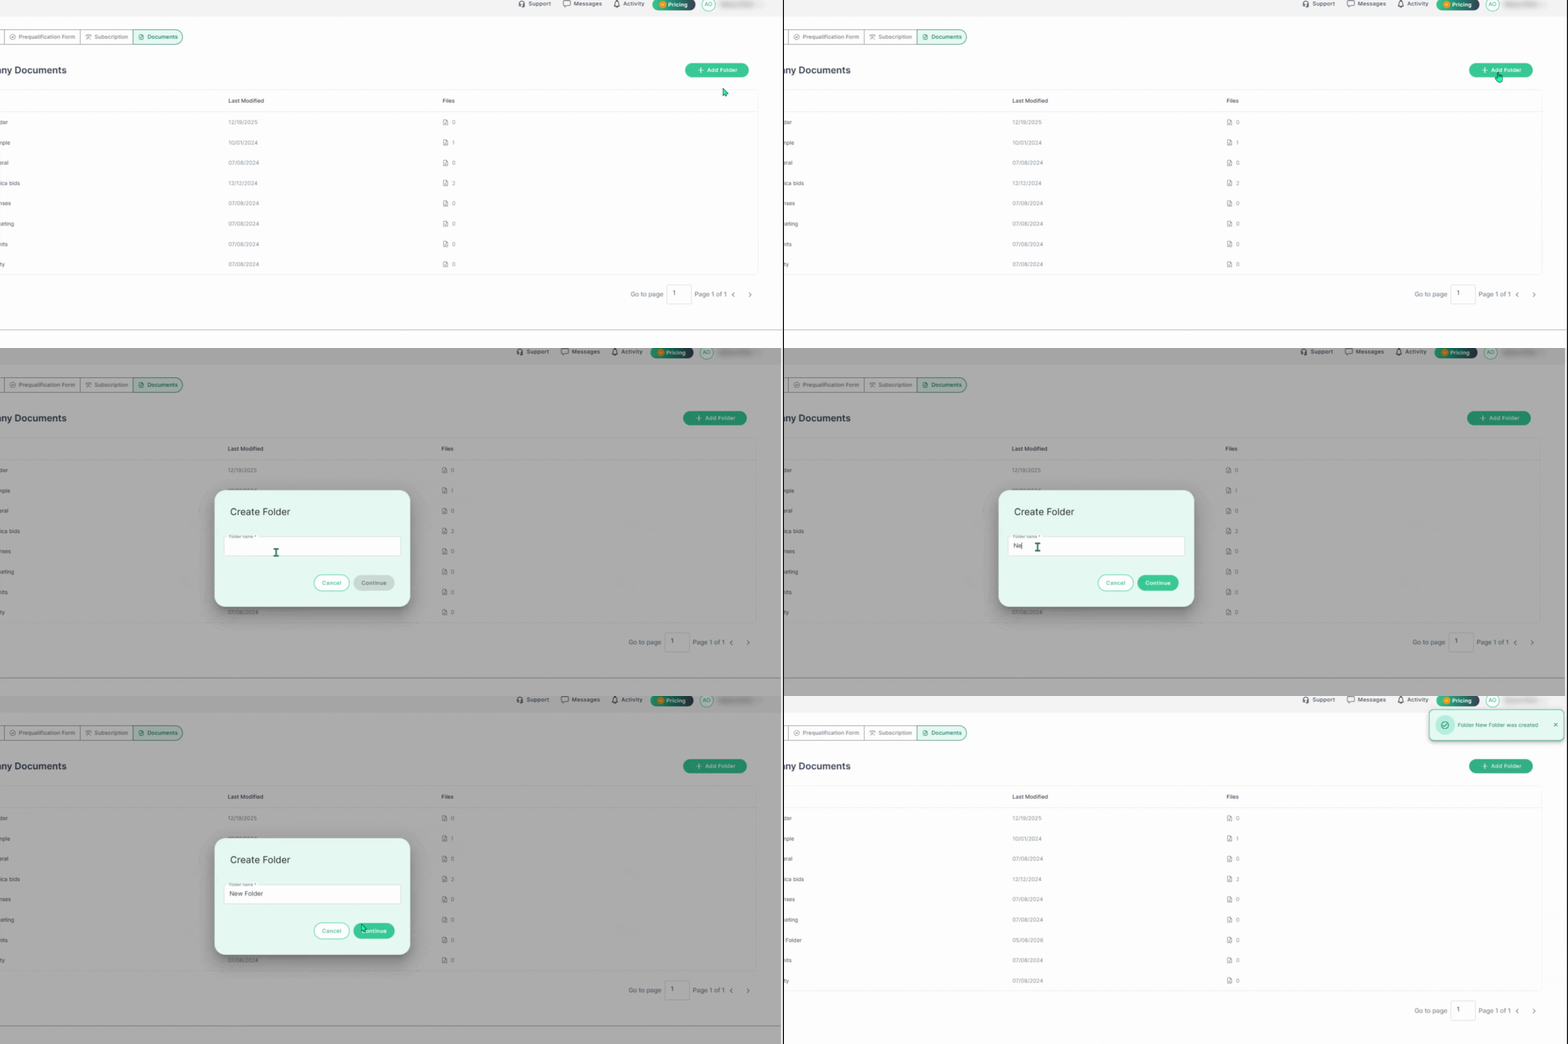
**Step 5:** To add a new folder, click **Add Folder** in the top right corner, then name your new folder.
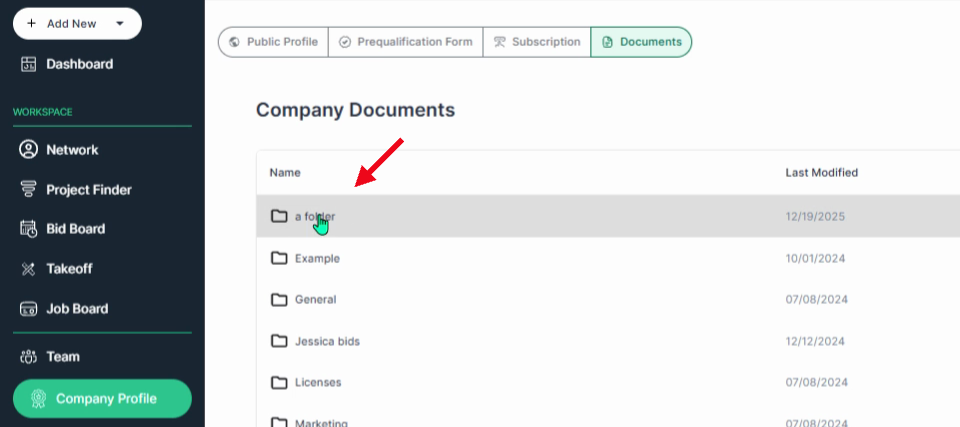
**Step 6:** To upload files, open the folder where you want to store them.
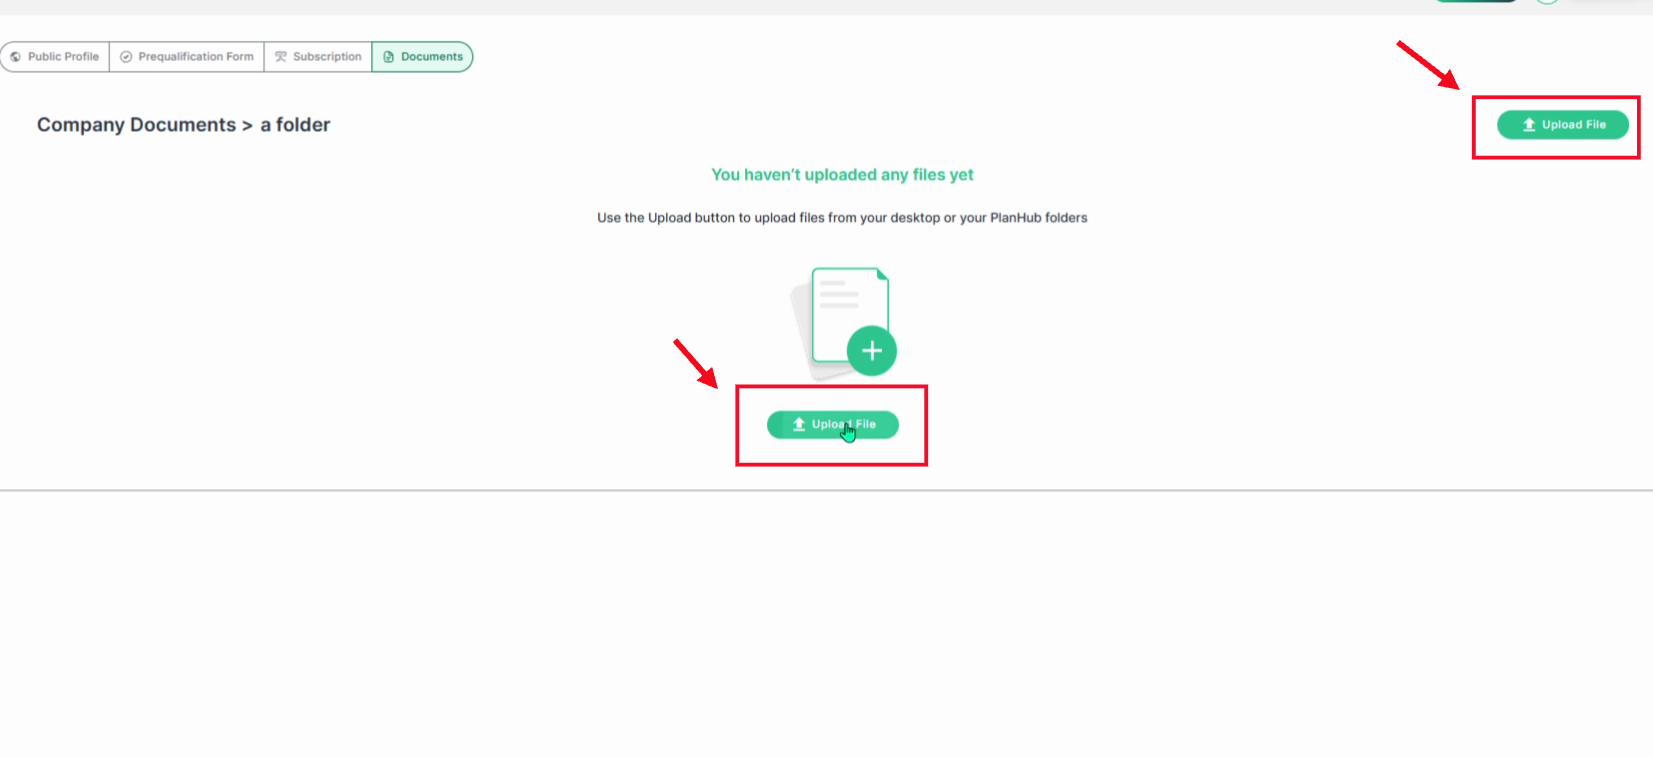
**Step 7:** Click **Upload File** and select documents from your computer.
**Step 8:** To rename a file, hover the mouse cursor over the file name and click the **pencil (edit)** icon.
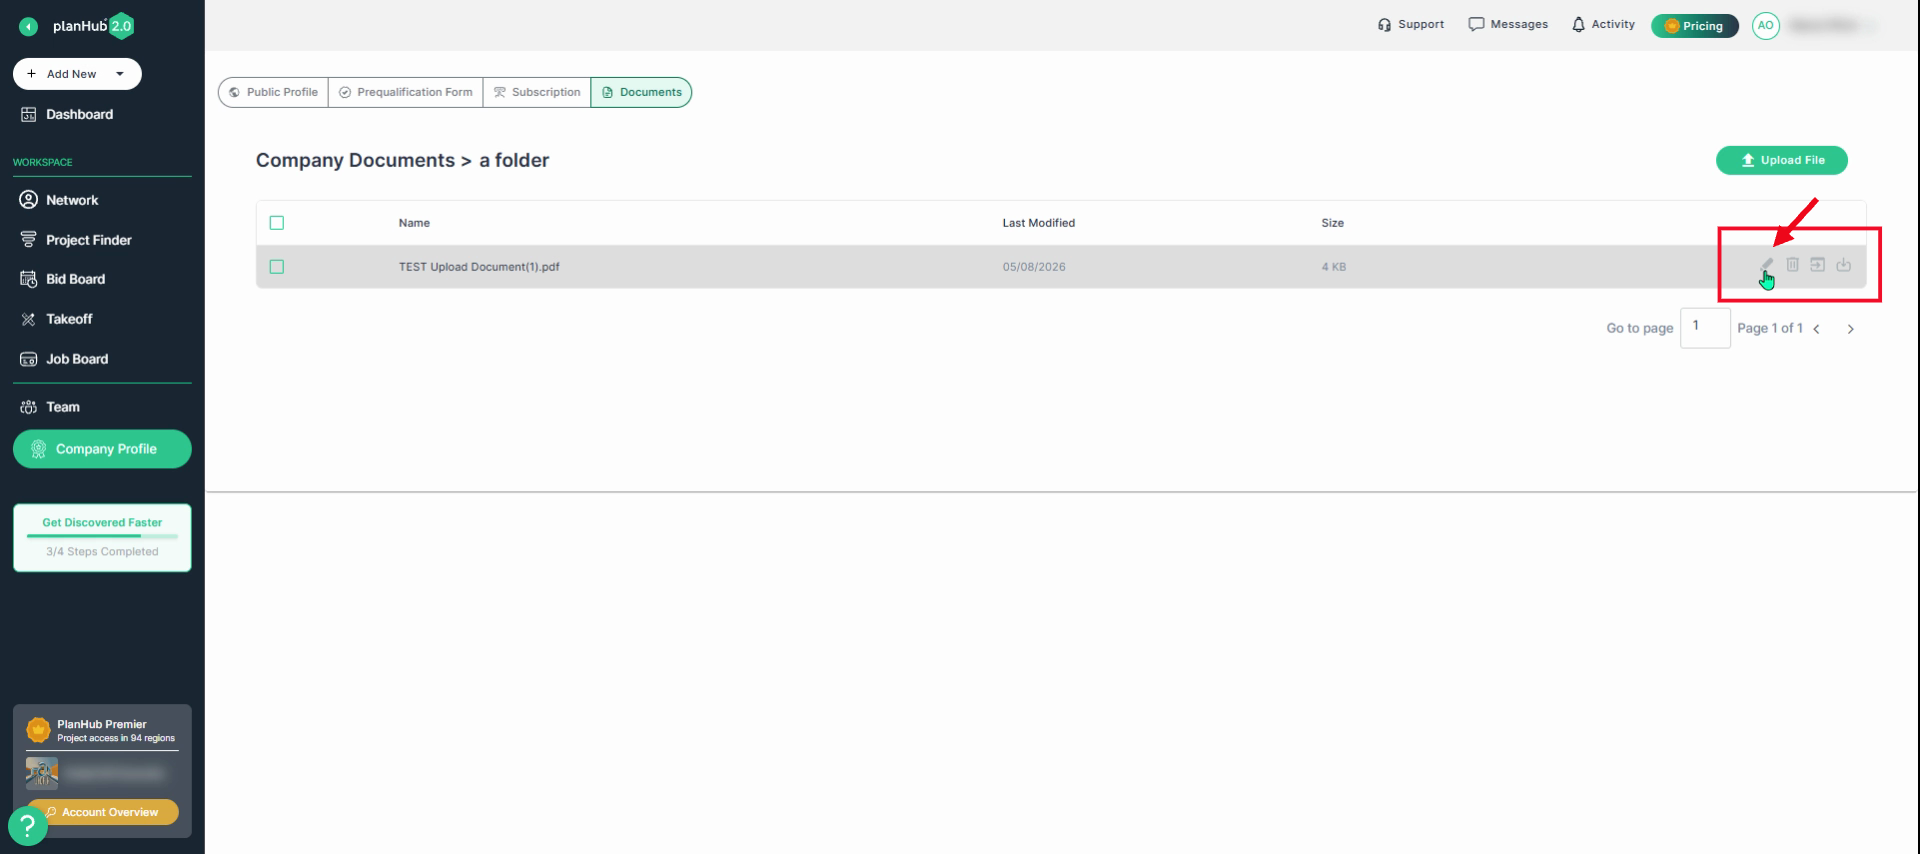
**Step 9:** To delete a file, click the **Trash Can** icon.
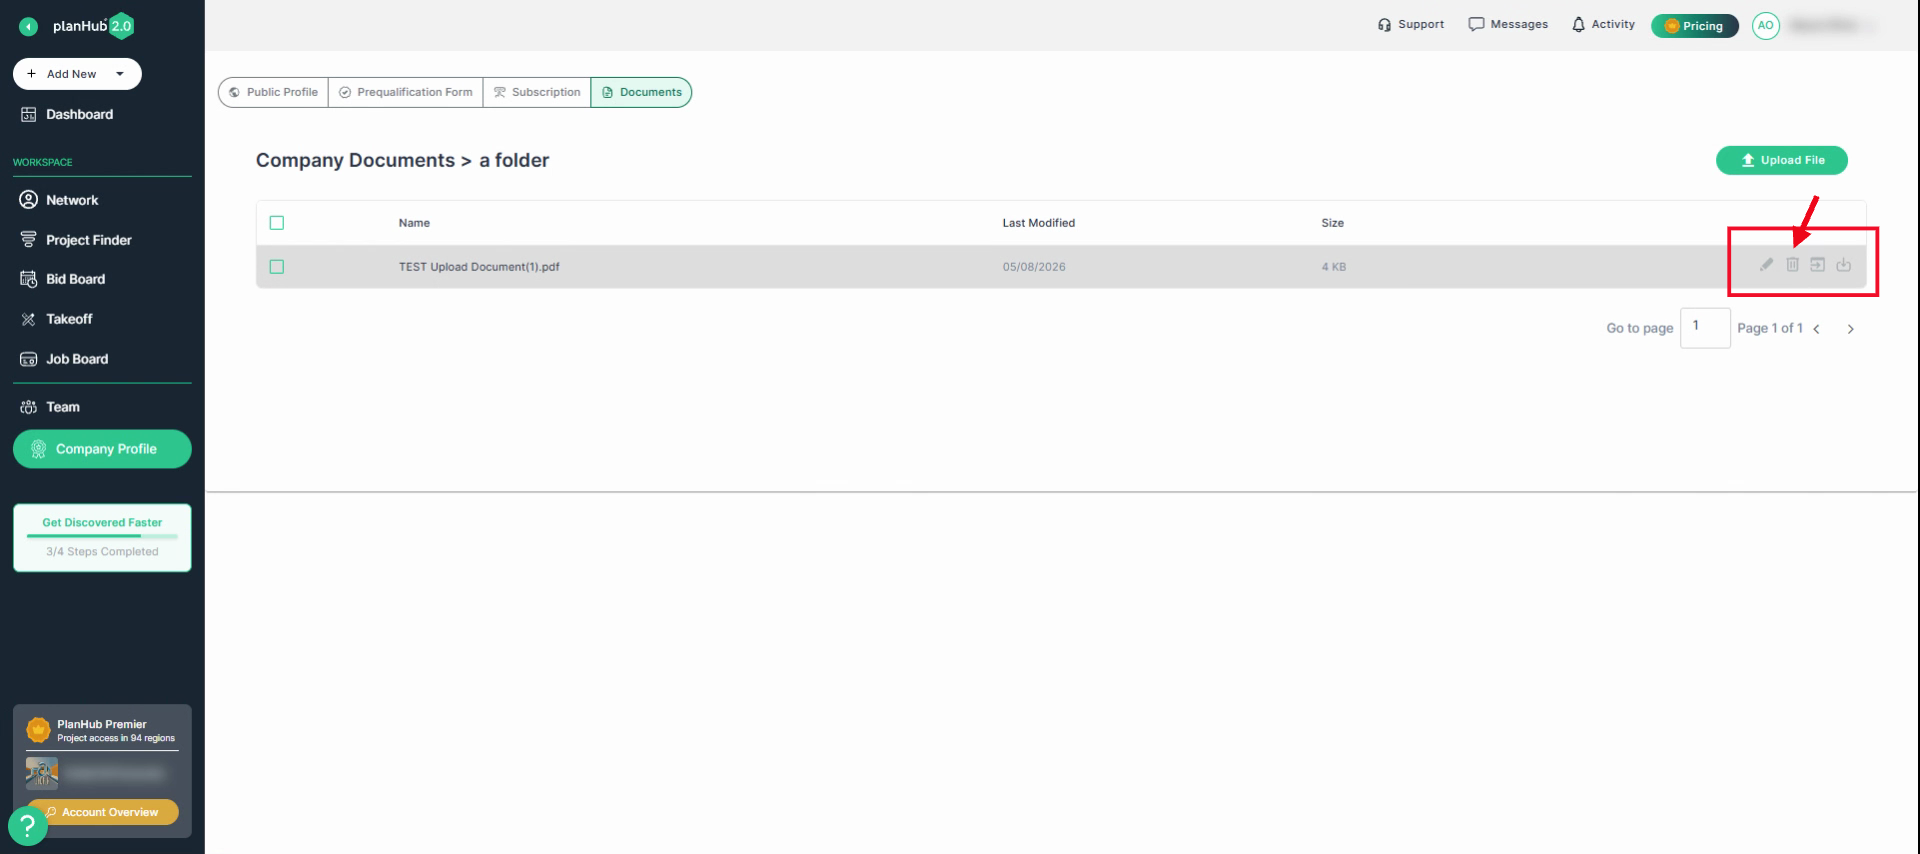
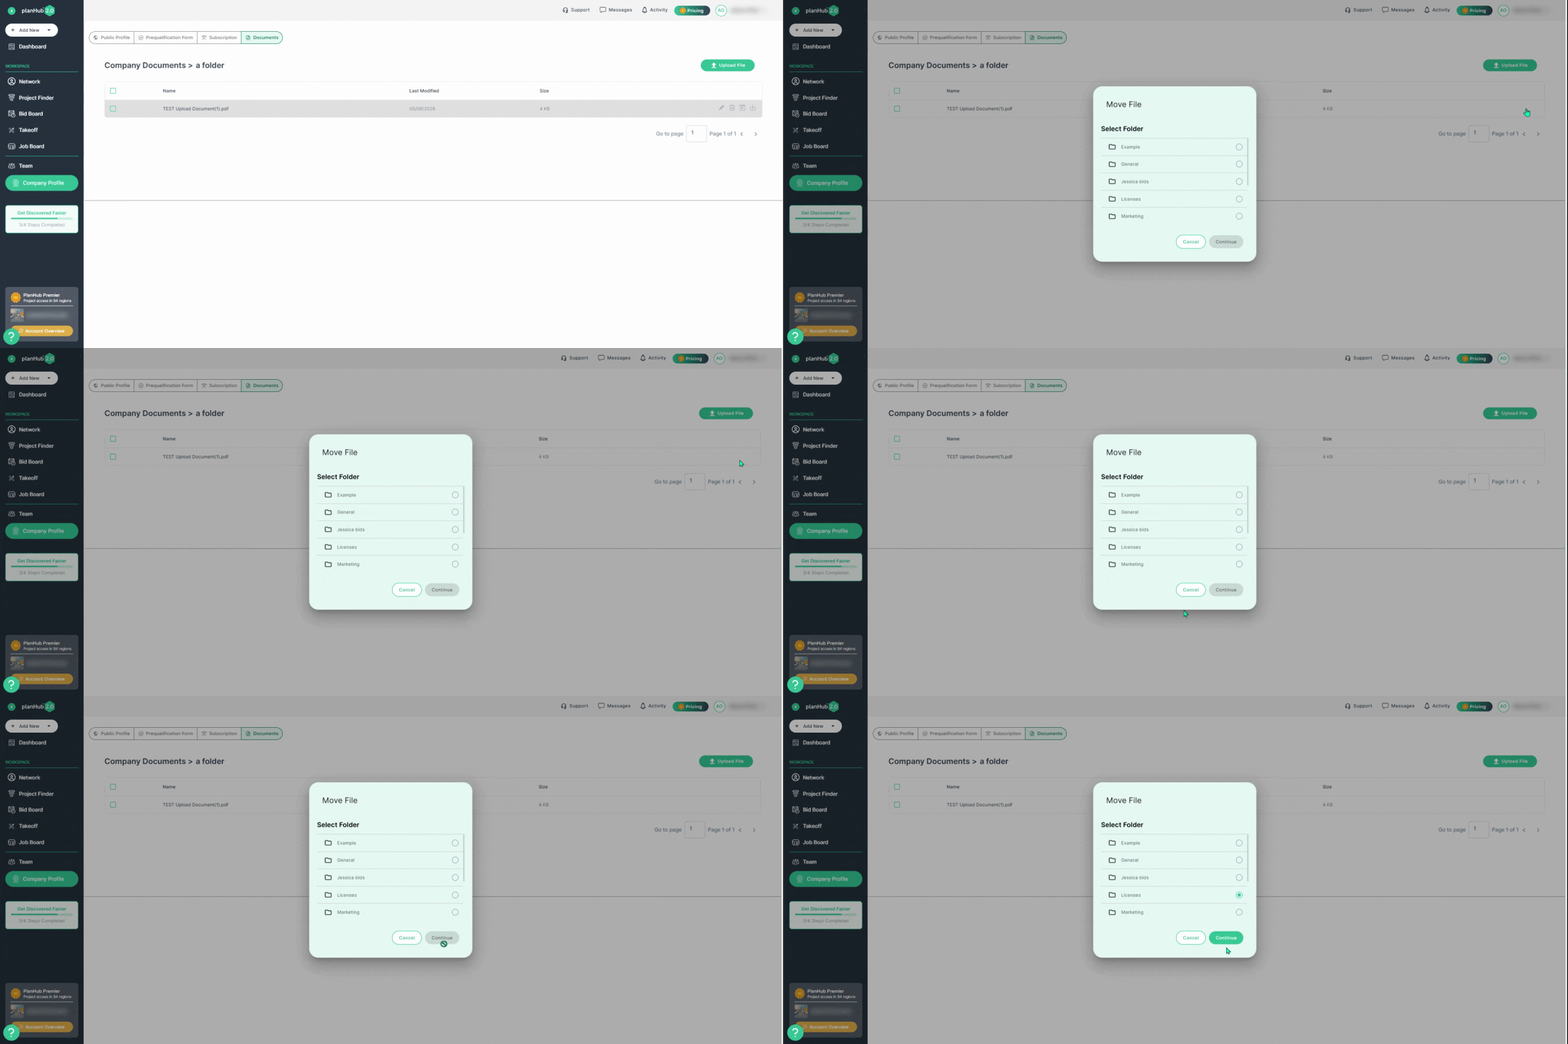
**Step 10:** To move a file to another folder, select the **Move file** icon, then choose the new location from the pop-up window and click **Continue**.
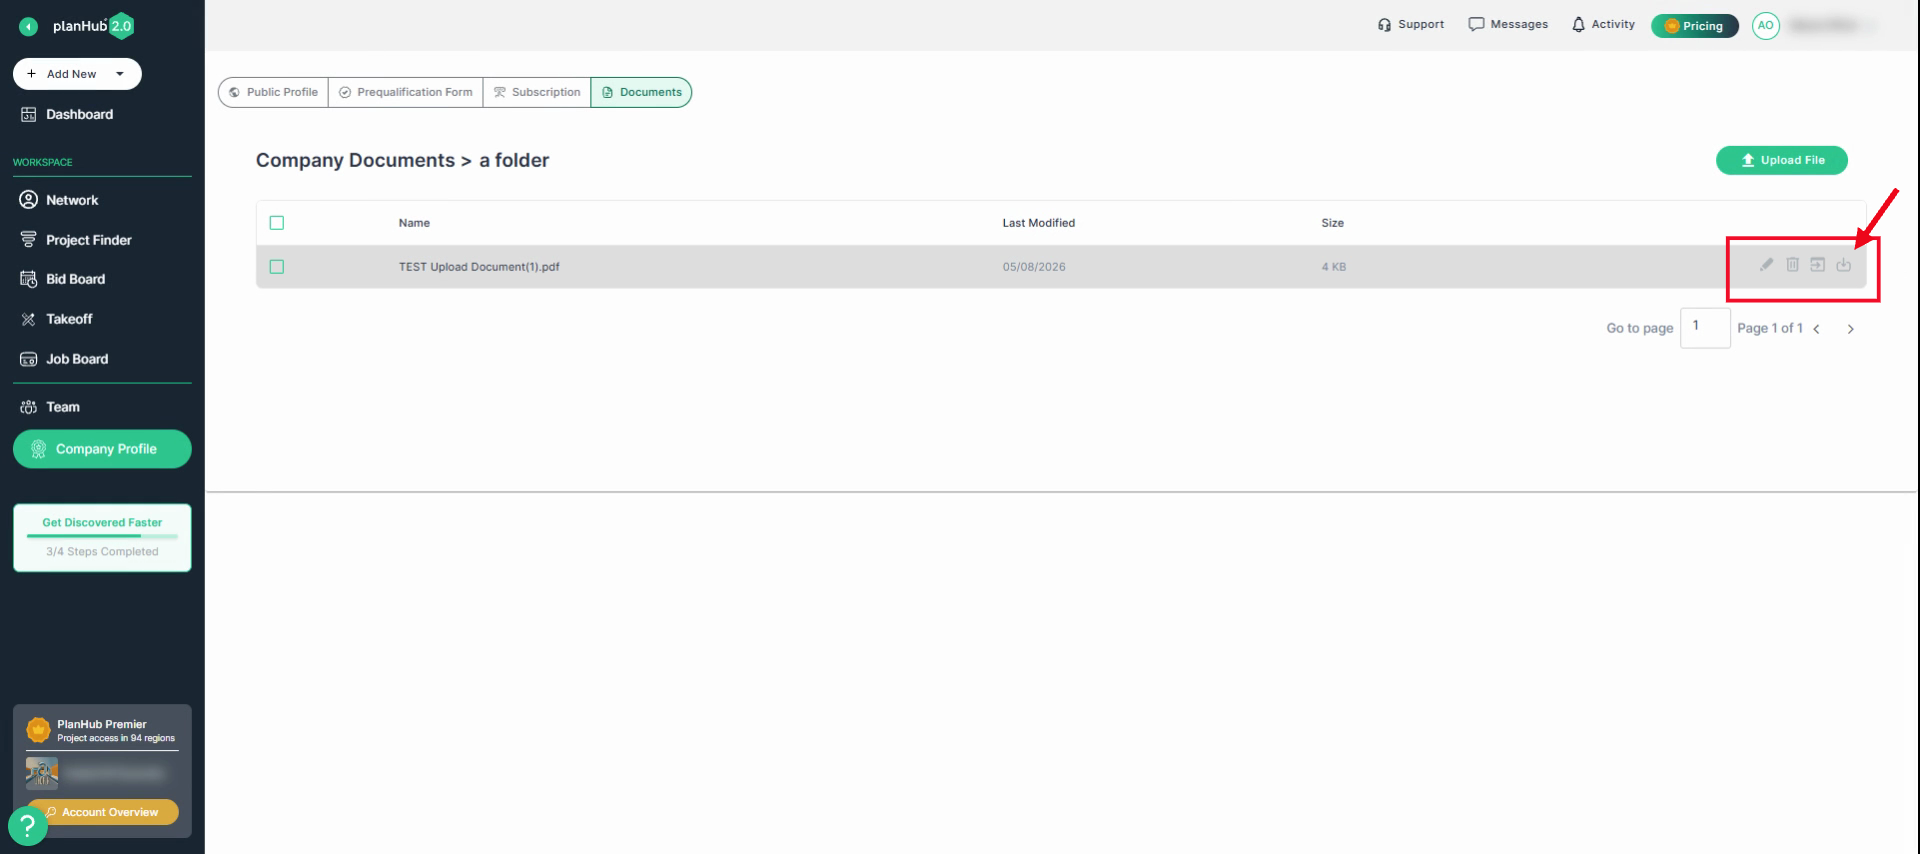
**Step 11:** Download a file by clicking the **Download** icon.
---
### Using PlanHub Drive Files While Bidding
Stay organized by attaching files directly from your PlanHub Drive during the bid submission process.
**Step 1:** During bid submission, click the prompt to attach files directly from your PlanHub company drive. To learn more about placing a bid, view the Knowledge Base article: [How To Place A Bid](https://knowledgebase.planhub.com/knowledge/how-to-place-a-bid?hs_preview=CWKDPlzZ-199248611159&hsLang=en)
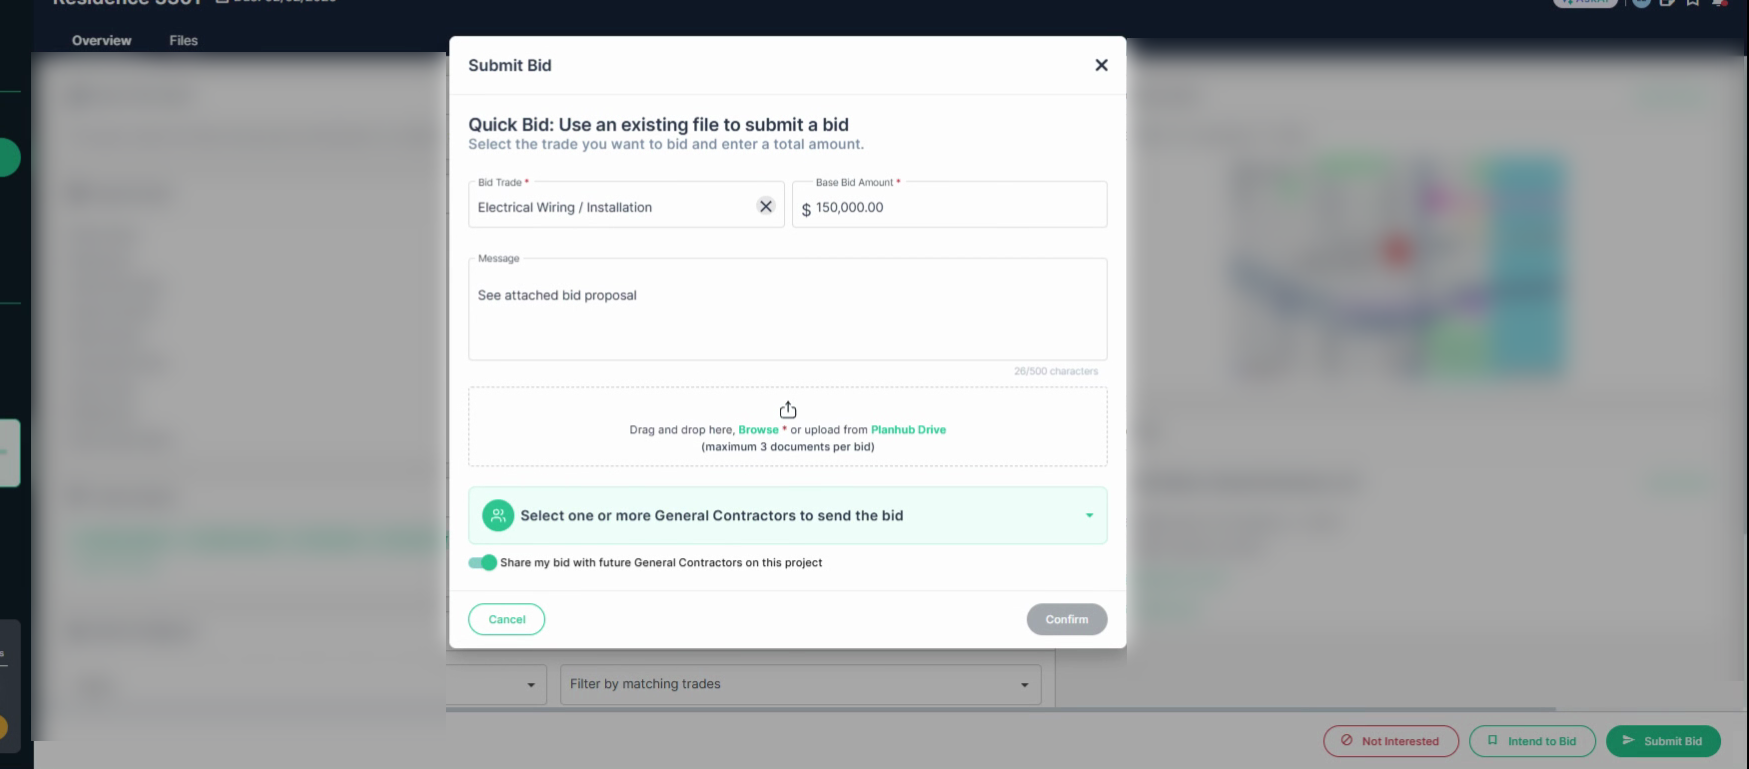
**Step 2:** Click on the **PlanHub Drive** option in the file upload field.
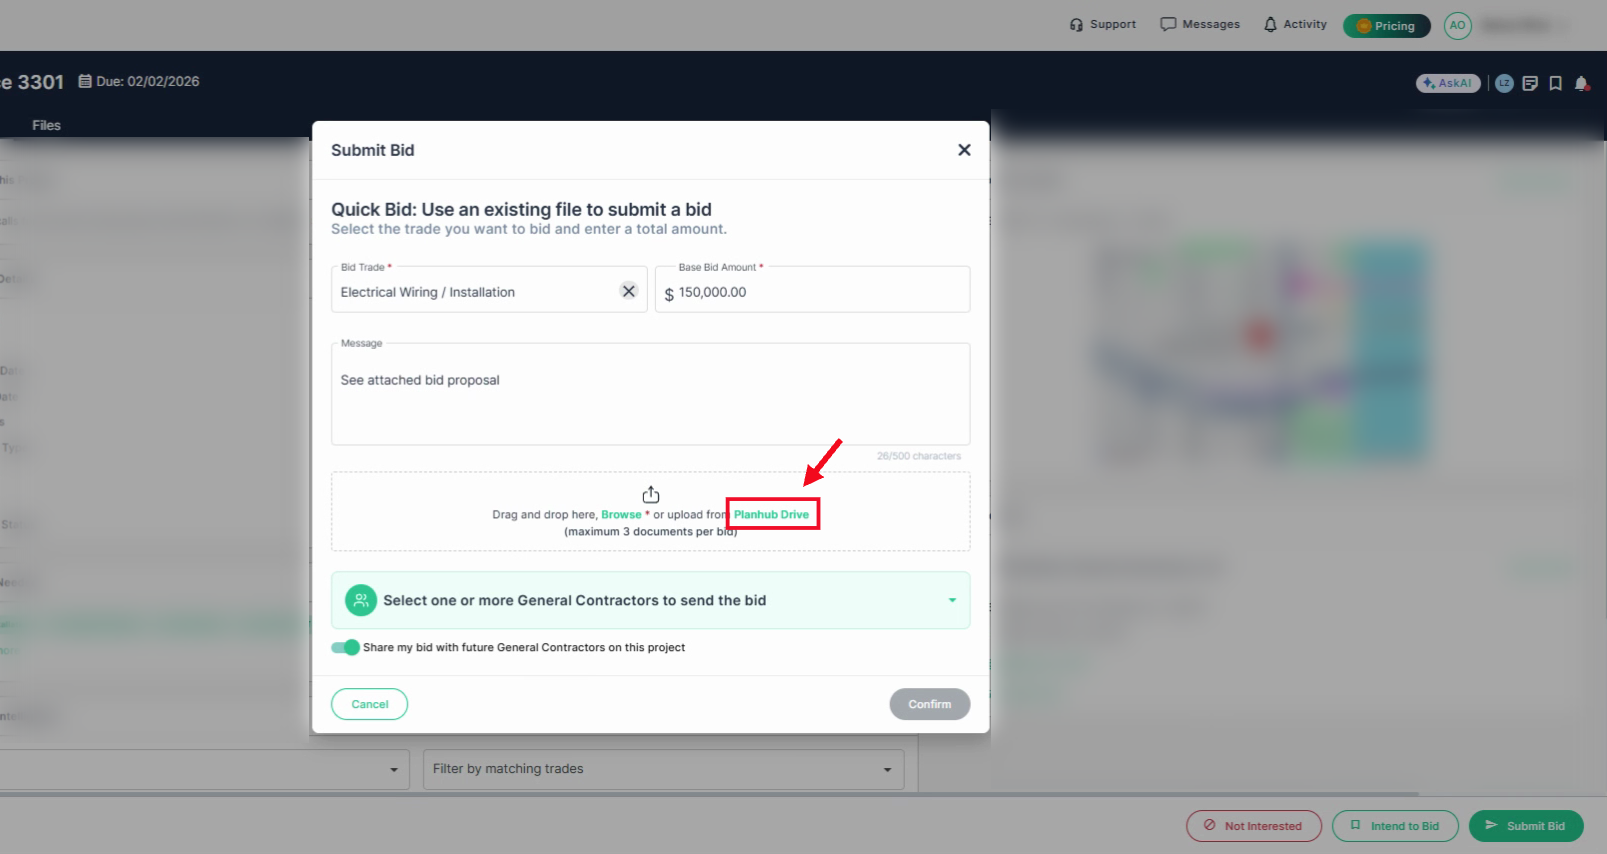
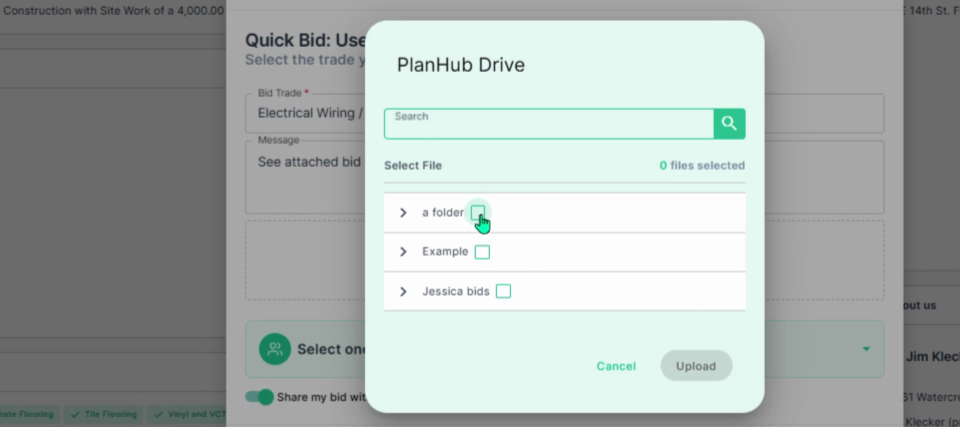
**Step 3:** Select the files you want to add from your PlanHub drive.
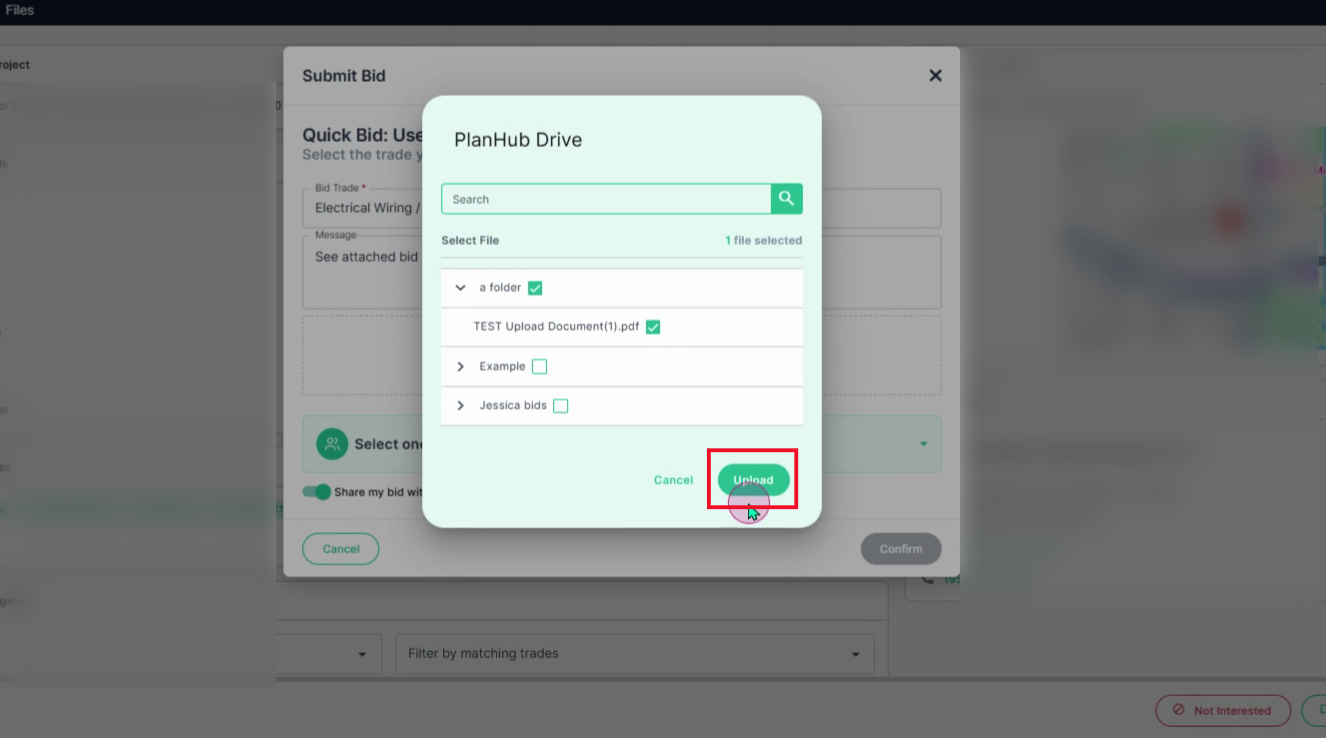
**Step 4:** Click **Upload** to attach your selected files to the bid.
PlanHub Drive makes it effortless to organize, access, and use your critical project documents—right when and where you need them. Keep your files managed to streamline collaboration and bidding on every project.
### Troubleshooting
Contact us if you need assistance or to report an issue:
- PlanHub Contact Page: https://planhub.com/contact/
- Customer Facing Support Ticket Link: https://knowledgebase.planhub.com/knowledge/kb-tickets/new
- Customer Success Team: CustomerSuccess@planhub.com
- [General Contractor](https://knowledgebase.planhub.com/knowledge/general-contractor?hsLang=en#main-content)
- [Overview](https://knowledgebase.planhub.com/knowledge/general-contractor?hsLang=en#overview)
- [Projects](https://knowledgebase.planhub.com/knowledge/general-contractor?hsLang=en#projects)
- [Networking](https://knowledgebase.planhub.com/knowledge/general-contractor?hsLang=en#networking)
- [Subcontractors](https://knowledgebase.planhub.com/knowledge/subcontractors?hsLang=en#main-content)
- [Overview](https://knowledgebase.planhub.com/knowledge/subcontractors?hsLang=en#overview)
- [Projects](https://knowledgebase.planhub.com/knowledge/subcontractors?hsLang=en#projects)
- [Bid Board & Tracking](https://knowledgebase.planhub.com/knowledge/subcontractors?hsLang=en#bid-board-tracking)
- [Networking](https://knowledgebase.planhub.com/knowledge/subcontractors?hsLang=en#networking)
- [Takeoff & Estimation](https://knowledgebase.planhub.com/knowledge/subcontractors?hsLang=en#takeoff-estimation)
- [Manage Your Team](https://knowledgebase.planhub.com/knowledge/subcontractors?hsLang=en#manage-your-team)
- [Account & Settings](https://knowledgebase.planhub.com/knowledge/subcontractors?hsLang=en#account-settings)
- [Job Board](https://knowledgebase.planhub.com/knowledge/subcontractors?hsLang=en#job-board)
- [Request for Information](https://knowledgebase.planhub.com/knowledge/subcontractors?hsLang=en#request-for-information)
- [Supplier](https://knowledgebase.planhub.com/knowledge/supplier?hsLang=en#main-content)
- [Overview](https://knowledgebase.planhub.com/knowledge/supplier?hsLang=en#overview)
- [Projects and Leads](https://knowledgebase.planhub.com/knowledge/supplier?hsLang=en#projects-and-leads)
- [Bidding & Estimating](https://knowledgebase.planhub.com/knowledge/supplier?hsLang=en#bidding-estimating)
- [Networking](https://knowledgebase.planhub.com/knowledge/supplier?hsLang=en#networking)
- [Account & Settings](https://knowledgebase.planhub.com/knowledge/supplier?hsLang=en#account-settings)
- [Takeoff & Estimation](https://knowledgebase.planhub.com/knowledge/takeoff-estimation?hsLang=en#main-content)
- [Getting Started](https://knowledgebase.planhub.com/knowledge/takeoff-estimation?hsLang=en#getting-started)
- [Takeoff Tools & Measurements](https://knowledgebase.planhub.com/knowledge/takeoff-estimation?hsLang=en#takeoff-tools-measurements)
- [Trade-Specific Takeoffs](https://knowledgebase.planhub.com/knowledge/takeoff-estimation?hsLang=en#trade-specific-takeoffs)
- [Estimating](https://knowledgebase.planhub.com/knowledge/takeoff-estimation?hsLang=en#estimating)
- [Managing & Sharing Your Work](https://knowledgebase.planhub.com/knowledge/takeoff-estimation?hsLang=en#managing-sharing-your-work)
- [Account & Billing](https://knowledgebase.planhub.com/knowledge/account-billing?hsLang=en#main-content)
- [Account & Billing](https://knowledgebase.planhub.com/knowledge/account-billing?hsLang=en#account-billing)
- [Account Closure](https://knowledgebase.planhub.com/knowledge/account-billing?hsLang=en#account-closure)
- [Troubleshooting](https://knowledgebase.planhub.com/knowledge/troubleshooting?hsLang=en)
- [About PlanHub](https://knowledgebase.planhub.com/knowledge/about-planhub?hsLang=en)
- [New General Contractor Experience](https://knowledgebase.planhub.com/knowledge/new-general-contractor-experience?hsLang=en#main-content)
- [Overview](https://knowledgebase.planhub.com/knowledge/new-general-contractor-experience?hsLang=en#overview)
- [Projects](https://knowledgebase.planhub.com/knowledge/new-general-contractor-experience?hsLang=en#projects)
- [Networking](https://knowledgebase.planhub.com/knowledge/new-general-contractor-experience?hsLang=en#networking)
- [Takeoff & Estimation](https://knowledgebase.planhub.com/knowledge/new-general-contractor-experience?hsLang=en#takeoff-estimation)
- [Account & Settings](https://knowledgebase.planhub.com/knowledge/new-general-contractor-experience?hsLang=en#account-settings)
- [Manage Your Team](https://knowledgebase.planhub.com/knowledge/new-general-contractor-experience?hsLang=en#manage-your-team)
- [Submit Feedback](https://knowledgebase.planhub.com/knowledge/submit-feedback?hsLang=en#main-content)
- [Feedback](https://knowledgebase.planhub.com/knowledge/submit-feedback?hsLang=en#feedback)
- [Have an Issue? Submit a Ticket](https://knowledgebase.planhub.com/knowledge/kb-tickets/new)
[](http://planhub.com)
[Knowledge Base Home](https://knowledgebase.planhub.com/knowledge?hsLang=en)
[Submit a Ticket](https://knowledgebase.planhub.com/knowledge/kb-tickets/new?hsLang=en)
Copyright © 2026, ©2026 PlanHub, Inc. All rights reserved