---
title: How to Manage and Update Project Folders and Documents
description: project files, files, folders, add folder, add files, upload files, delete files, download files, move files, delete folders
---
[Skip to content](https://knowledgebase.planhub.com/knowledge/general-contractors-how-to-add-edit-or-delete-a-document-and/or-folder-to-an-existing-project#main-content)
English
Show submenu for translations
[Submit a Ticket](https://knowledgebase.planhub.com/knowledge/kb-tickets/new?hsLang=en)
![NEW\_PlanHub\_Logo\_Navy.png\]](https://knowledgebase.planhub.com/hs-fs/hubfs/Design/PH%20Logos/NEW%202024%20PH%20Logos/NEW_PlanHub_Logo_Navy.png?height=40&name=NEW_PlanHub_Logo_Navy.png)
- [Have an Issue? Submit a Ticket](https://knowledgebase.planhub.com/knowledge/kb-tickets/new)
Open main navigation
Close main navigation
- [Have an Issue? Submit a Ticket](https://knowledgebase.planhub.com/knowledge/kb-tickets/new)
- English
Show submenu for translations
- [Submit a Ticket](https://knowledgebase.planhub.com/knowledge/kb-tickets/new)
What can we help you with?
- There are no suggestions because the search field is empty.
1. [Knowledge Base](https://knowledgebase.planhub.com/knowledge?hsLang=en)
2. [New General Contractor Experience](https://knowledgebase.planhub.com/knowledge/new-general-contractor-experience?hsLang=en)
3. [Projects](https://knowledgebase.planhub.com/knowledge/new-general-contractor-experience?hsLang=en#projects)
# How to Manage and Update Project Folders and Documents
## Managing documents and files is a crucial part of staying organized on your construction projects. Here’s how general contractors can add, edit, or delete documents and folders within an existing project workspace.
**Step 1:** Open the **My** **Projects** tab from the main workspace panel.
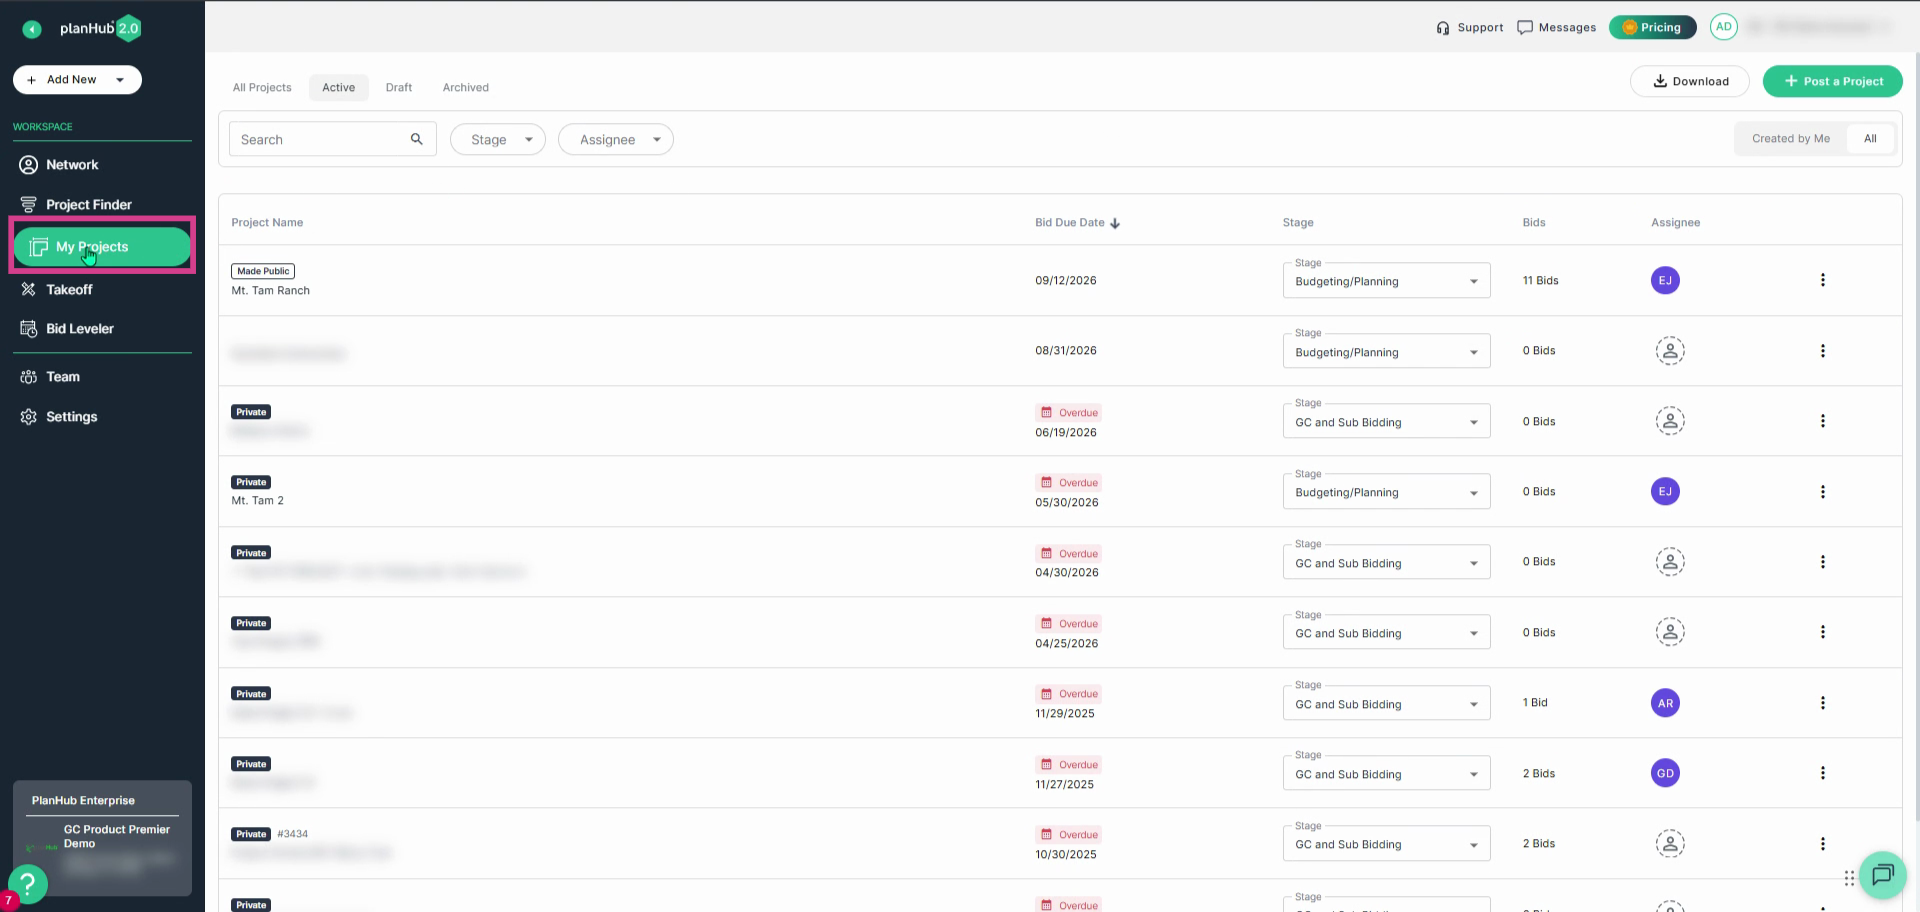
**Step 2:** Select the project you want to manage.
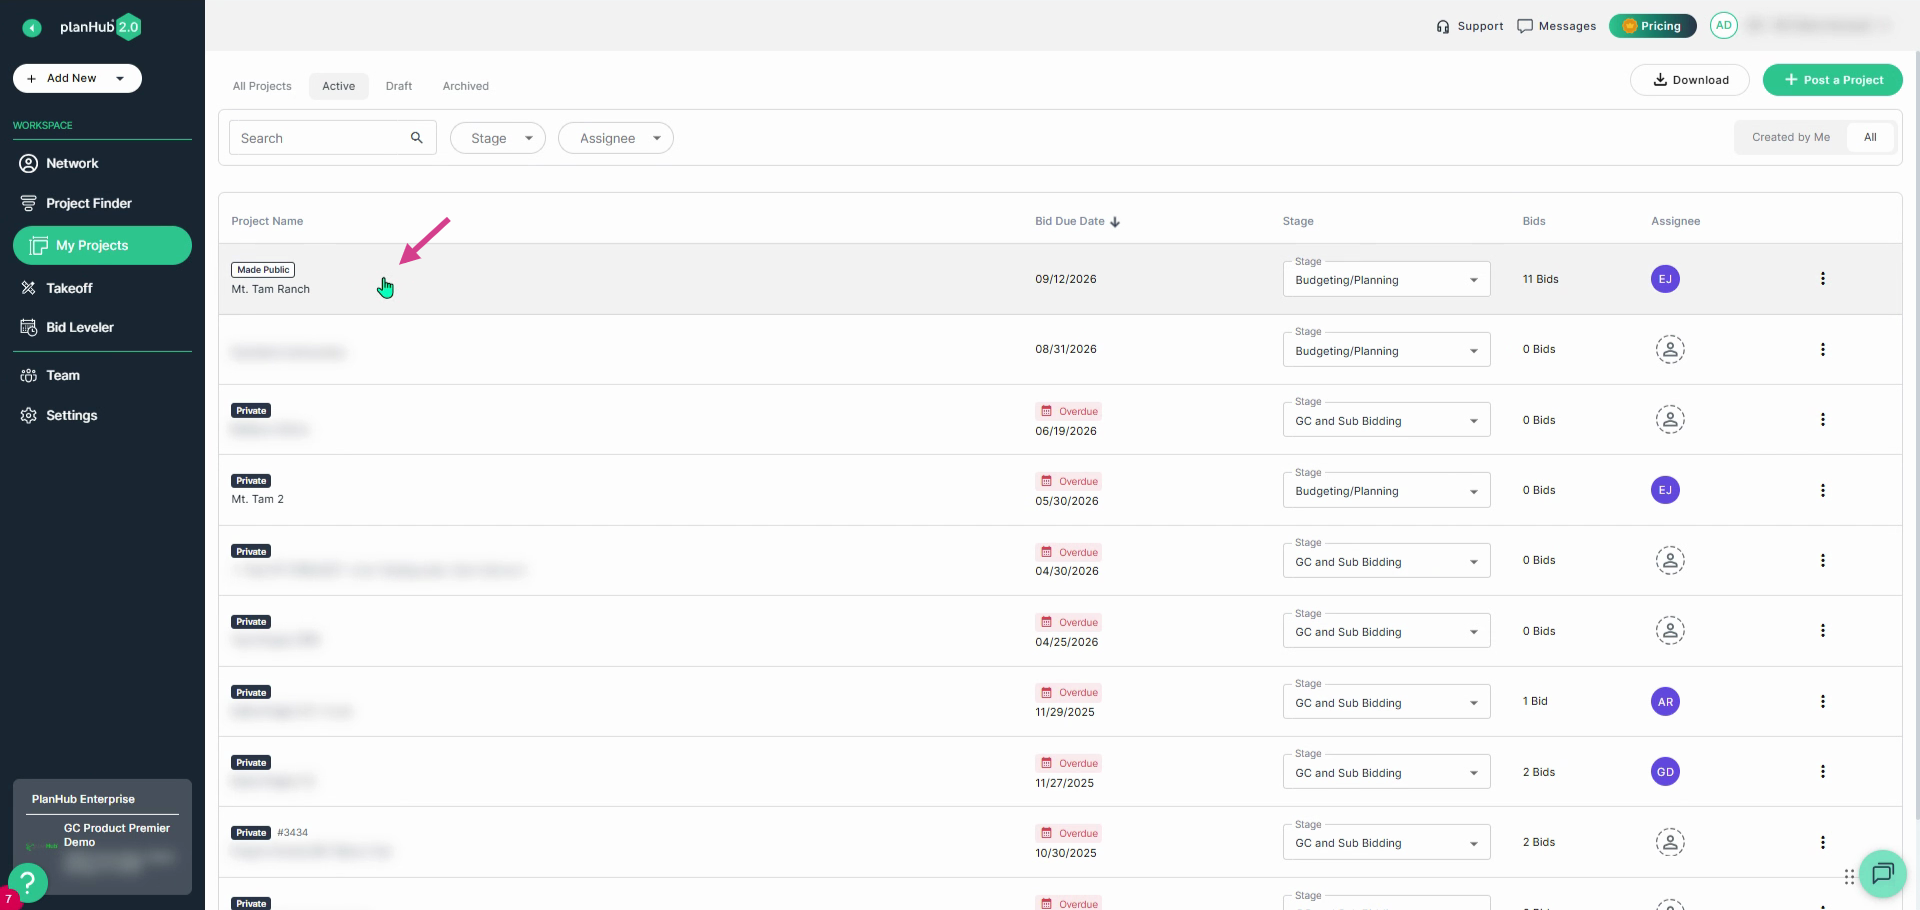
**Step 3:** Navigate to the **Files** tab inside the selected project.
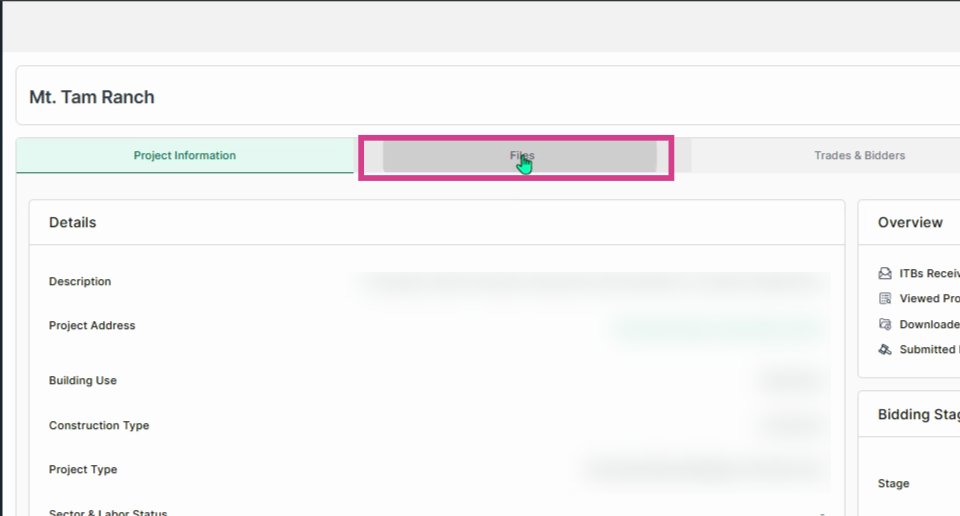
**Step 4:** In the project files section, choose between creating a **New Folder** or **Upload** a saved file document.
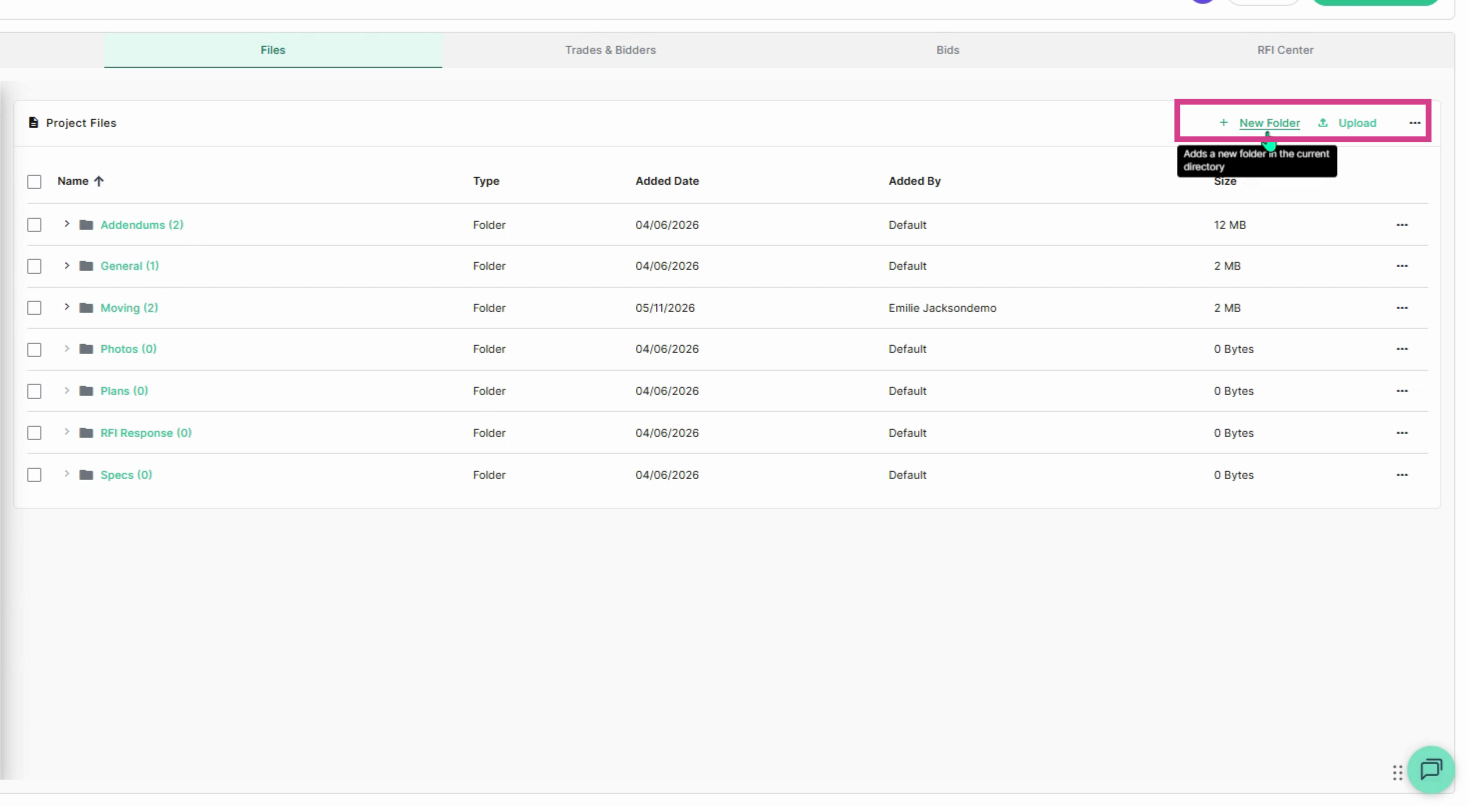
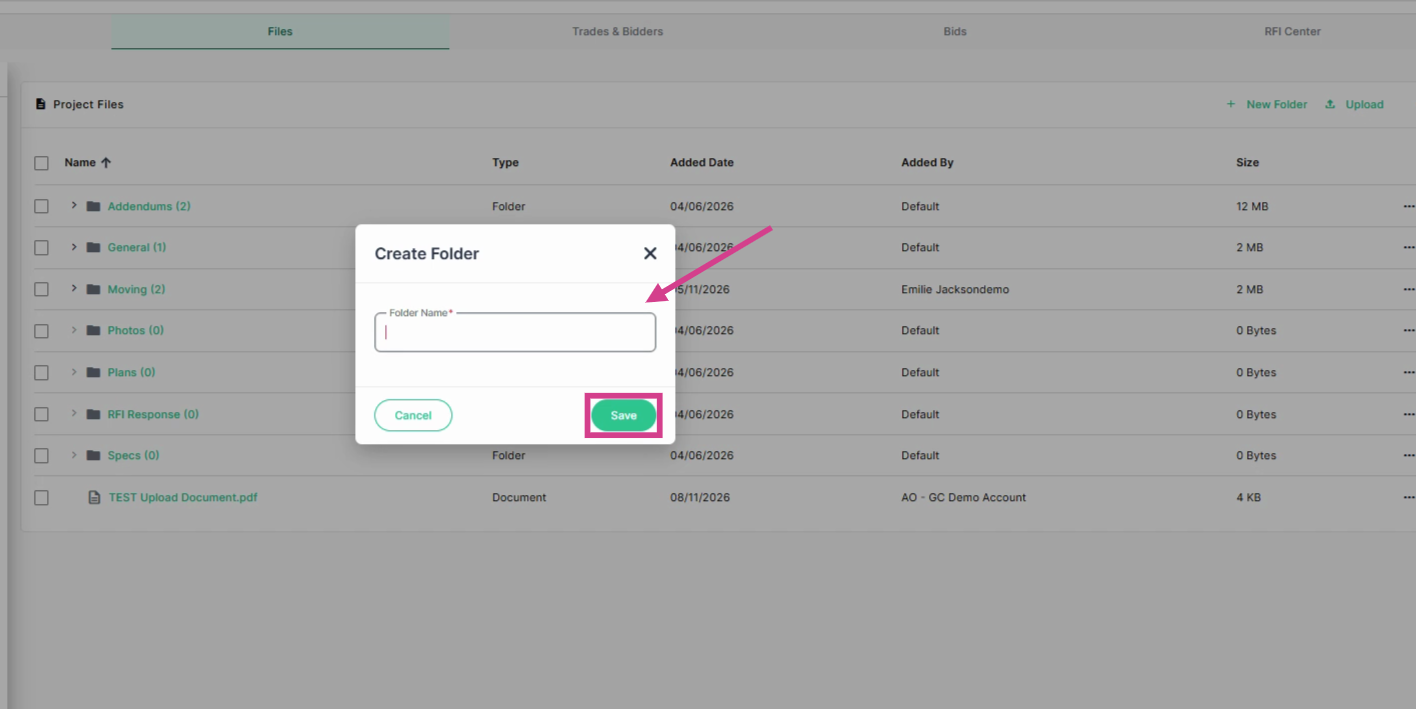
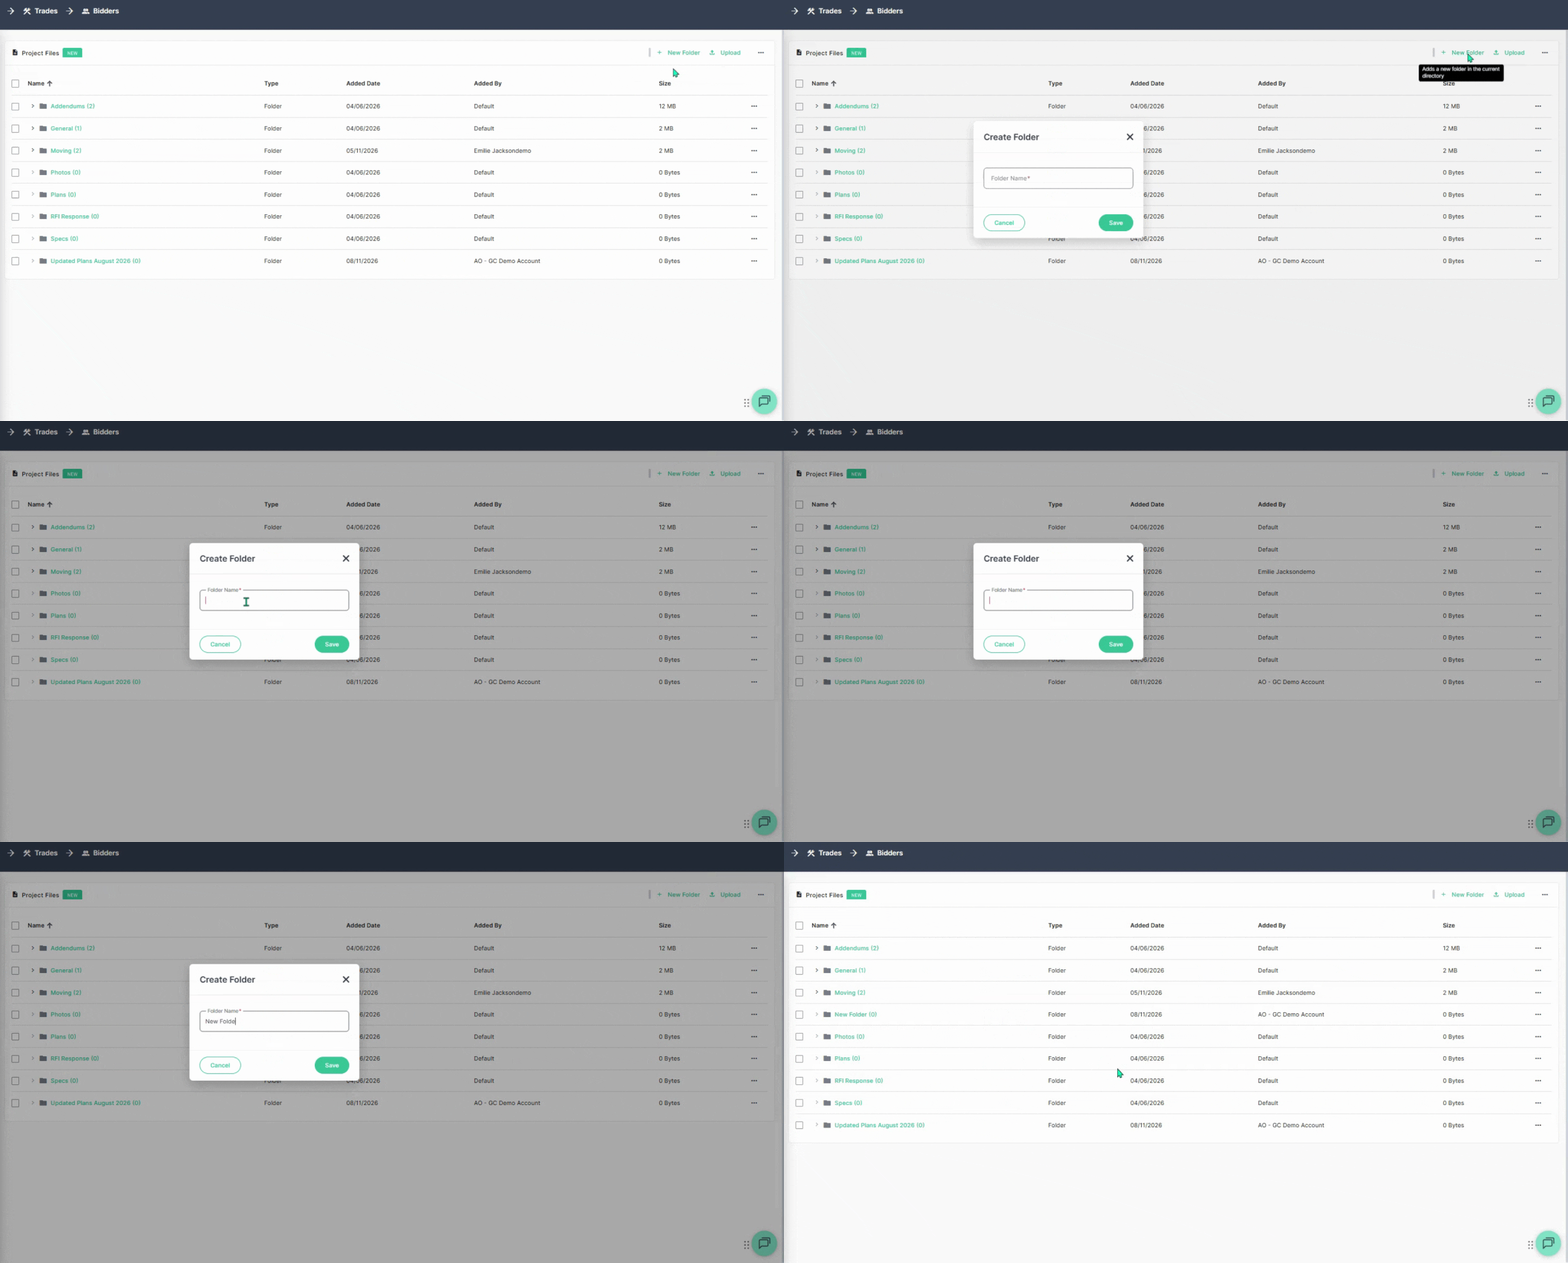
**Step 5:** Enter a folder name, then click **Save**.
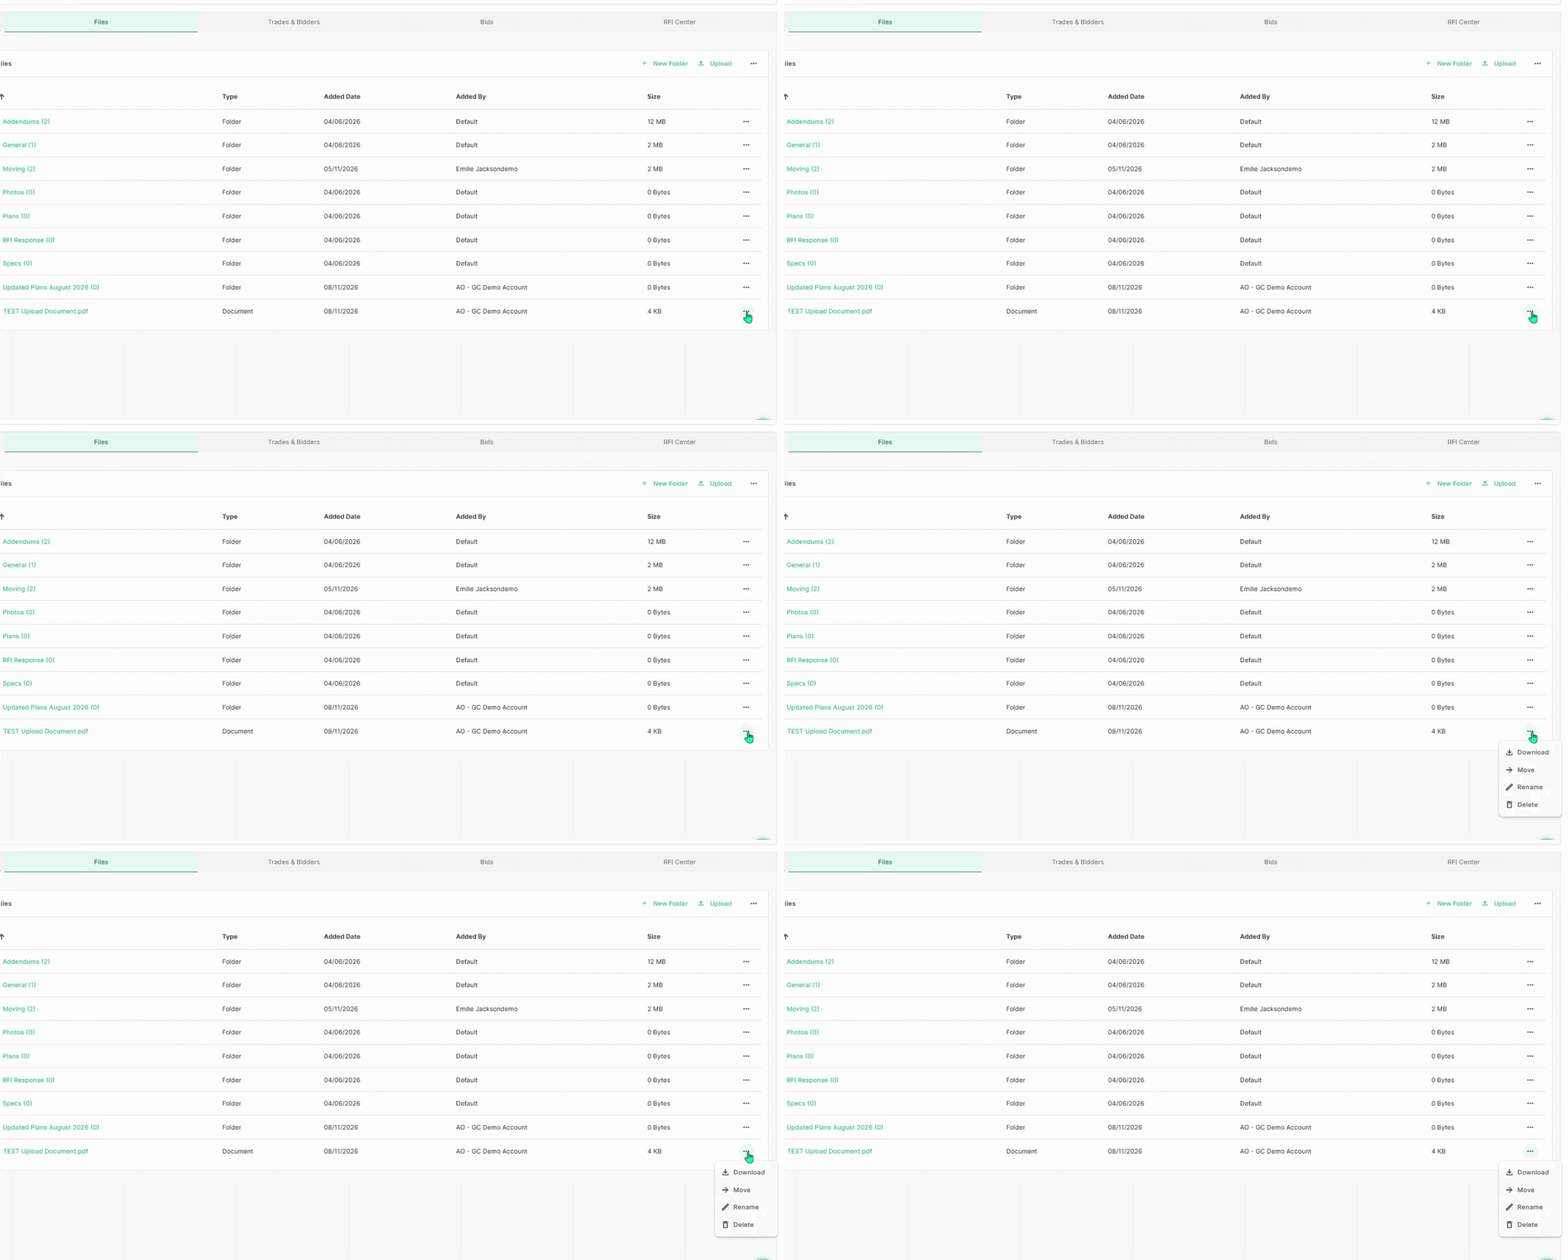
**Step 6:** To move documents into a folder, click the **three dots action menu** at the end of the row.
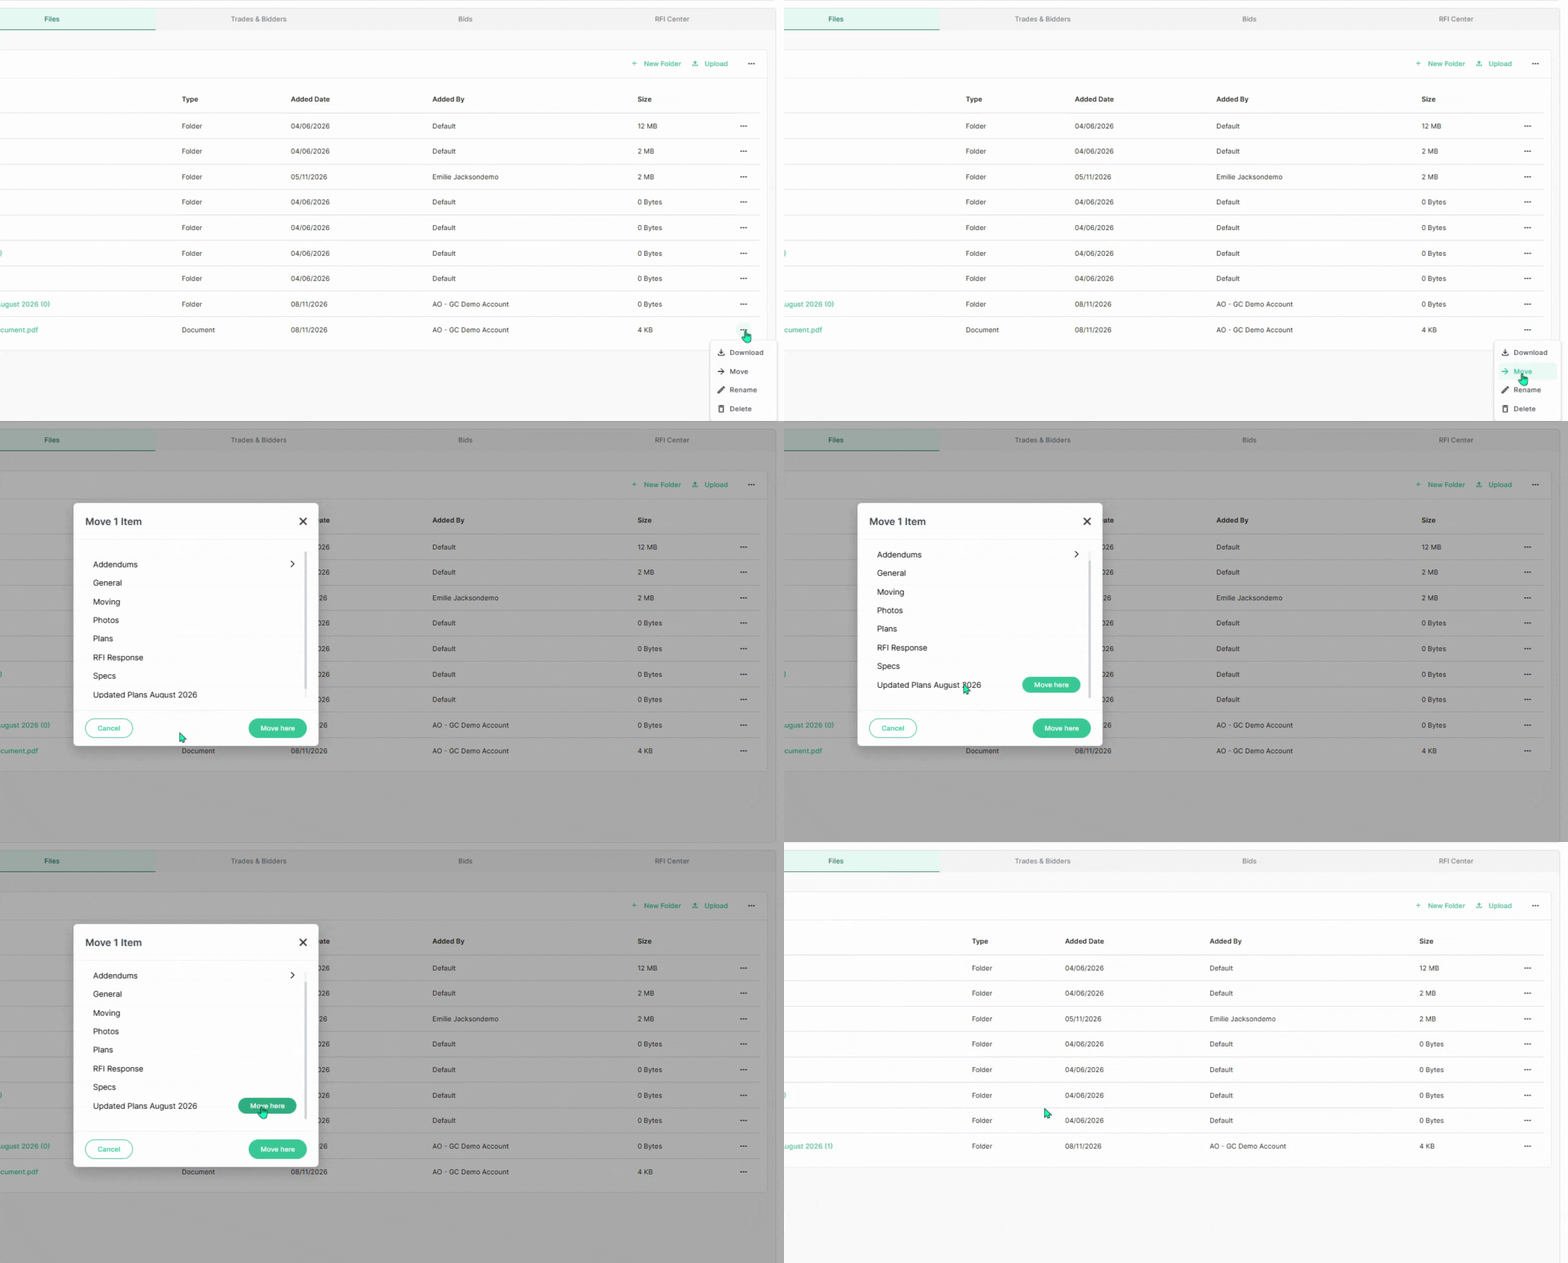
**Step 7:** Click **Move**, then choose the destination folder, and select **Move Here**.
**Step 8:** To rename a folder or file document, select the **three dots action menu** next to it, then choose **Rename**.
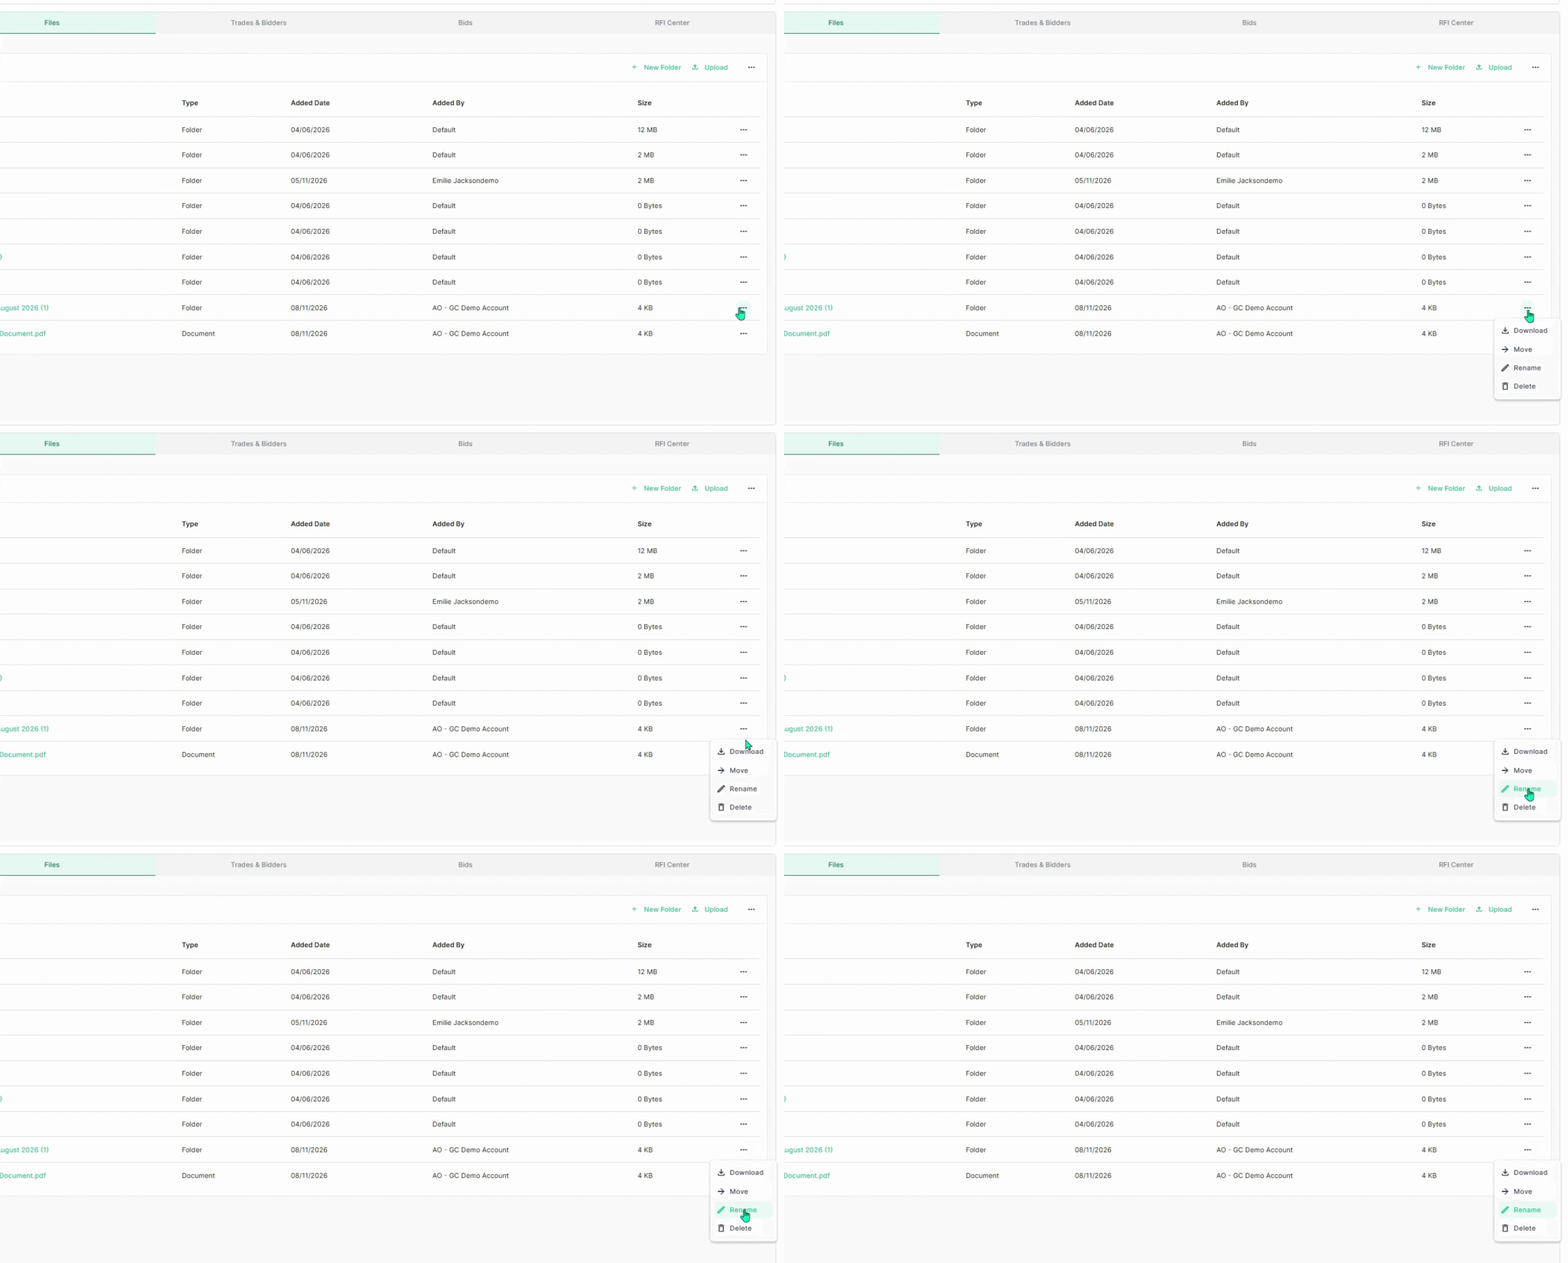
**Step 9:** Enter the new name and click **Save**.
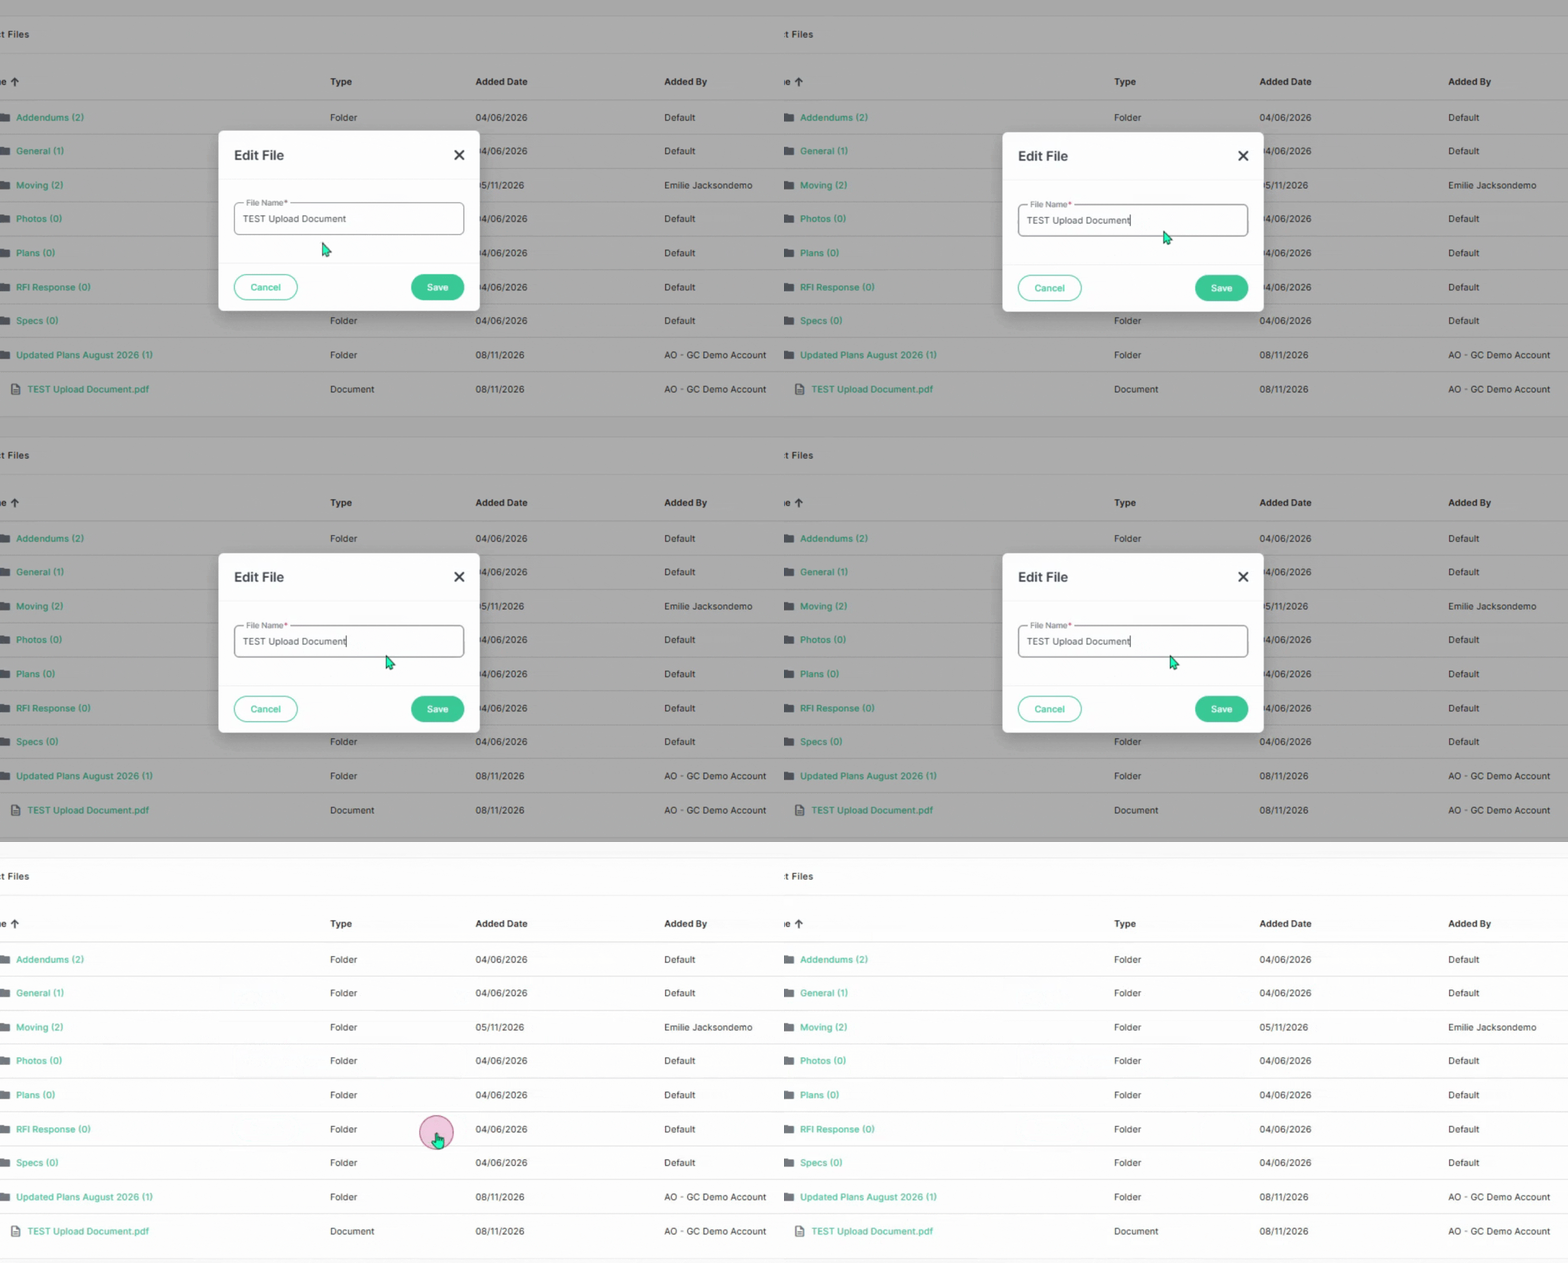
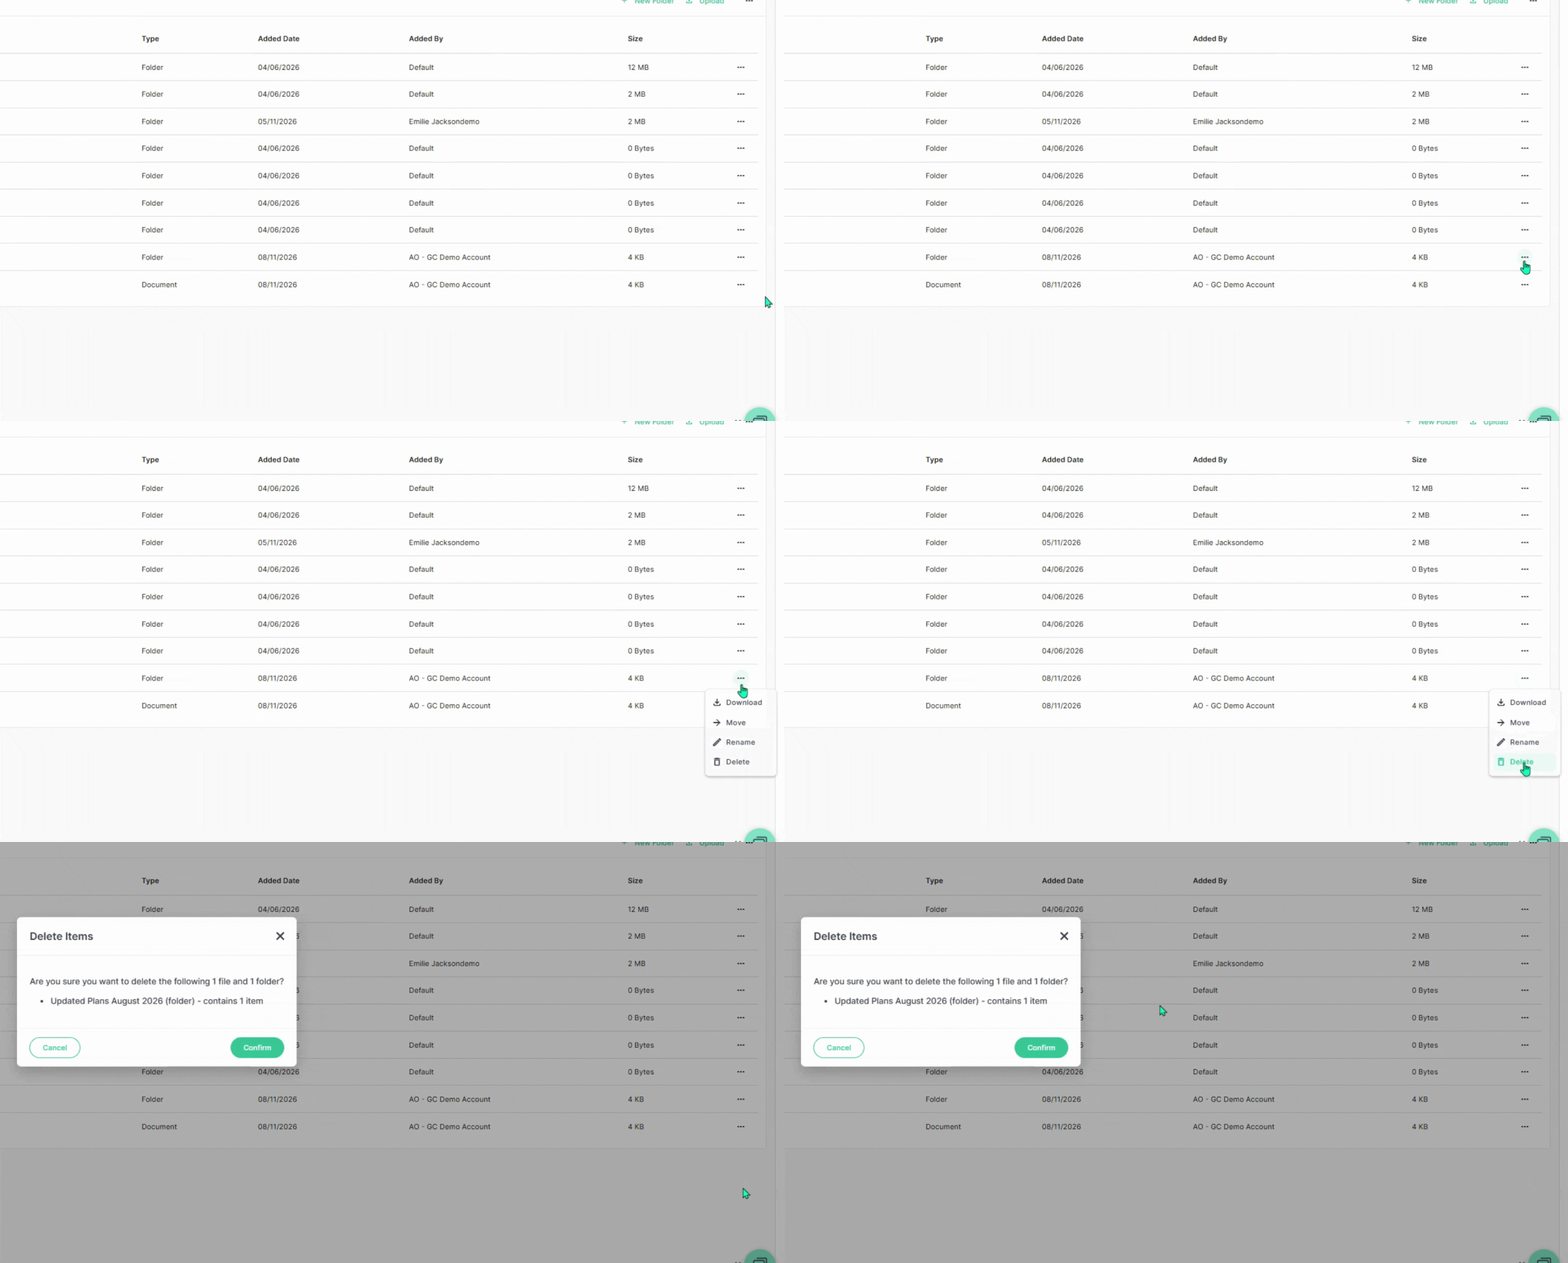
**Step 10:** To delete a folder or file, use the **three dots action menu**, select **Delete**, then confirm your choice when prompted.
---
### Adding, Editing, or Deleting Files through Project Edit Mode
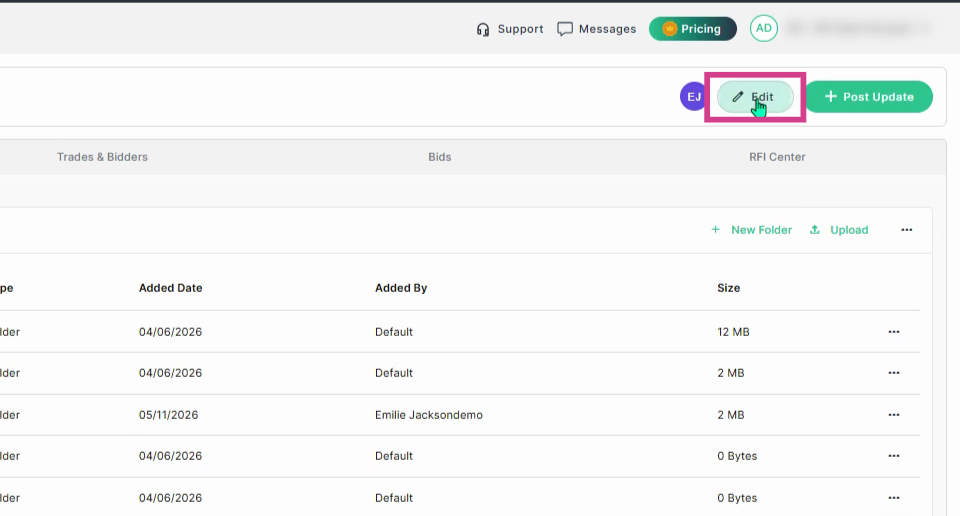
**Step 1:** From the project page, click **Edit** in the top right corner.
**Step 2:** Under the **Files** tab, click **New Folder** and enter a folder name. Then, click **Save**.
**Step 3:** To upload a file document into a folder, select the folder then click **Upload** or **Browse** to locate and upload the file from your computer.
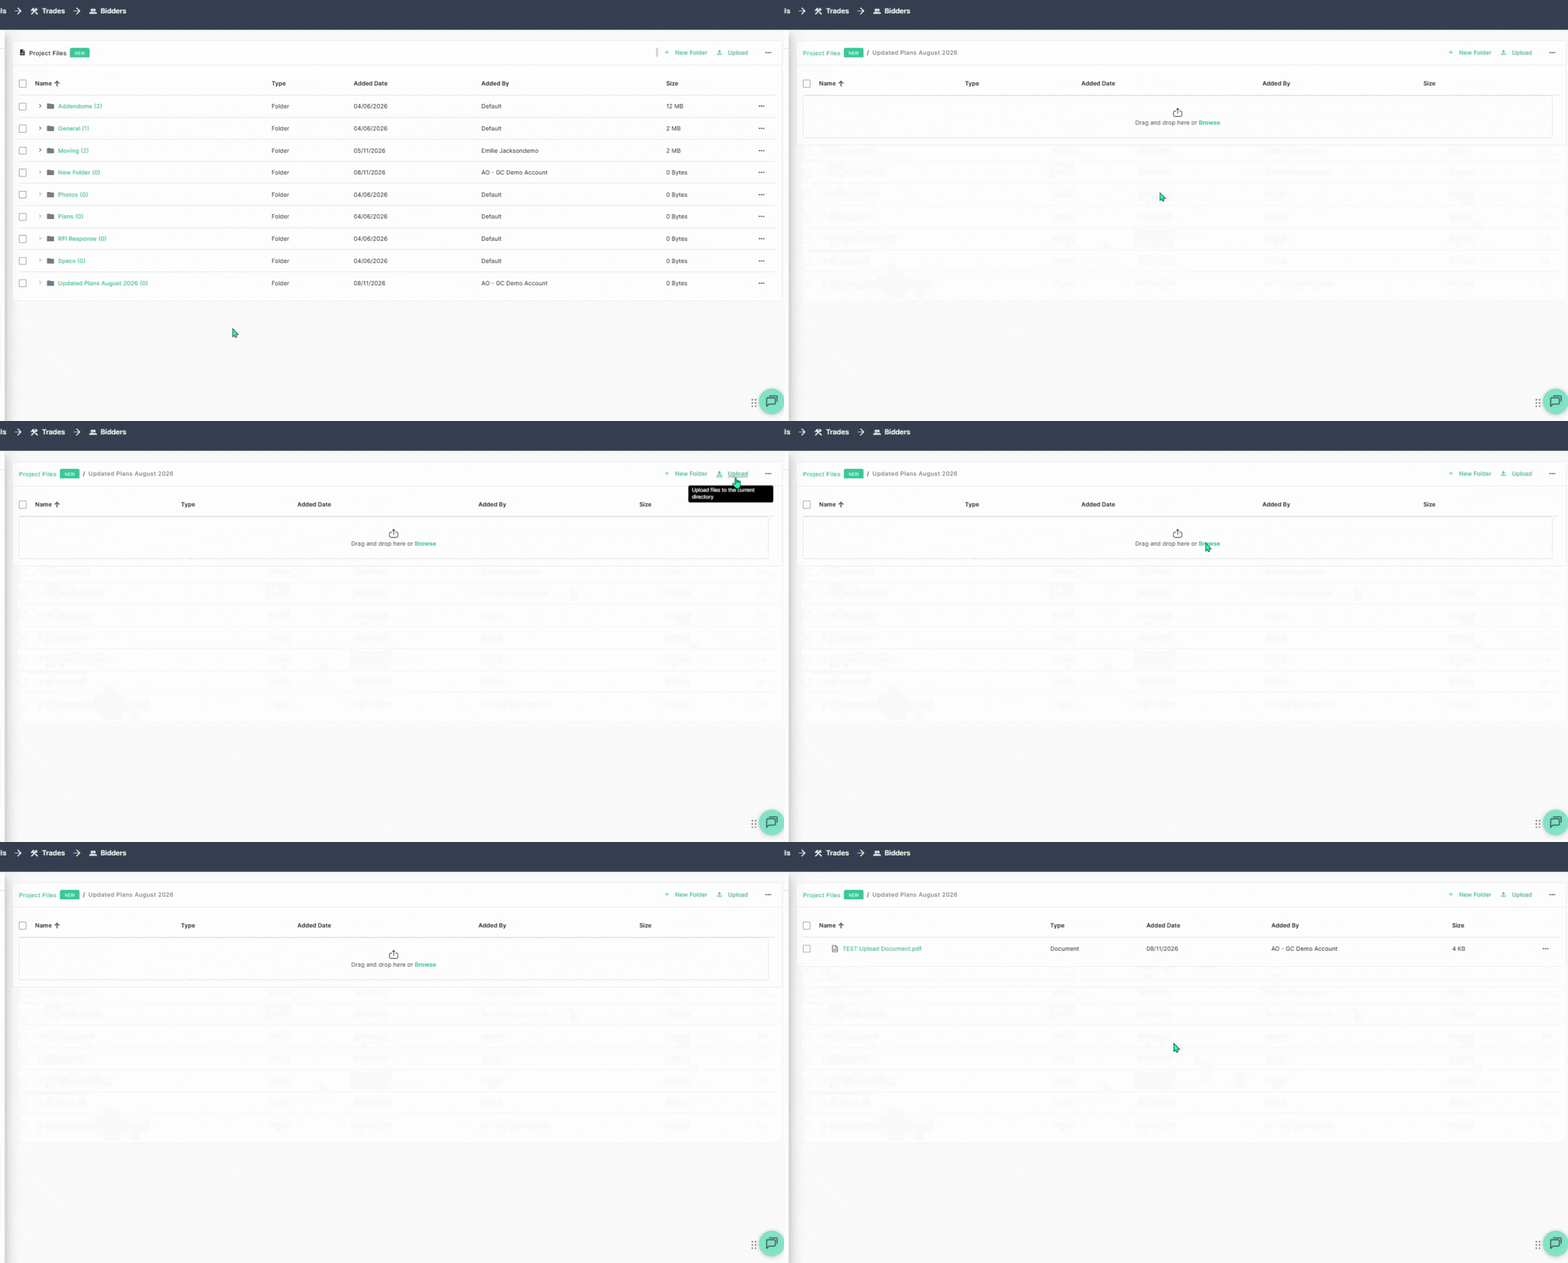
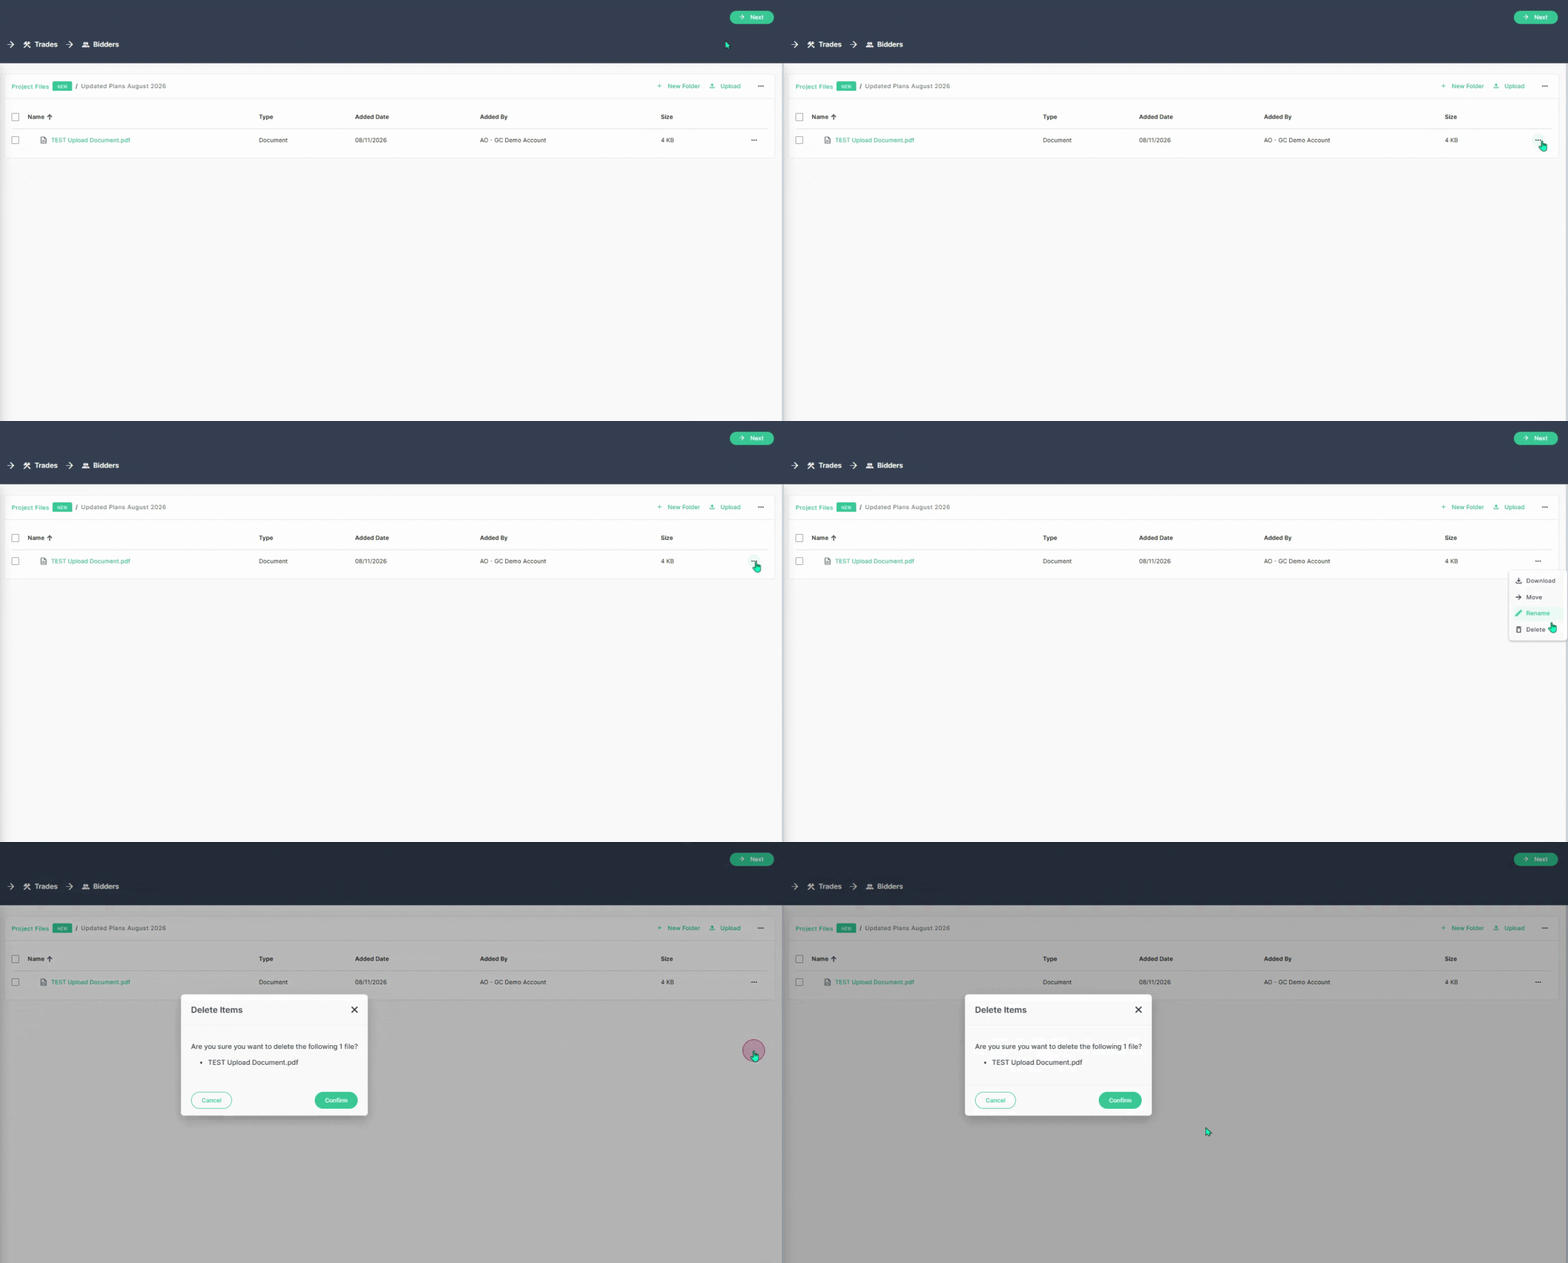
**Step 4:** To **delete** a file or folder, click the **three dots action menu**, choose **Delete**, and confirm.
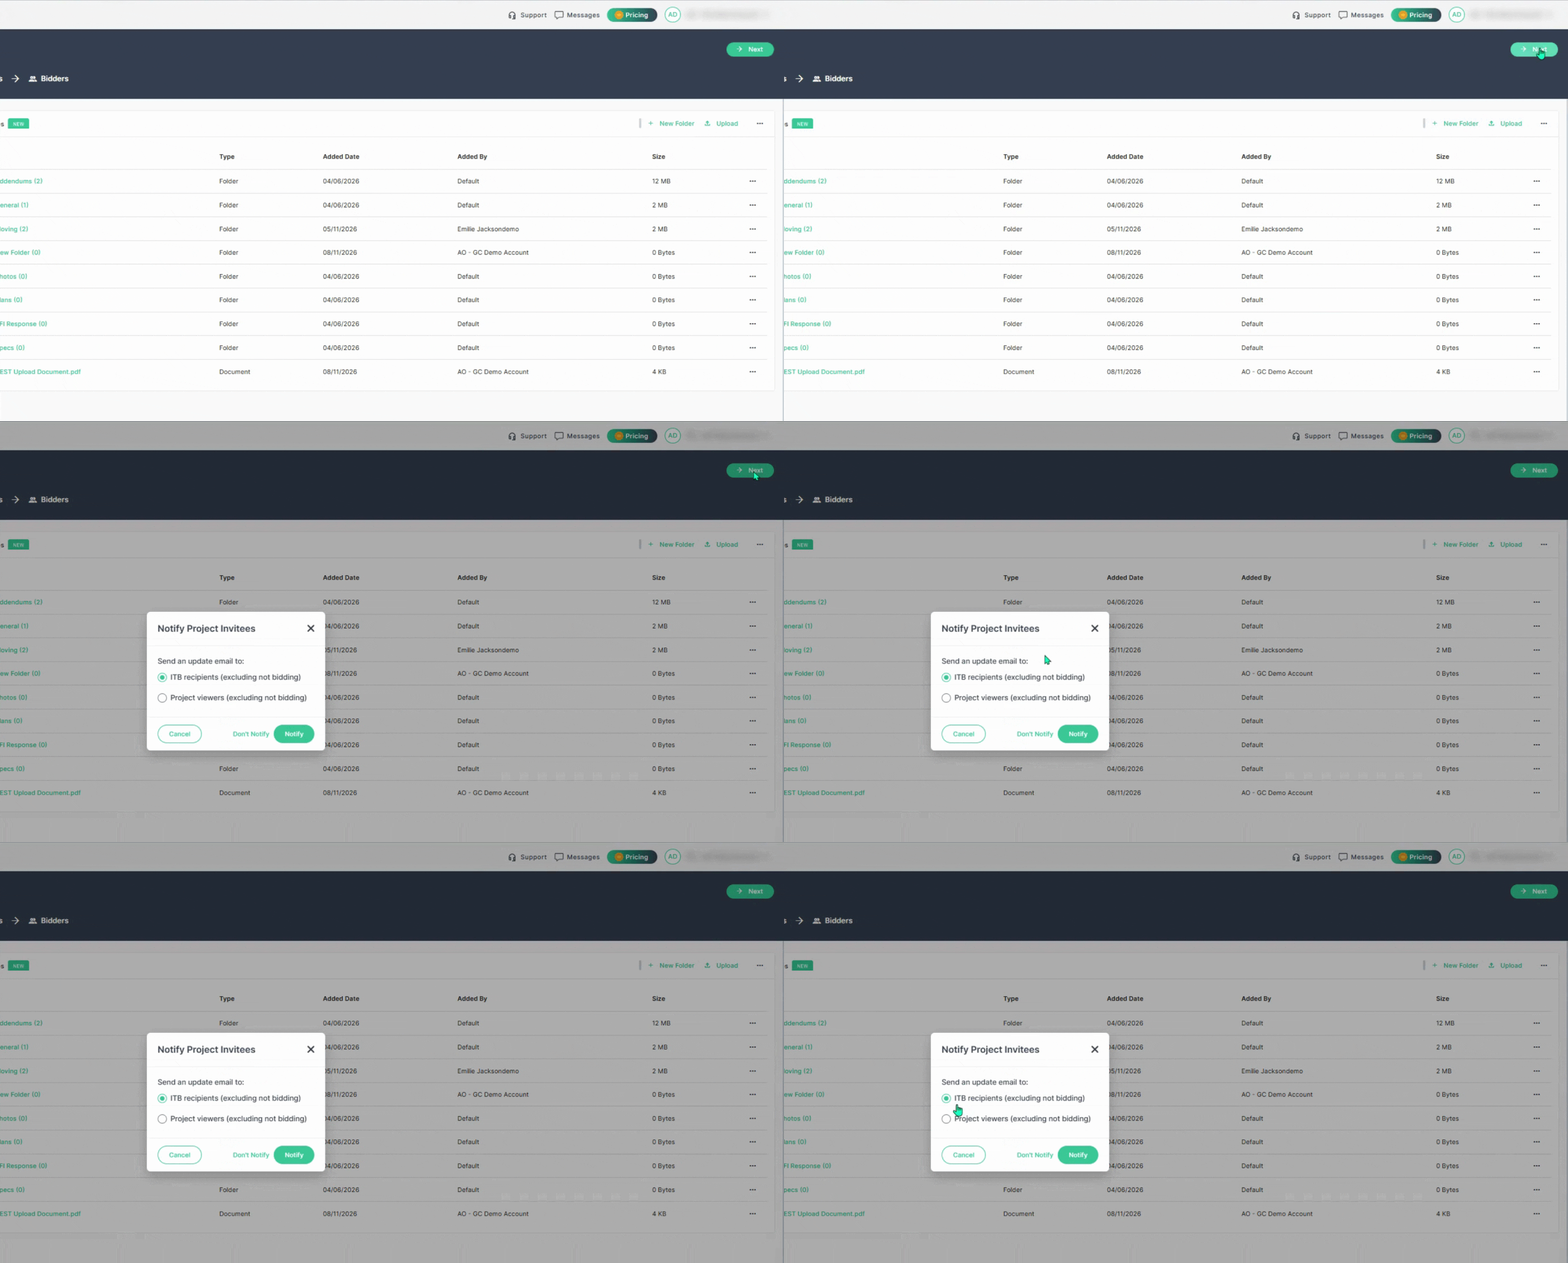
**Step 5:** Once you’ve added or updated files and folders, click **Next** in the upper right. You’ll see a the option to notify project recipients or viewers of the project by email (excluding those who are not bidding) make your selection, then click **Notify**.
---
### Working with Default and Uploaded Folders
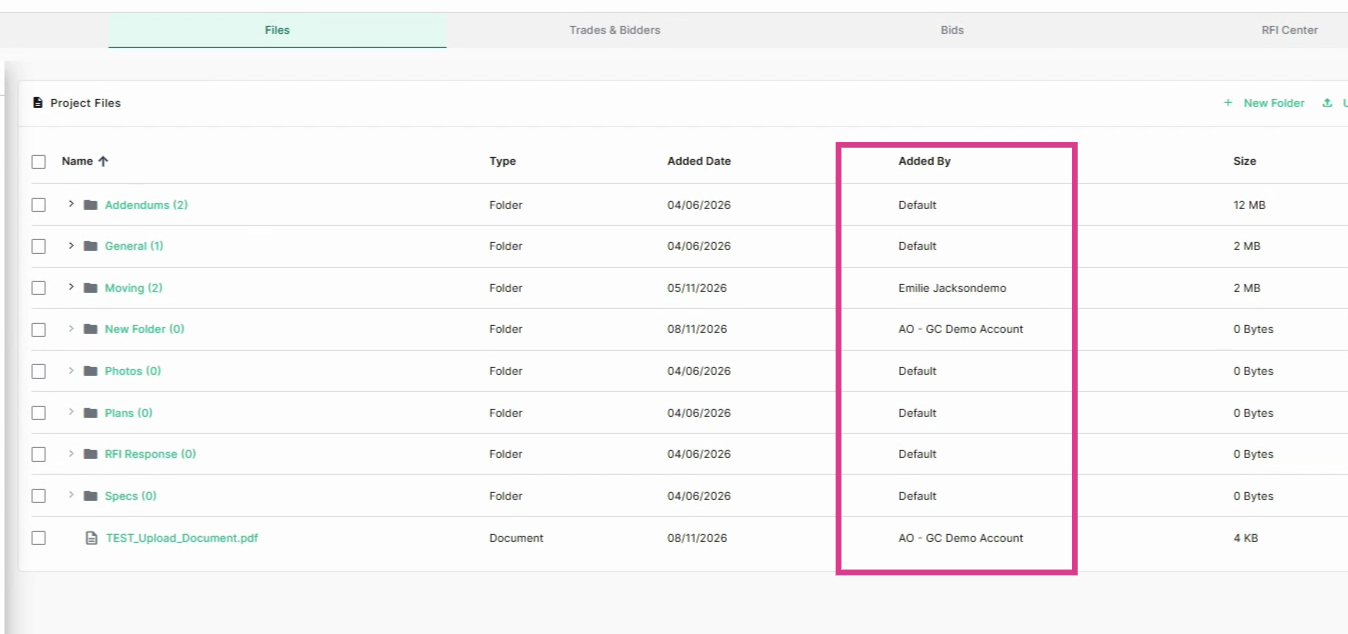
**Note:** Default folders cannot be moved, renamed, or deleted. You can download documents inside these folders.
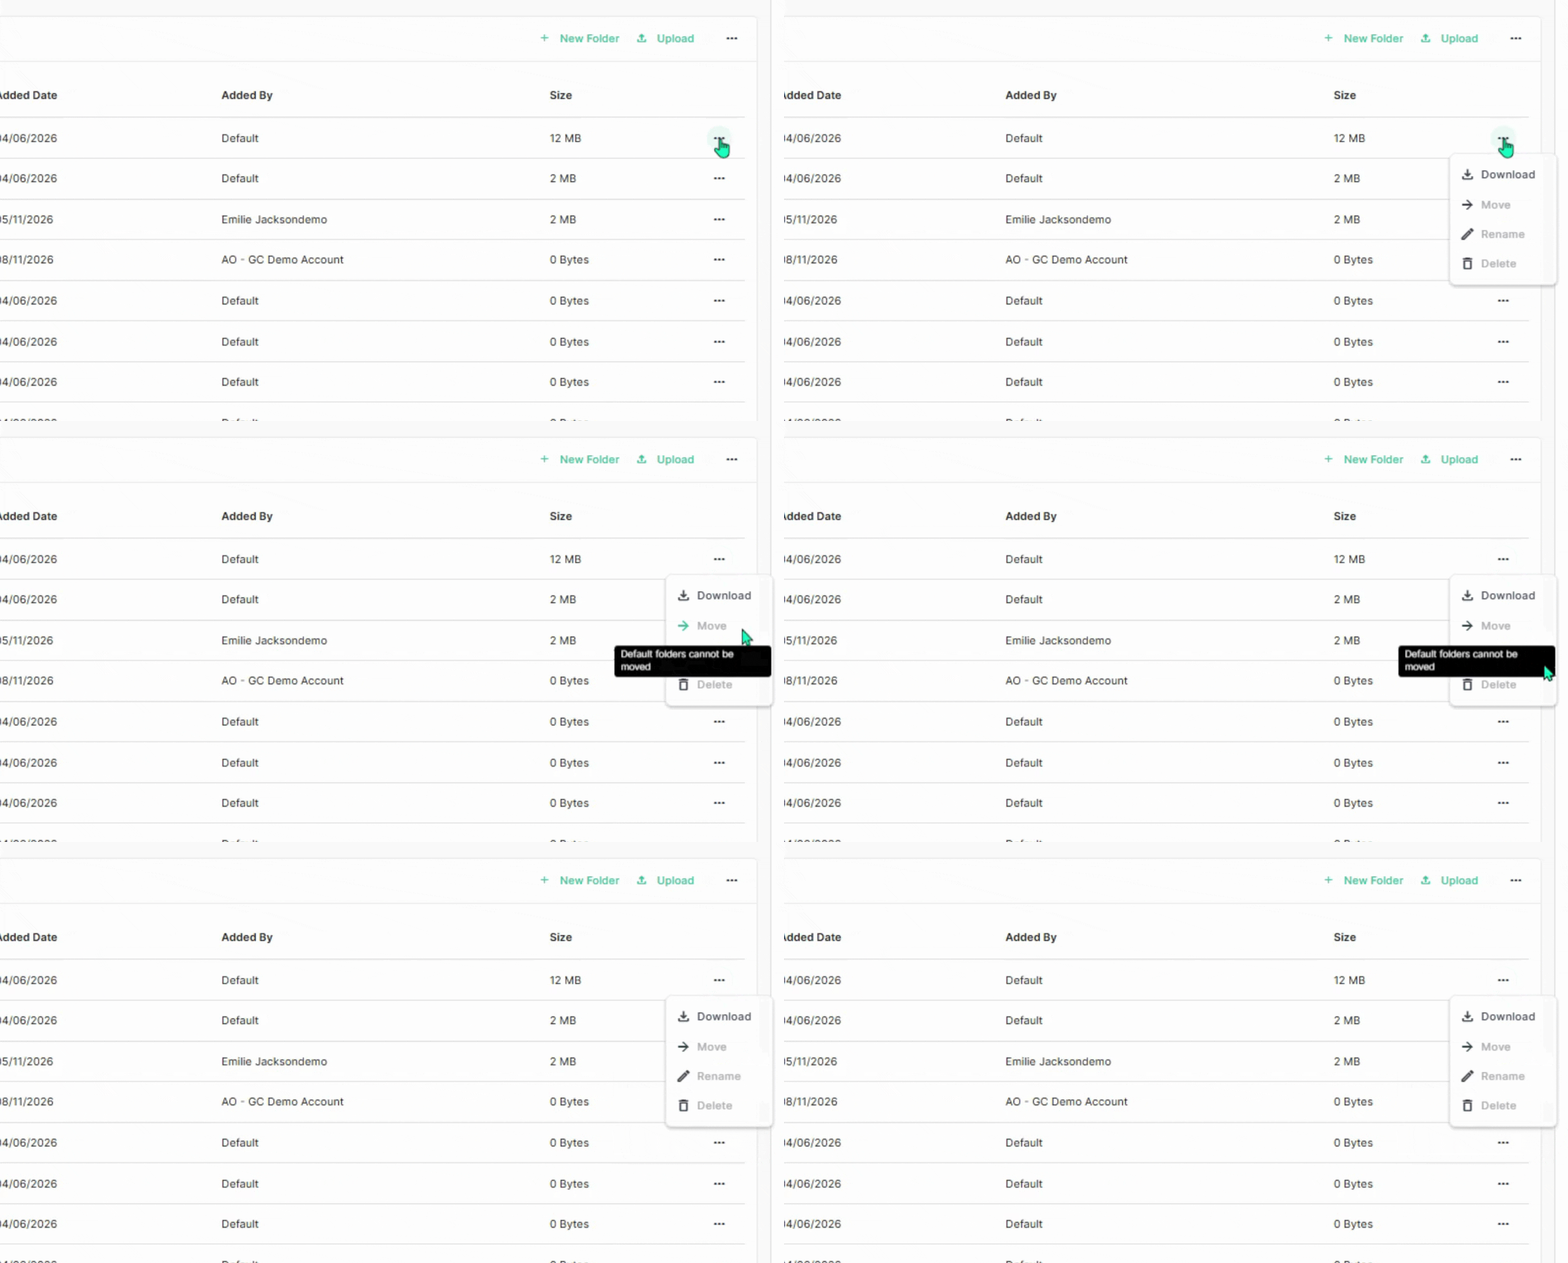
**Step 1:** Identify default folders in the **Added By** column—they’re marked accordingly.
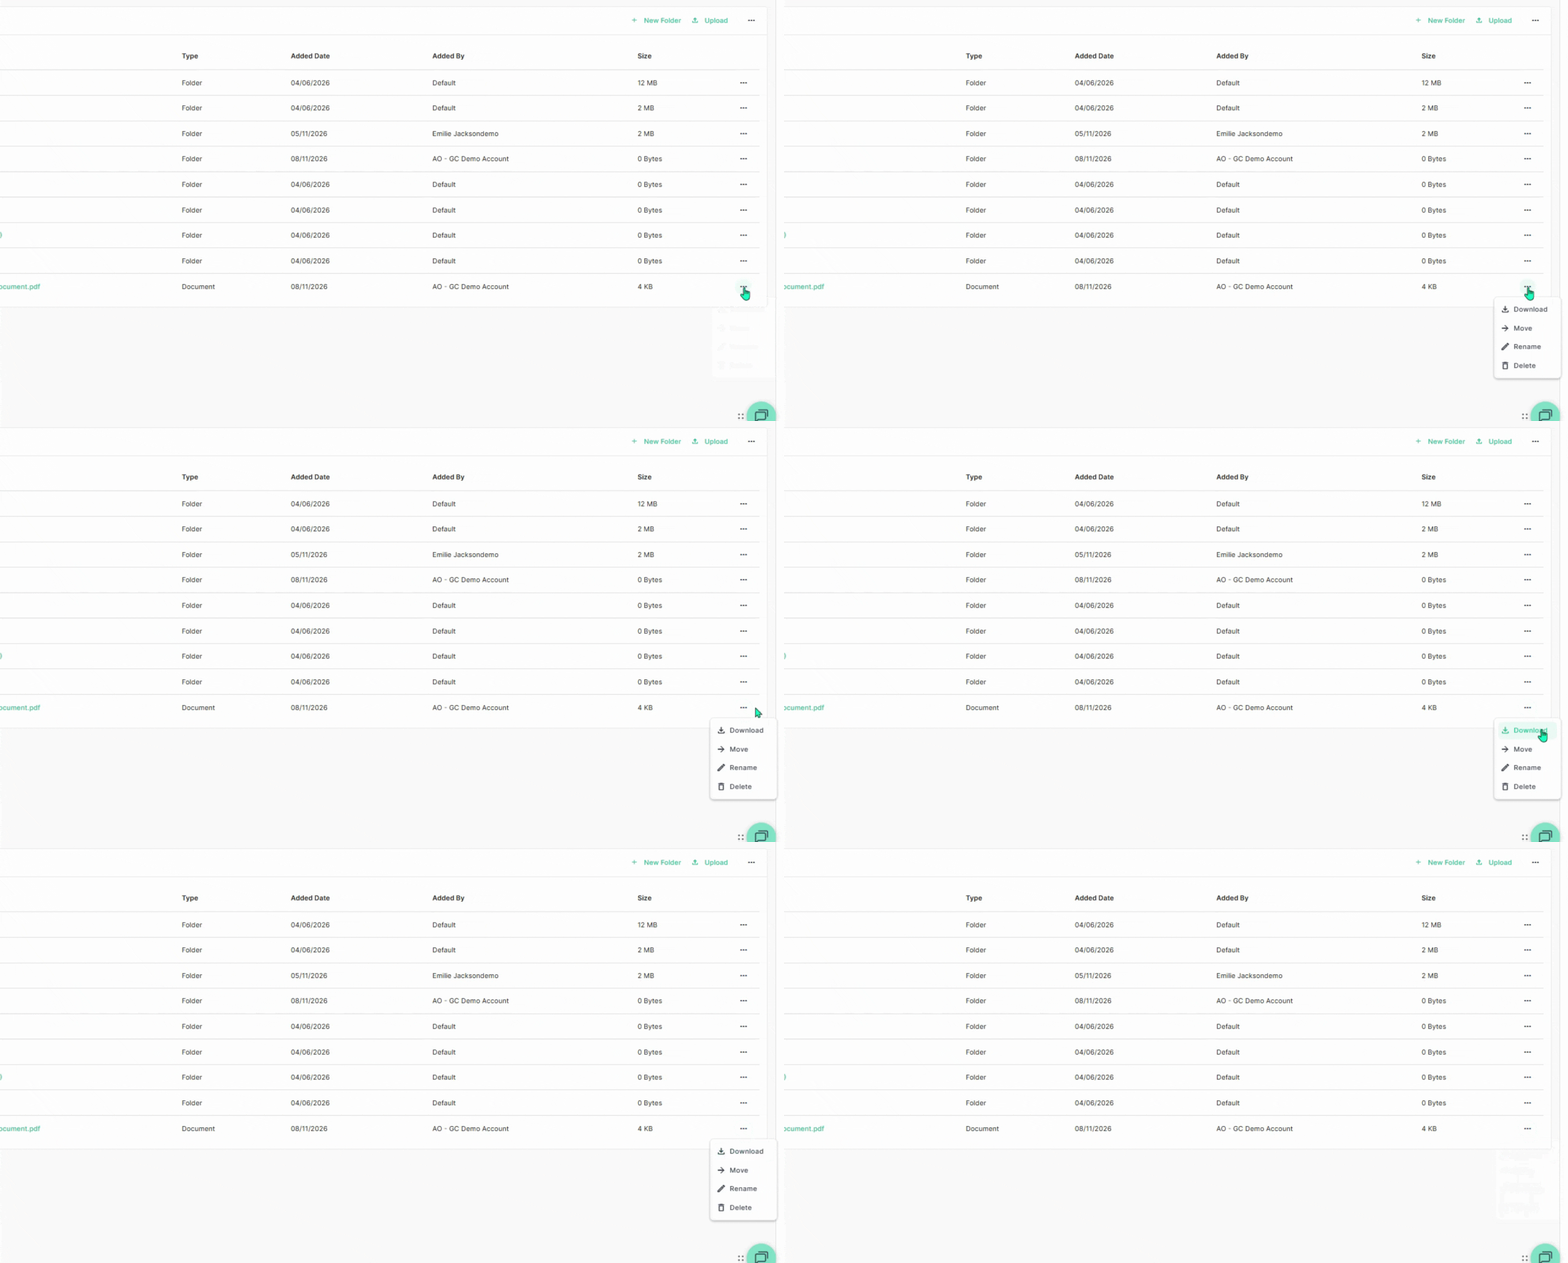
**Step 3:** Download files from any folder you’ve created or from default folders by clicking the **three dots action menu** next to the file.
As a general contractor, keeping your project files organized makes it easier to manage documents, collaborate with your team, receive accurate bids, and keep your projects moving forward.
### Troubleshooting
Contact us if you need assistance or to report an issue:
- planHub Contact Page: [https://planhub.com/contact/](https://planhub.com/contact/)
- Customer Facing Support Ticket Link: [https://knowledgebase.planhub.com/knowledge/kb-tickets/new](https://knowledgebase.planhub.com/knowledge/kb-tickets/new?hsLang=en)
- Customer Success Team: [CustomerSuccess@planhub.com](mailto:CustomerSuccess@planhub.com)
- [General Contractor](https://knowledgebase.planhub.com/knowledge/general-contractor?hsLang=en#main-content)
- [Overview](https://knowledgebase.planhub.com/knowledge/general-contractor?hsLang=en#overview)
- [Projects](https://knowledgebase.planhub.com/knowledge/general-contractor?hsLang=en#projects)
- [Networking](https://knowledgebase.planhub.com/knowledge/general-contractor?hsLang=en#networking)
- [Subcontractors](https://knowledgebase.planhub.com/knowledge/subcontractors?hsLang=en#main-content)
- [Overview](https://knowledgebase.planhub.com/knowledge/subcontractors?hsLang=en#overview)
- [Projects](https://knowledgebase.planhub.com/knowledge/subcontractors?hsLang=en#projects)
- [Bid Board & Tracking](https://knowledgebase.planhub.com/knowledge/subcontractors?hsLang=en#bid-board-tracking)
- [Networking](https://knowledgebase.planhub.com/knowledge/subcontractors?hsLang=en#networking)
- [Takeoff & Estimation](https://knowledgebase.planhub.com/knowledge/subcontractors?hsLang=en#takeoff-estimation)
- [Manage Your Team](https://knowledgebase.planhub.com/knowledge/subcontractors?hsLang=en#manage-your-team)
- [Account & Settings](https://knowledgebase.planhub.com/knowledge/subcontractors?hsLang=en#account-settings)
- [Job Board](https://knowledgebase.planhub.com/knowledge/subcontractors?hsLang=en#job-board)
- [Request for Information](https://knowledgebase.planhub.com/knowledge/subcontractors?hsLang=en#request-for-information)
- [Supplier](https://knowledgebase.planhub.com/knowledge/supplier?hsLang=en#main-content)
- [Overview](https://knowledgebase.planhub.com/knowledge/supplier?hsLang=en#overview)
- [Projects and Leads](https://knowledgebase.planhub.com/knowledge/supplier?hsLang=en#projects-and-leads)
- [Bidding & Estimating](https://knowledgebase.planhub.com/knowledge/supplier?hsLang=en#bidding-estimating)
- [Networking](https://knowledgebase.planhub.com/knowledge/supplier?hsLang=en#networking)
- [Account & Settings](https://knowledgebase.planhub.com/knowledge/supplier?hsLang=en#account-settings)
- [Takeoff & Estimation](https://knowledgebase.planhub.com/knowledge/takeoff-estimation?hsLang=en#main-content)
- [Getting Started](https://knowledgebase.planhub.com/knowledge/takeoff-estimation?hsLang=en#getting-started)
- [Takeoff Tools & Measurements](https://knowledgebase.planhub.com/knowledge/takeoff-estimation?hsLang=en#takeoff-tools-measurements)
- [Trade-Specific Takeoffs](https://knowledgebase.planhub.com/knowledge/takeoff-estimation?hsLang=en#trade-specific-takeoffs)
- [Estimating](https://knowledgebase.planhub.com/knowledge/takeoff-estimation?hsLang=en#estimating)
- [Managing & Sharing Your Work](https://knowledgebase.planhub.com/knowledge/takeoff-estimation?hsLang=en#managing-sharing-your-work)
- [Account & Billing](https://knowledgebase.planhub.com/knowledge/account-billing?hsLang=en#main-content)
- [Account & Billing](https://knowledgebase.planhub.com/knowledge/account-billing?hsLang=en#account-billing)
- [Account Closure](https://knowledgebase.planhub.com/knowledge/account-billing?hsLang=en#account-closure)
- [Troubleshooting](https://knowledgebase.planhub.com/knowledge/troubleshooting?hsLang=en)
- [About PlanHub](https://knowledgebase.planhub.com/knowledge/about-planhub?hsLang=en)
- [New General Contractor Experience](https://knowledgebase.planhub.com/knowledge/new-general-contractor-experience?hsLang=en#main-content)
- [Overview](https://knowledgebase.planhub.com/knowledge/new-general-contractor-experience?hsLang=en#overview)
- [Projects](https://knowledgebase.planhub.com/knowledge/new-general-contractor-experience?hsLang=en#projects)
- [Networking](https://knowledgebase.planhub.com/knowledge/new-general-contractor-experience?hsLang=en#networking)
- [Takeoff & Estimation](https://knowledgebase.planhub.com/knowledge/new-general-contractor-experience?hsLang=en#takeoff-estimation)
- [Account & Settings](https://knowledgebase.planhub.com/knowledge/new-general-contractor-experience?hsLang=en#account-settings)
- [Manage Your Team](https://knowledgebase.planhub.com/knowledge/new-general-contractor-experience?hsLang=en#manage-your-team)
- [Submit Feedback](https://knowledgebase.planhub.com/knowledge/submit-feedback?hsLang=en#main-content)
- [Feedback](https://knowledgebase.planhub.com/knowledge/submit-feedback?hsLang=en#feedback)
- [Have an Issue? Submit a Ticket](https://knowledgebase.planhub.com/knowledge/kb-tickets/new)
[](http://planhub.com)
[Knowledge Base Home](https://knowledgebase.planhub.com/knowledge?hsLang=en)
[Submit a Ticket](https://knowledgebase.planhub.com/knowledge/kb-tickets/new?hsLang=en)
Copyright © 2026, ©2026 PlanHub, Inc. All rights reserved