Introduction
Assemblies combine all the costs for a particular install so that you can estimate projects quickly and consistently. You’ll connect your takeoff measurements directly to your estimating workflow and automate cost calculations specific to your standard practices.
-
You will need access to Takeoff and the Estimation add-on Tool to build and use assemblies in PlanHub
There are four overall steps to building an assembly.
-
Fill Out Assembly Details, including the Name and Measurement Type.
-
Add your Cost Items and fill in their details.
-
Apply Formulas to each Cost Item.
-
Save the assembly and Test it.
Each step is required and must be completed to build an assembly
Prepare Your Takeoff
Make sure you've already completed the key takeoff measurement for your install (for example, measuring floor area for Luxury Vinyl Tile). This foundational measurement is critical since your assembly will reference it later.
Create an Assembly from Scratch
Step 1: Assembly Building
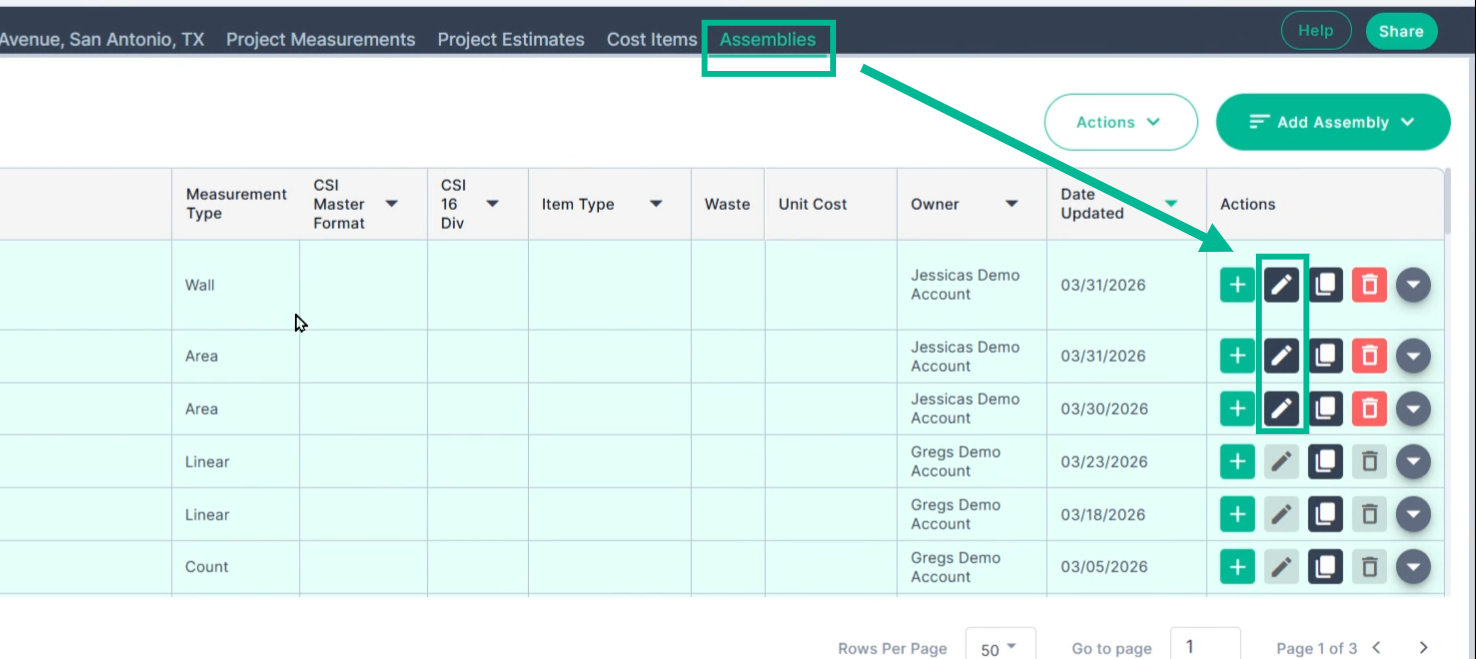
Click the Assemblies tab at the top of the screen.

Step 2: Click "Add Assembly"
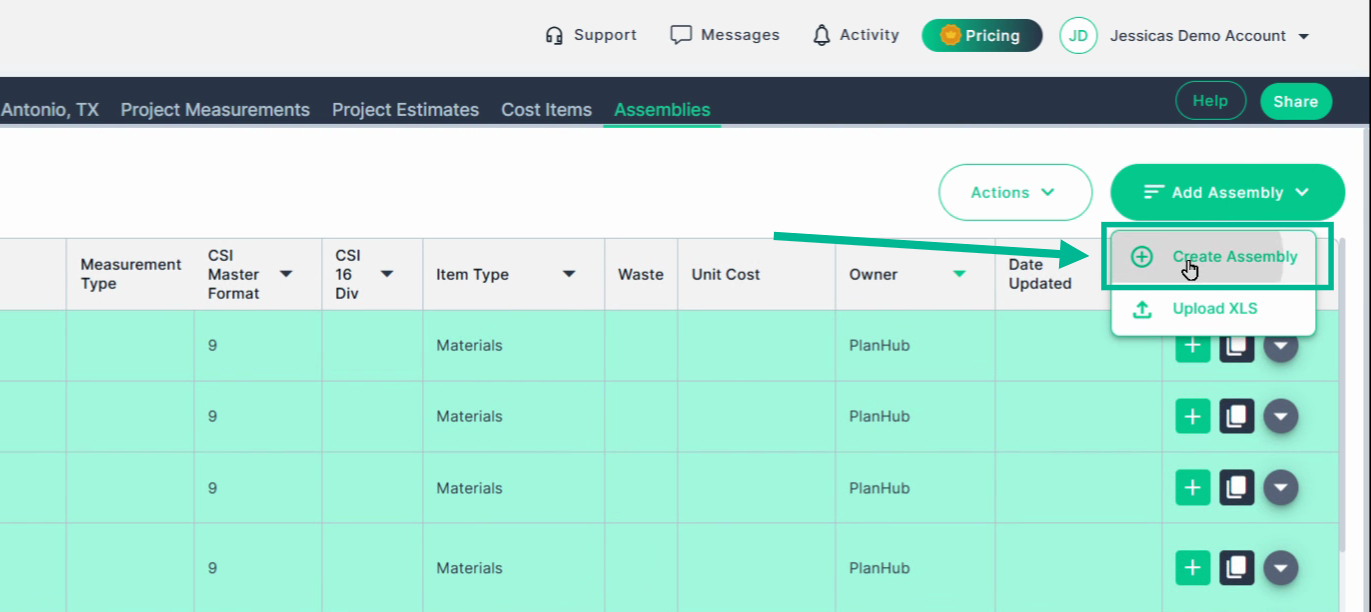
Click Add Assembly in the header menu.
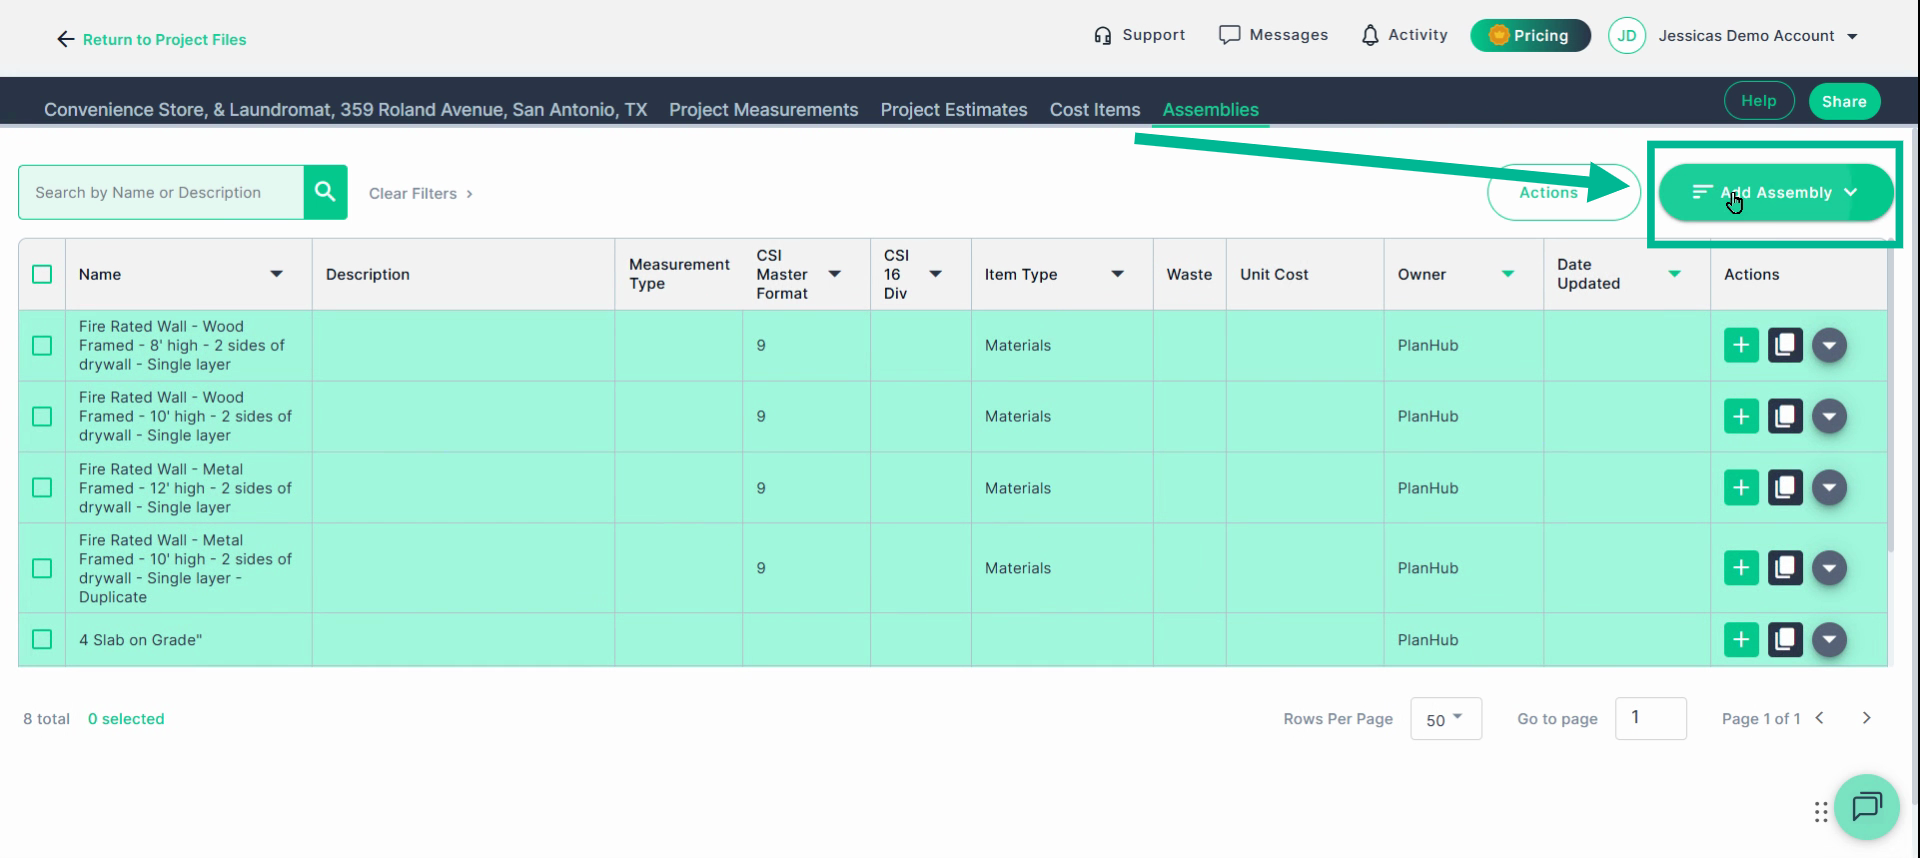
Choose Create Assembly from the dropdown.
Assembly Building
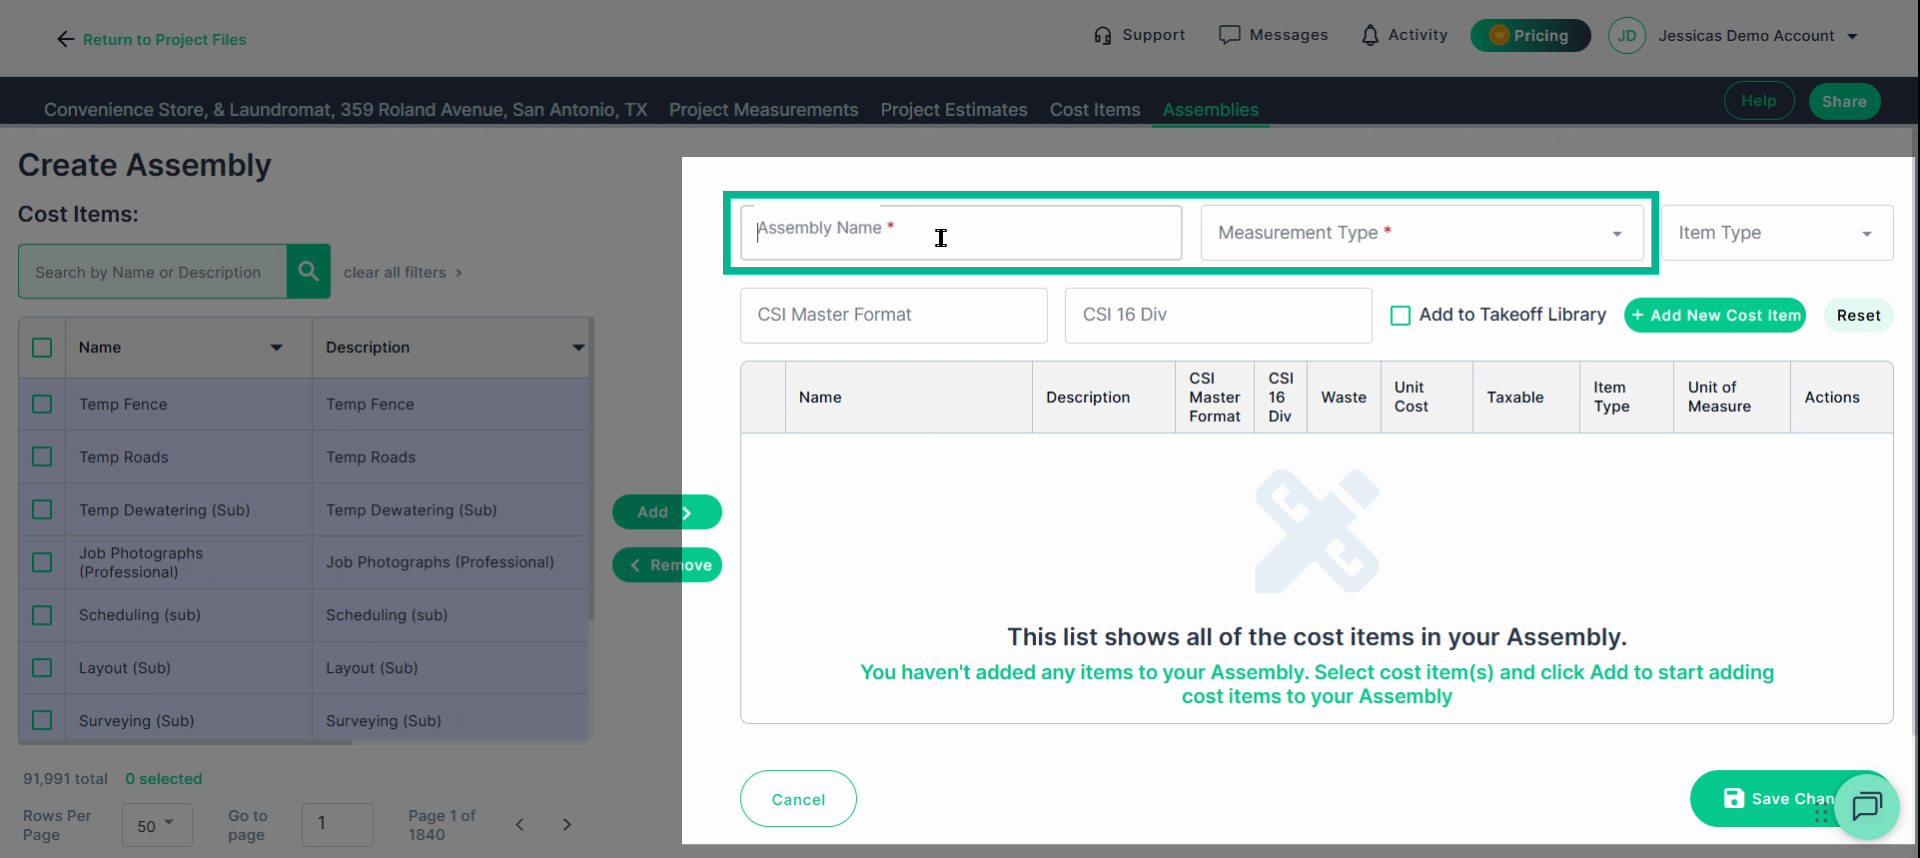
Step 1: Fill Out Assembly Details
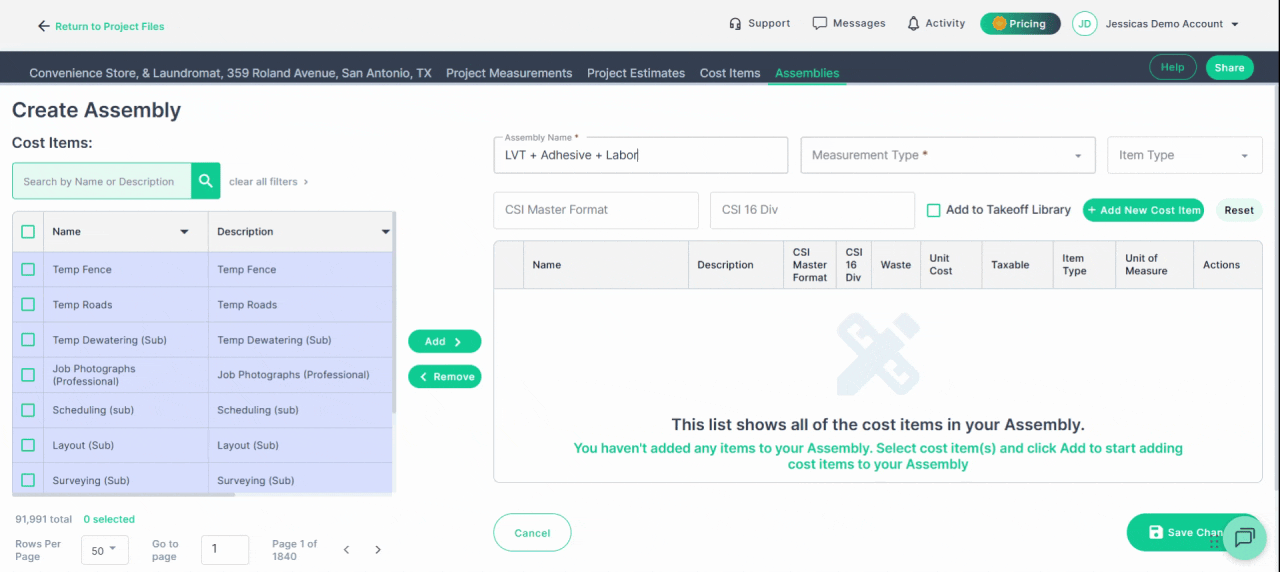
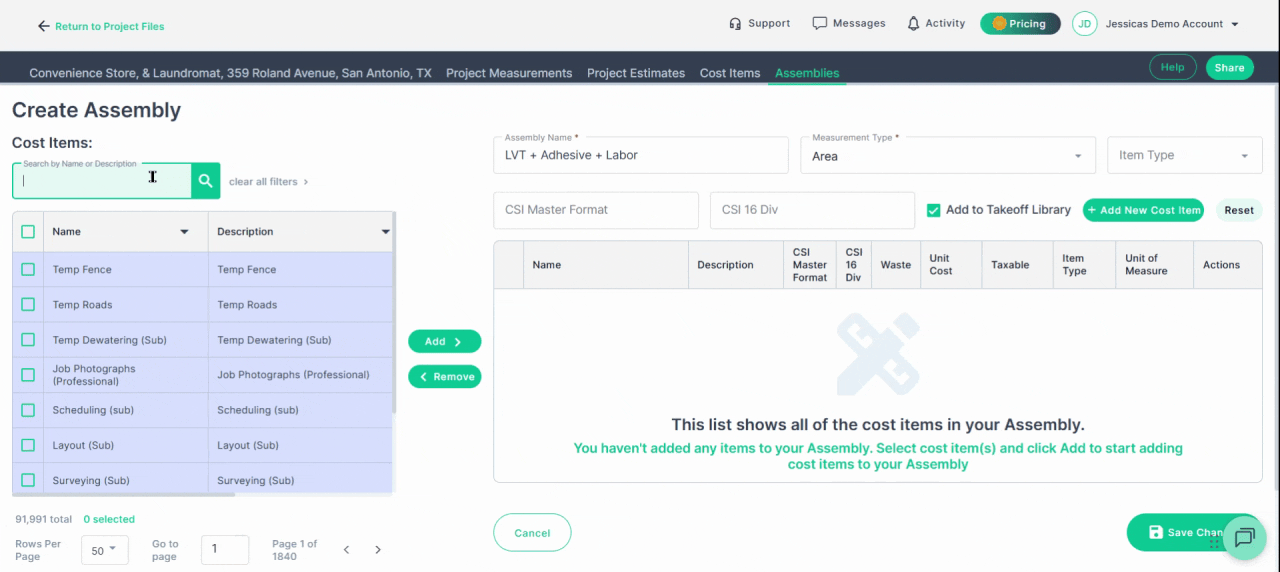
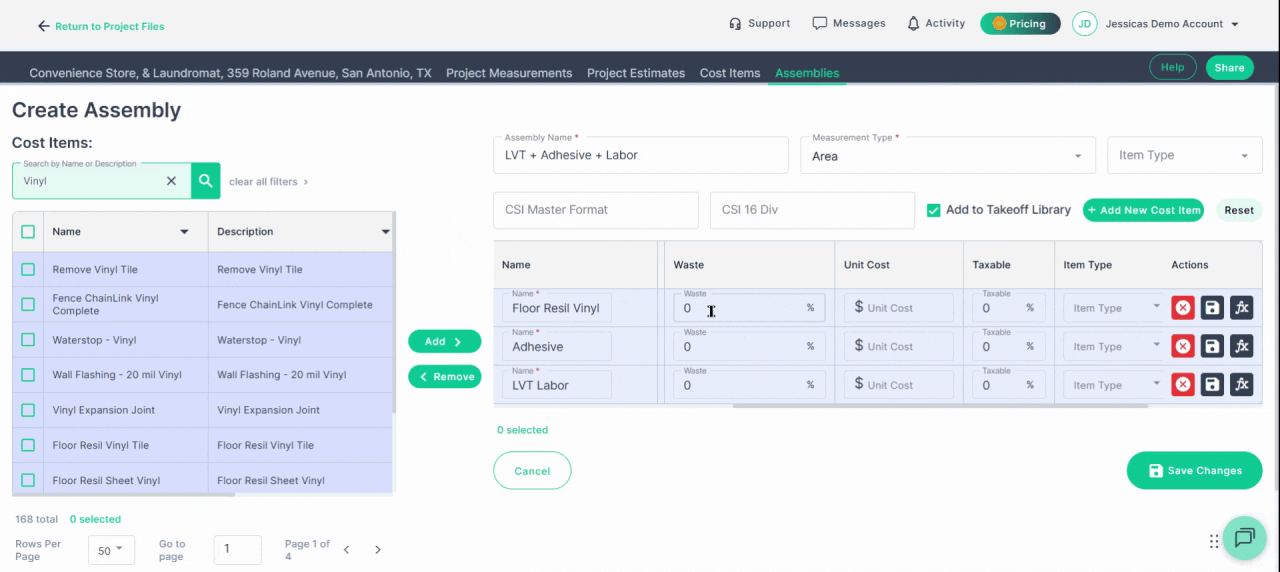
Name your assembly clearly and descriptively based on the project and install type (for example, "LVT + Adhesive + Labor").
Step 1.1:
Select the Measurement Type (such as Area, Linear, or Count) that matches your takeoff tool. Example: For flooring, select Area.
Step 2: Add Cost Items
Step 2.1: Cost Item Library
Use the Cost Item Library to search for and add materials, labor, or equipment items you need.
-
Check off items you wish to use in the Assembly and click "Add"
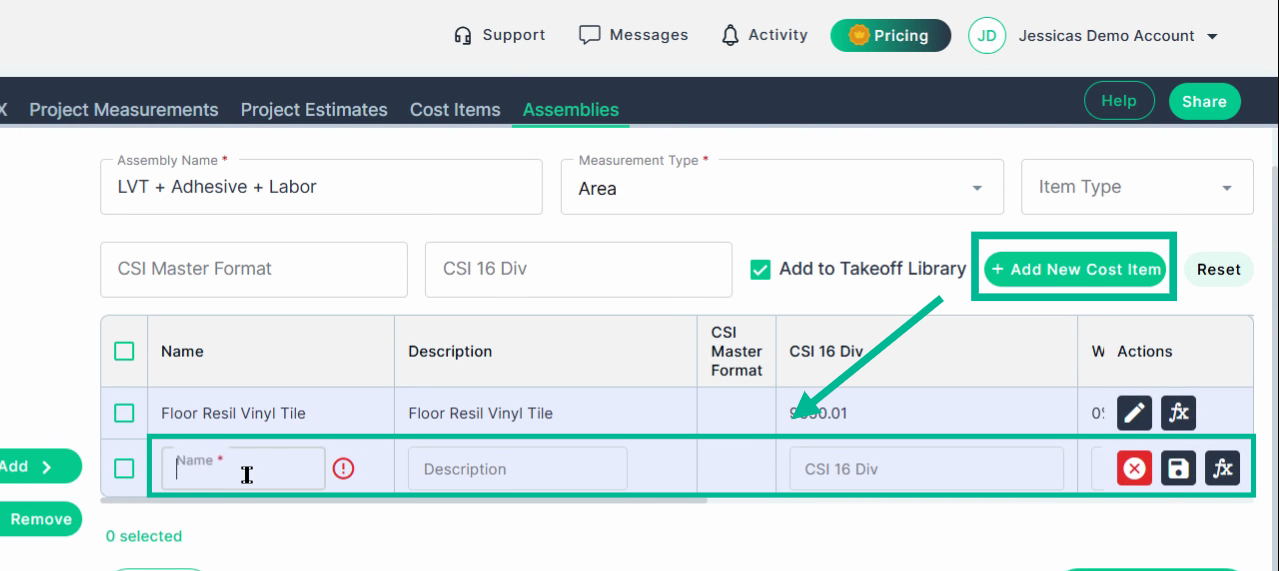
Step 2.2: Manually Create Cost Items
If preferred or needed, create a new cost item from scratch using Add New Cost Item, and fill in all the required fields, beginning with the item name.
-
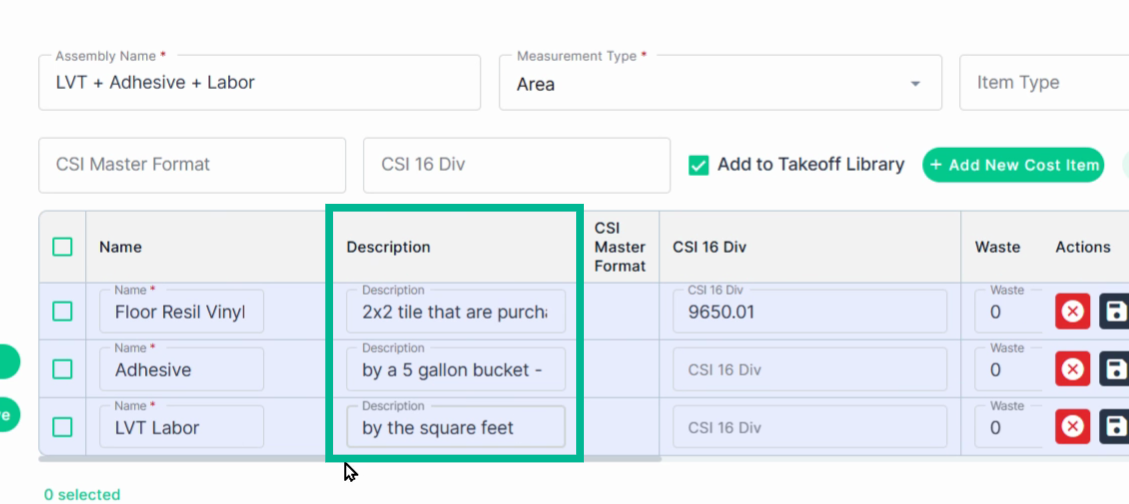
Edit each cost item, updating the Description field with important notes/details.
-
In this example, we added coverage rates and application notes in the Description for easy reference.
For example, in the description:
-
These tiles come in boxes of 54 sq ft.
-
Adhesive is bought by the 5-gallon bucket, covering 850 sq ft.
-
Labor is charged per square foot.
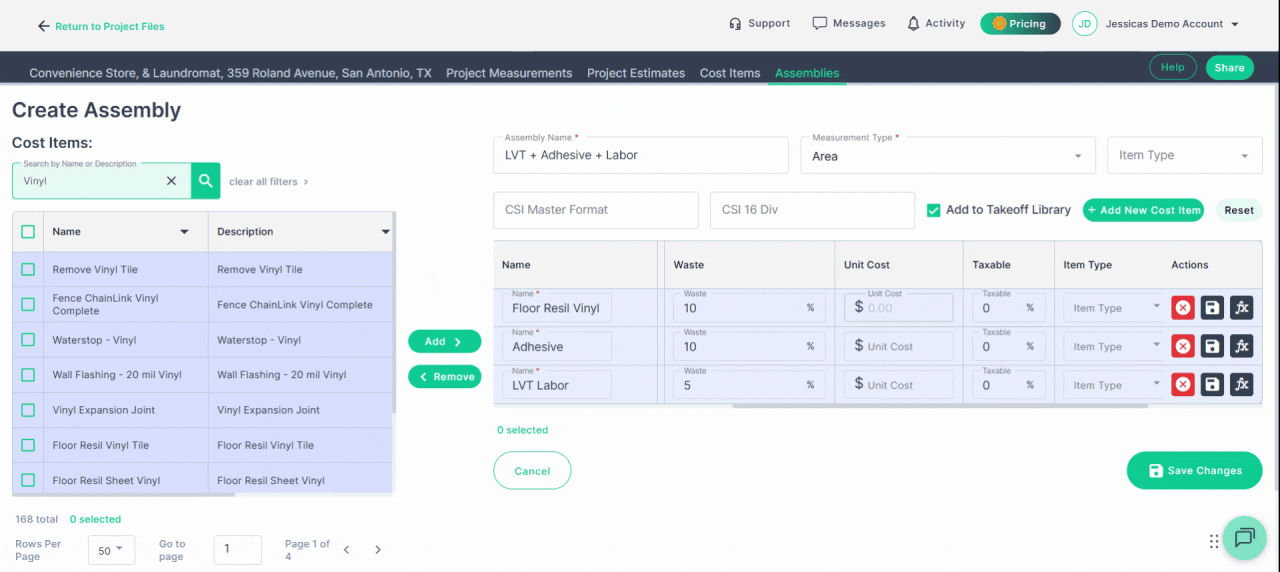
Step 2.3: Waste
Specify waste percentages as needed—such as 10% for LVT and adhesive, and 5% for labor—to make sure you cover overages.
-
Waste will increase your final assembly output by the percentage you entered
-
For example, 10% waste on 10 units would increase the units needed to 11 units.
Step 2.4: Unit Cost
If you know pricing per unit, enter the unit prices for each cost item:
-
The cost per box of tile, per 5-gallon bucket of adhesive, and labor per square foot.
Step 2.5: Tax %
Add tax if applicable.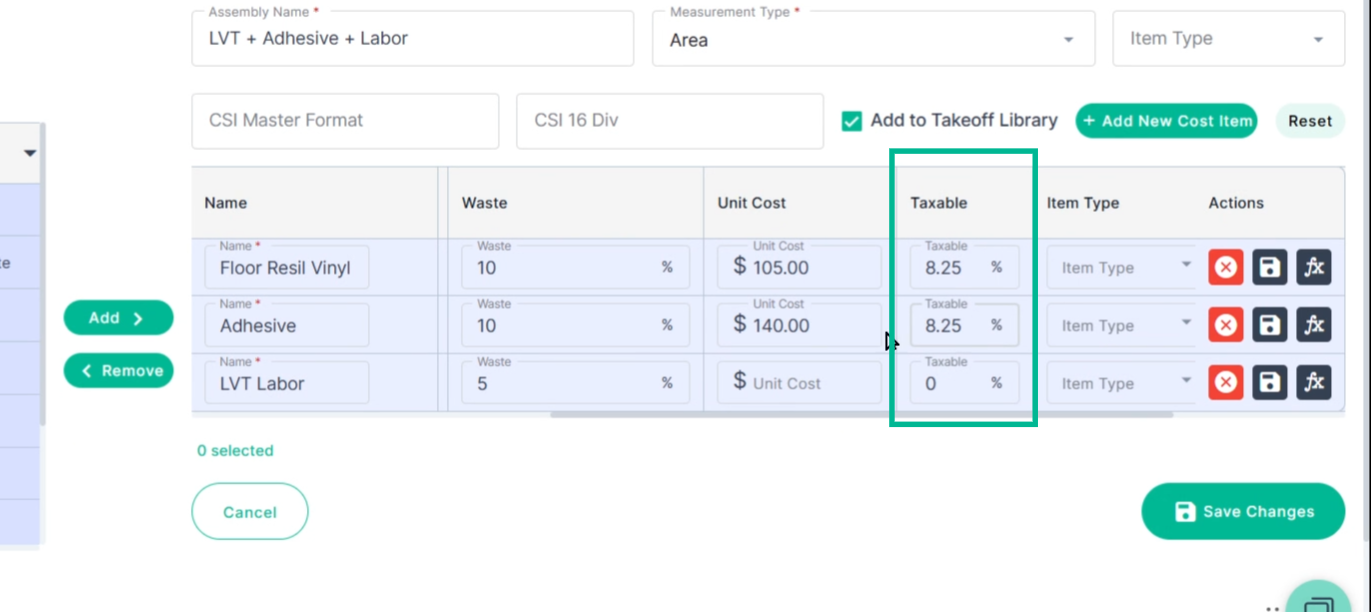
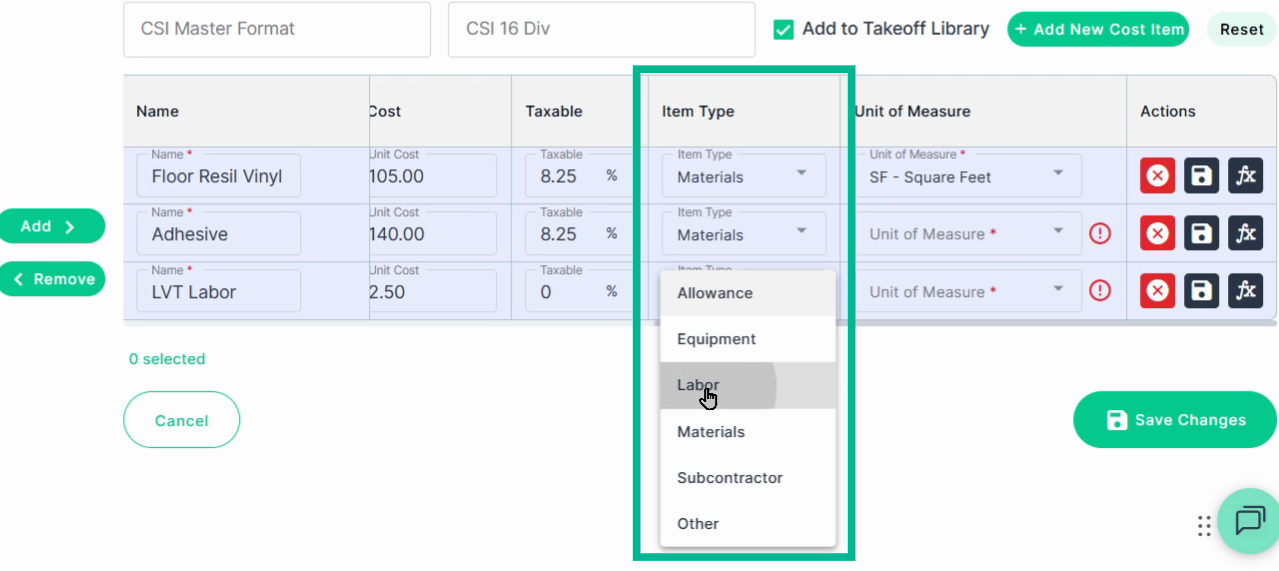
Step 2.6: Item Type
Assign an item type to each cost item
Example: We used Material for the tile and adhesive, then used Labor for the LVT Labor. Doing this helps you track expenses.
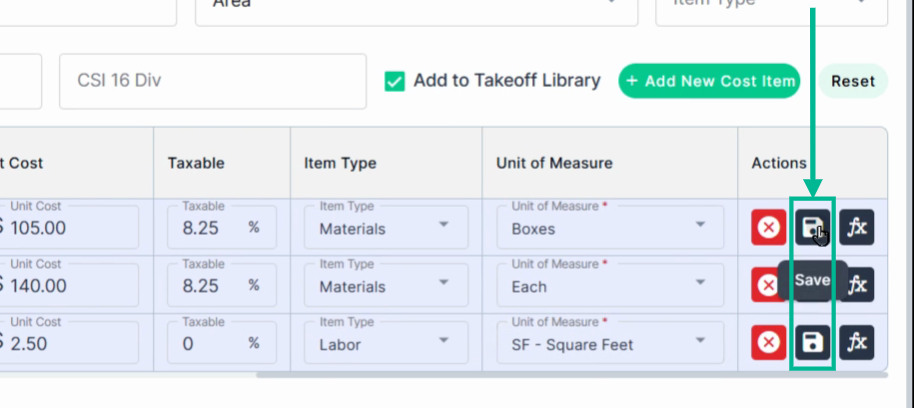
Step 2.7: Unit of Measure
Set the correct Unit of Measure for each item, matching how you buy or charge for it (e.g., "Boxes" for tile, "Each" for adhesive bucket, "Square Feet" for labor).
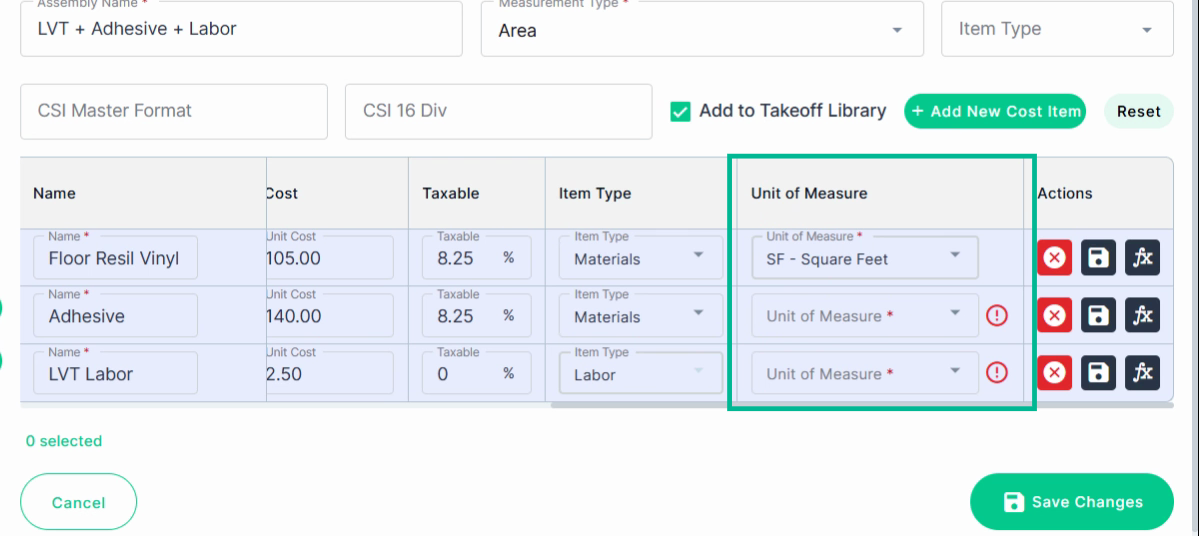
Step 2.7: Save Cost Item details
Click the Save icon on each cost item to save changes to your assembly’s cost items.
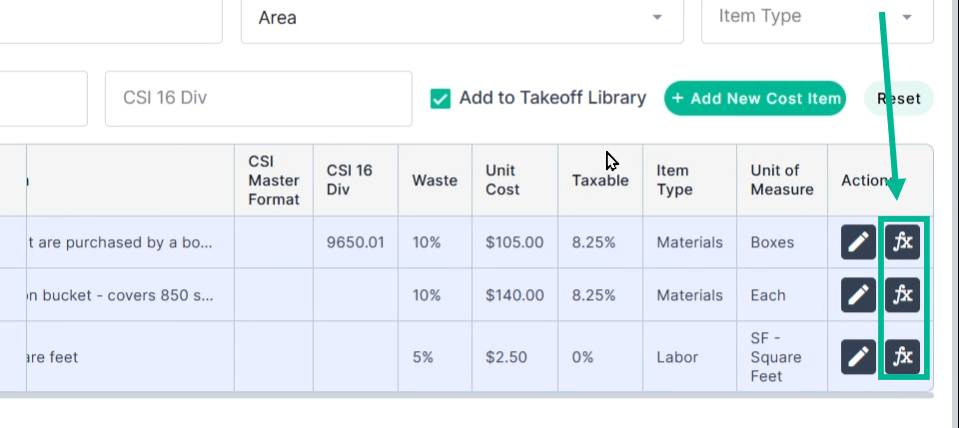
Step 3: Create and Apply Formulas
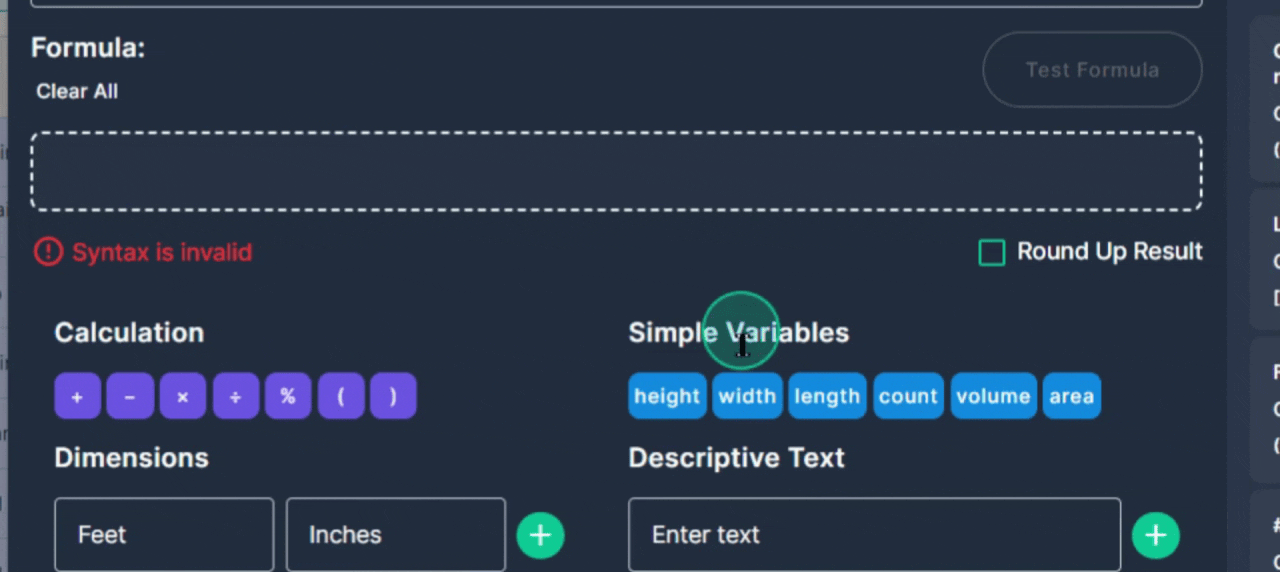
For each cost item, build a formula that converts your takeoff measurement into the appropriate quantity for ordering or costing. All Cost Items MUST have a Formula.
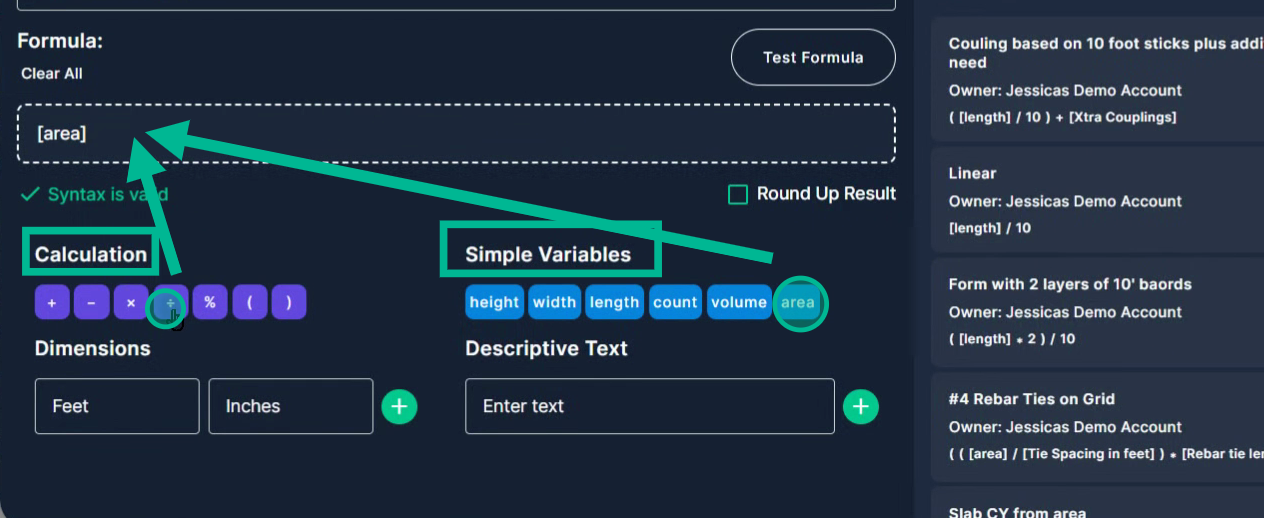
Step 3.1: Open Formula Builder
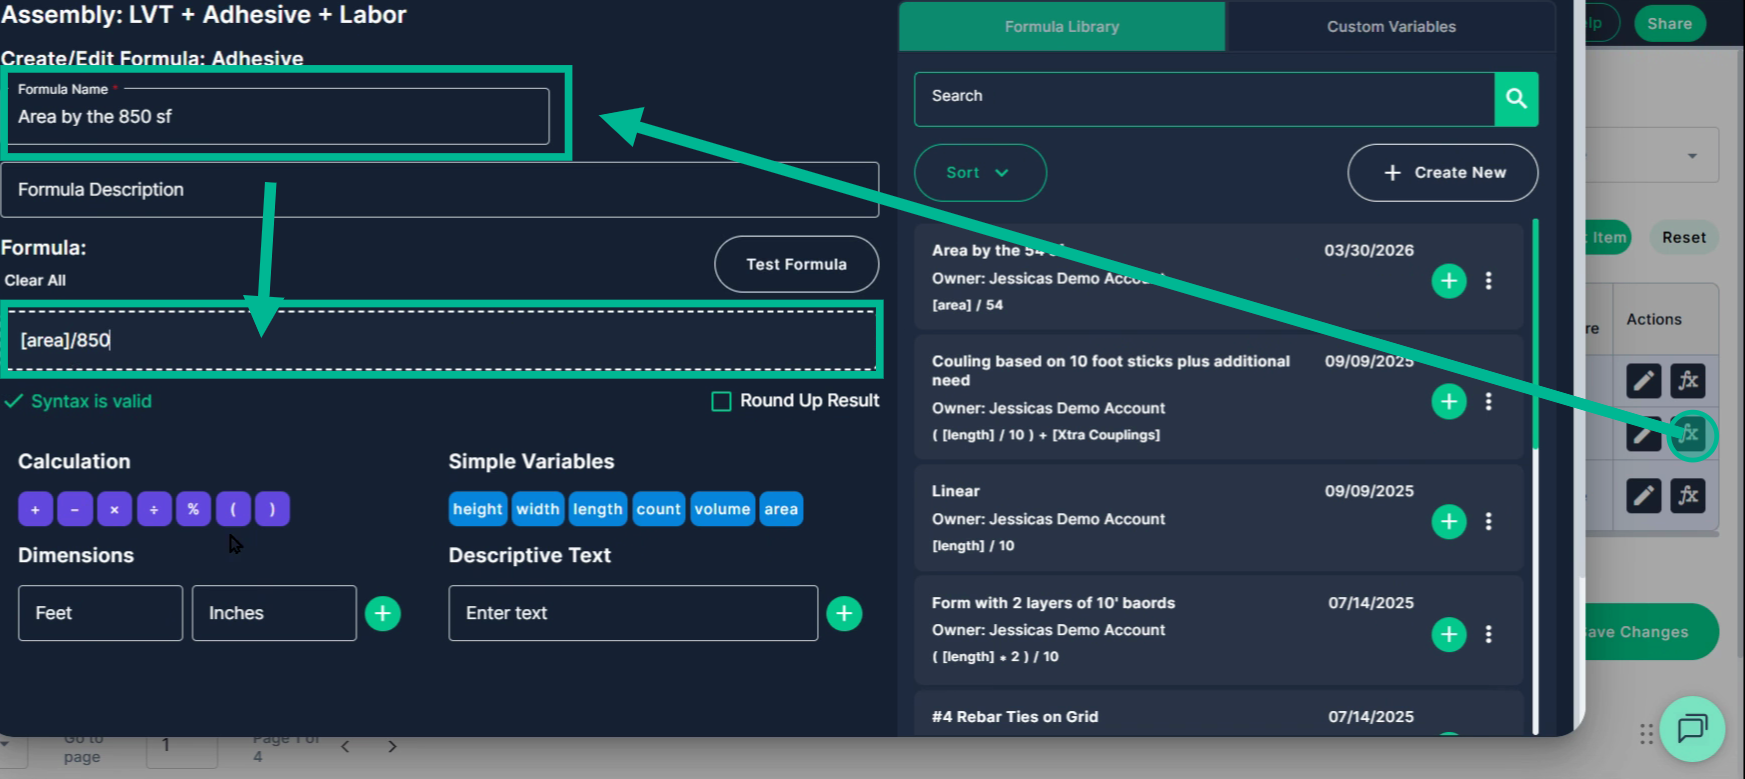
Click the formula (fx) icon to open the Formula builder.
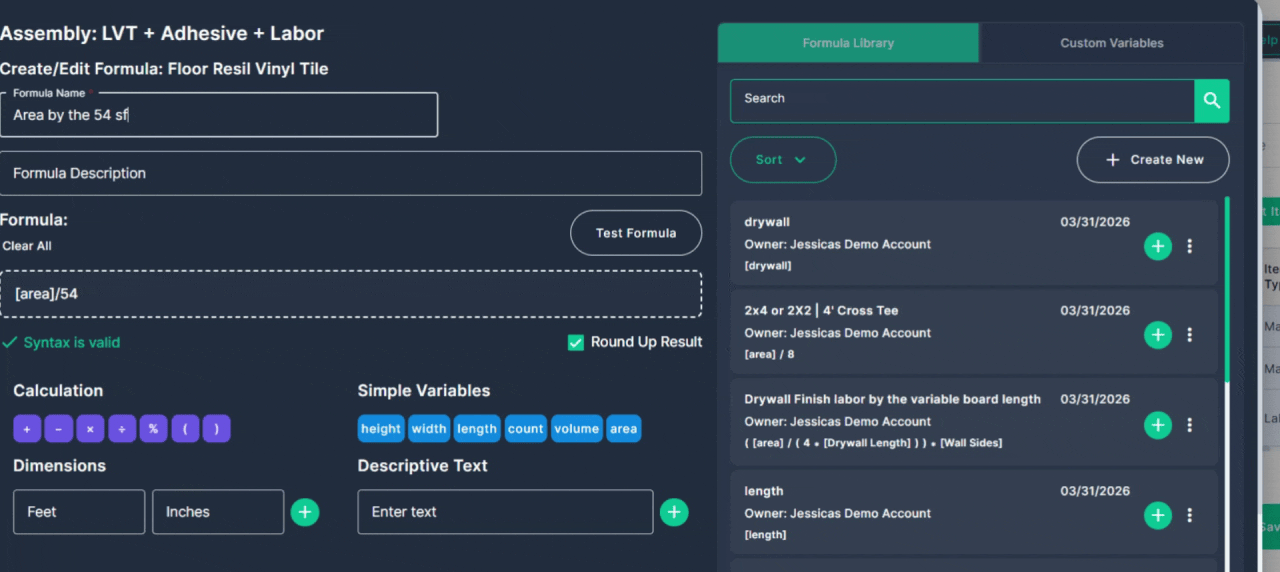
Step 3.2: Name Your Formula
Give your formula a clear, descriptive name (for example, "Boxes of LVT" or "Area by the 54 sf").
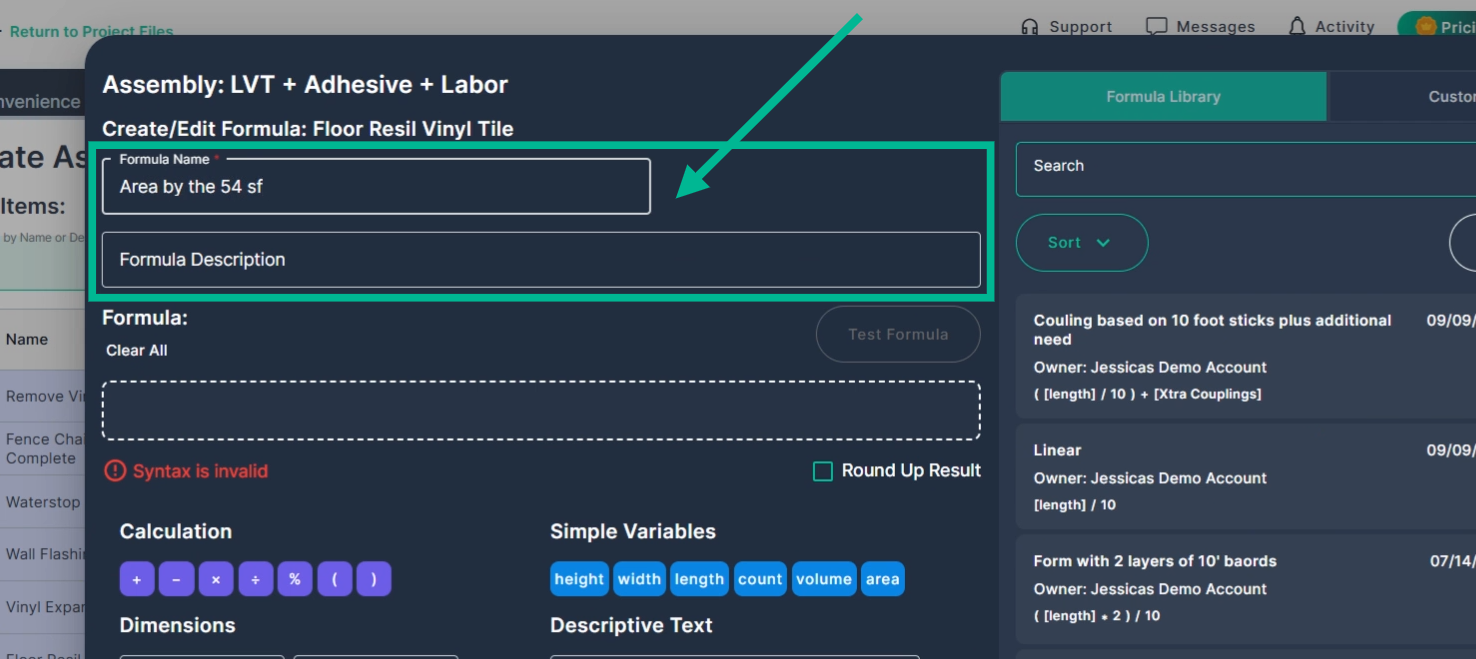
Step 3.3: Build the Formula for this Cost Item.
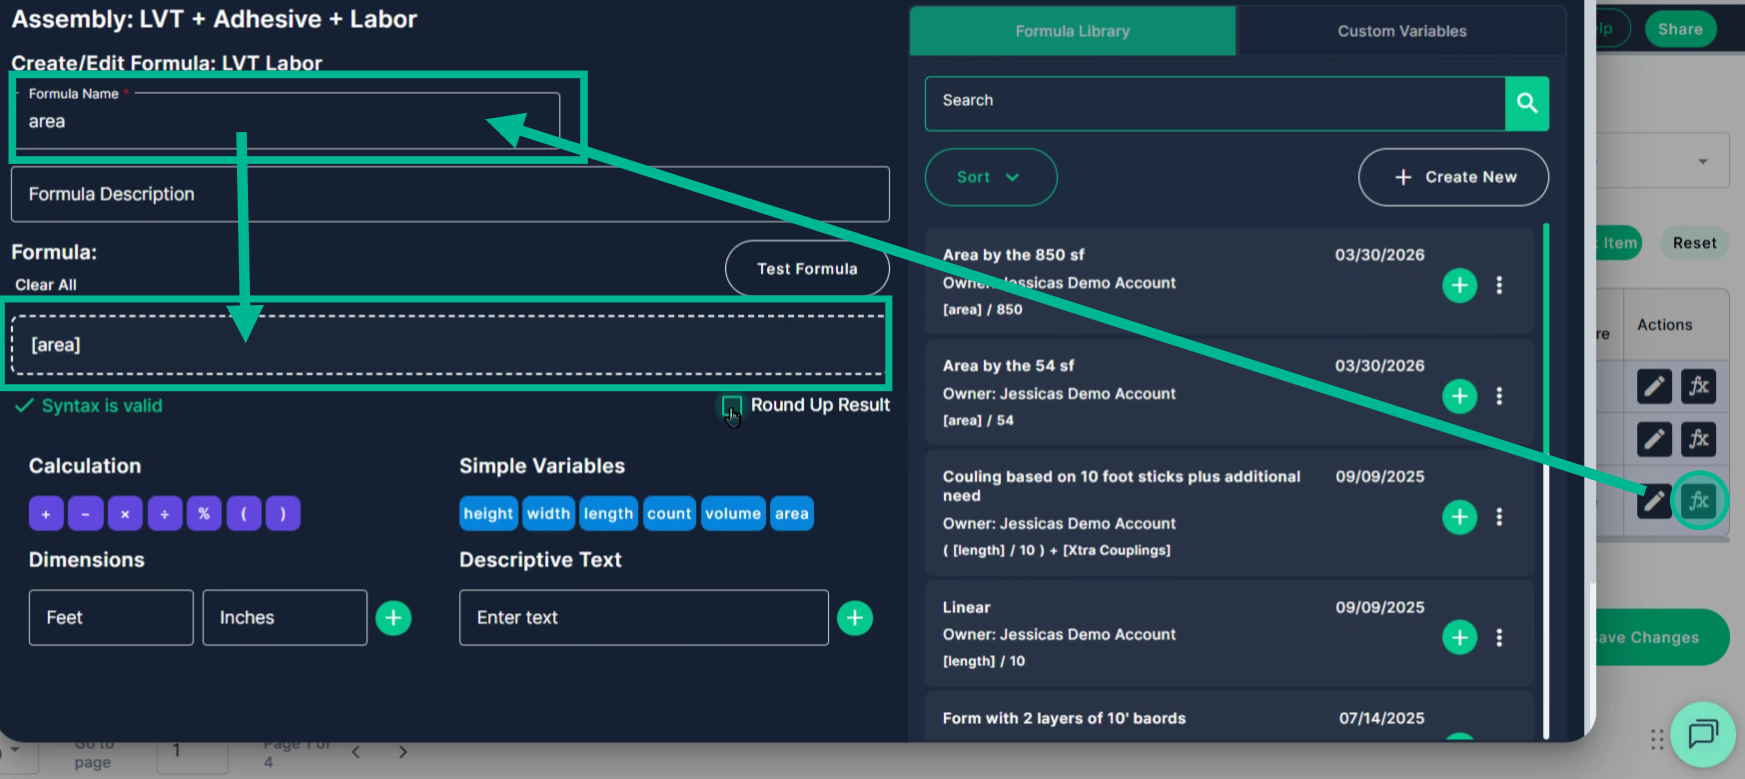
Build your formula using the Simple Variables (like "Area") and math operators.
For instance, divide the total area by the box coverage (54 sq ft) to calculate how many boxes you need.
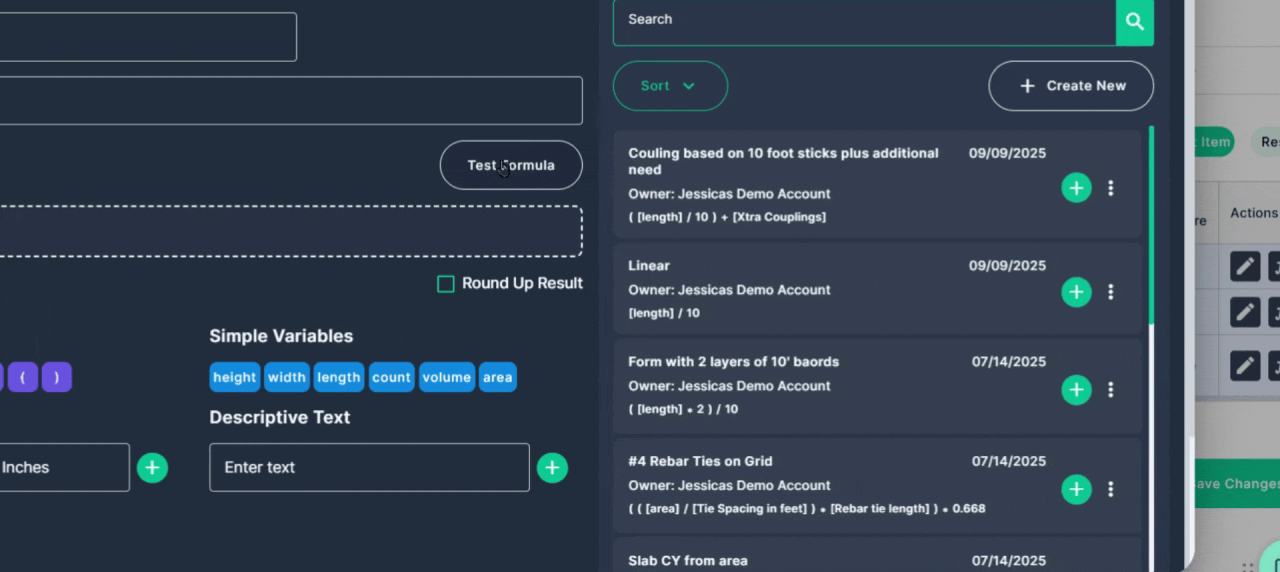
Optional Step 3.3: Test the formula
Click Test Formula to preview the result; round up if you want to purchase whole boxes only.
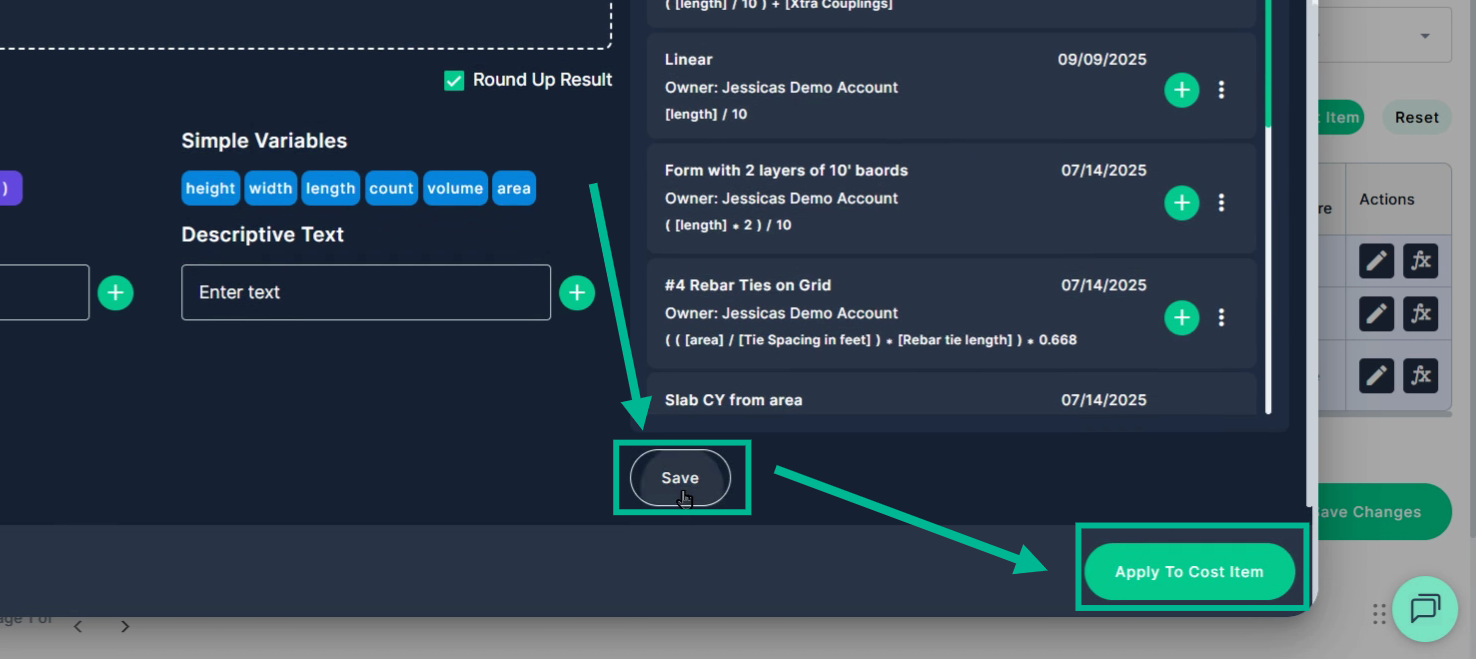
Step 3.4: Save and Apply the Formula
Once you’re satisfied, click Save and Apply To Cost Item.
Step 3.5: Build and Apply the Formula for the rest of your Cost Items.
Repeat for other cost items, such as dividing by 850 for a bucket of adhesive, and simply using only the simple Variable "area" for labor. Remember to Save and Apply each formula you create.
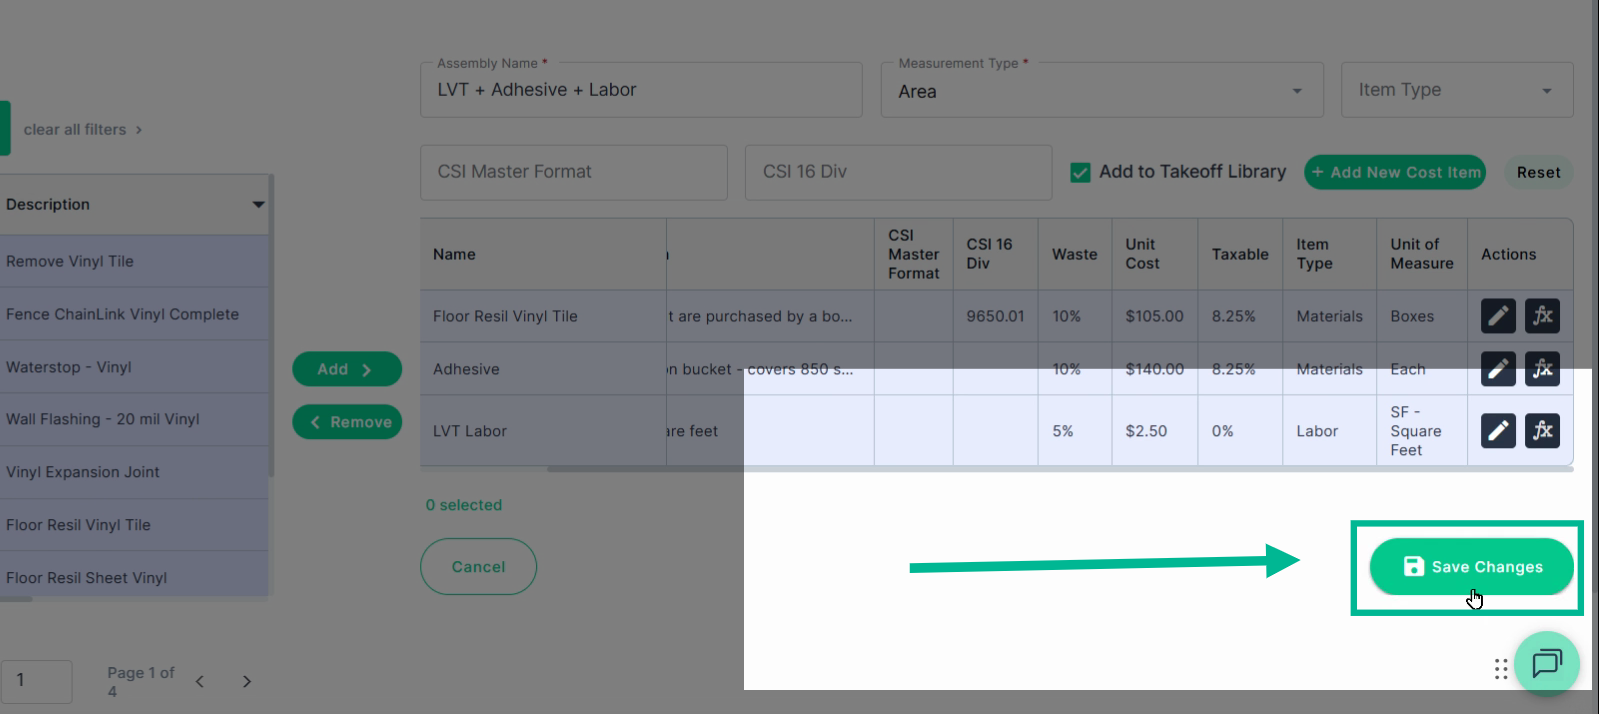
Step 4: Save and Test the Assembly
Step 4.1: Save Assembly
When all cost items and formulas are finalized, click Save Changes at the bottom of the cost item list.
Don’t leave the page without saving, you will lose your work!
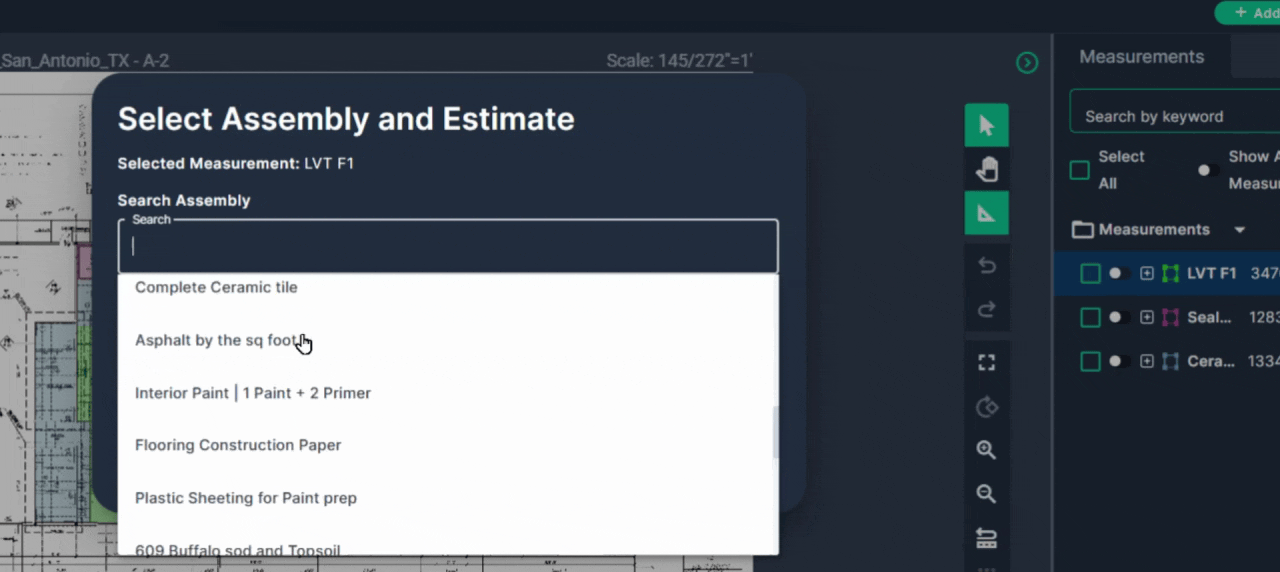
Step 4.2: Test by applying the Assembly to a Measurement
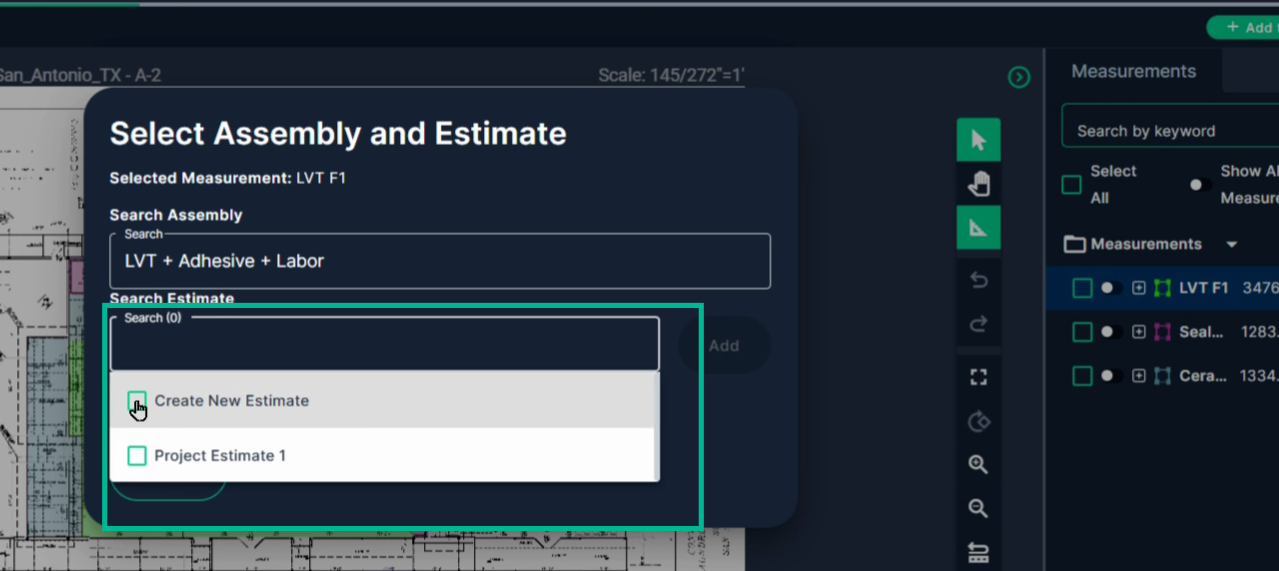
Go to your takeoff area. Right-click the relevant measurement. Click Send to Assembly from the menu.

Step 4.3: Select the Assembly in the drop-down
Choose the appropriate assembly for your measurement type.
Step 4.4: Select the Estimate tab destination in the drop-down
Check off your destination estimate tab—either an existing one or create a new page. Then click Add.
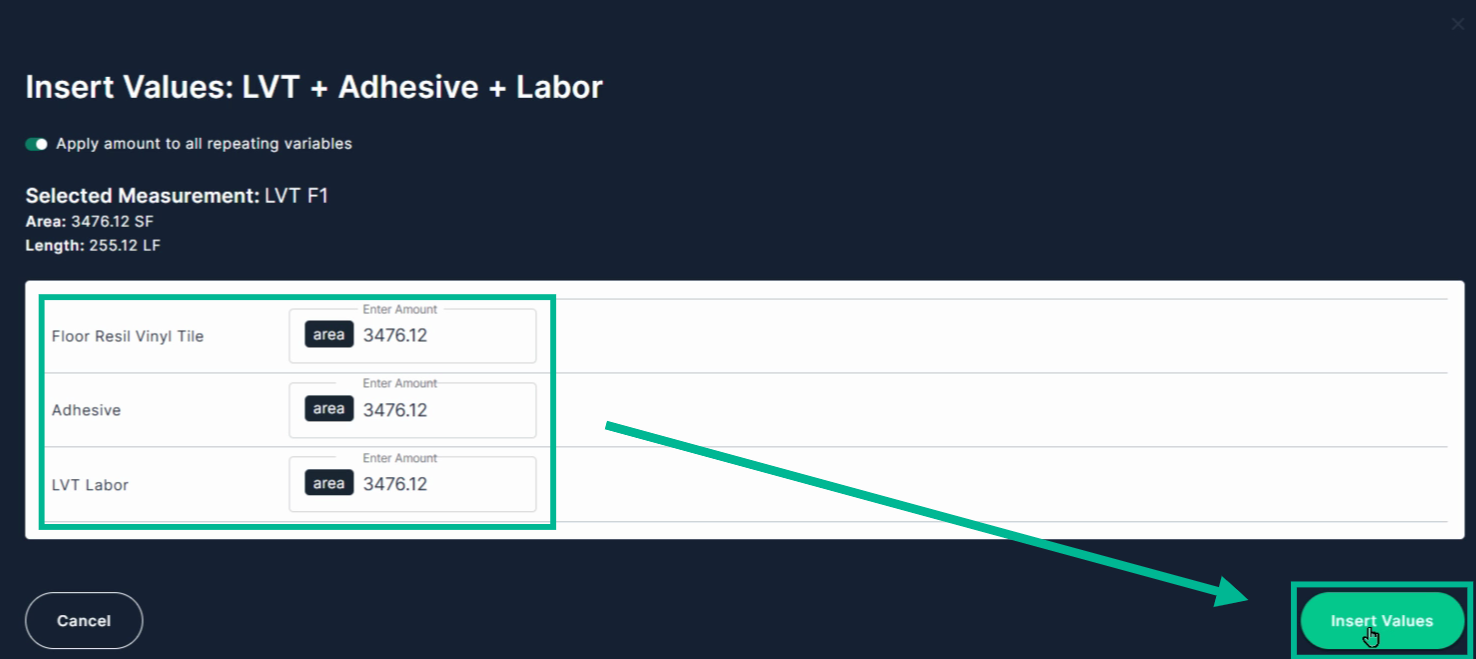
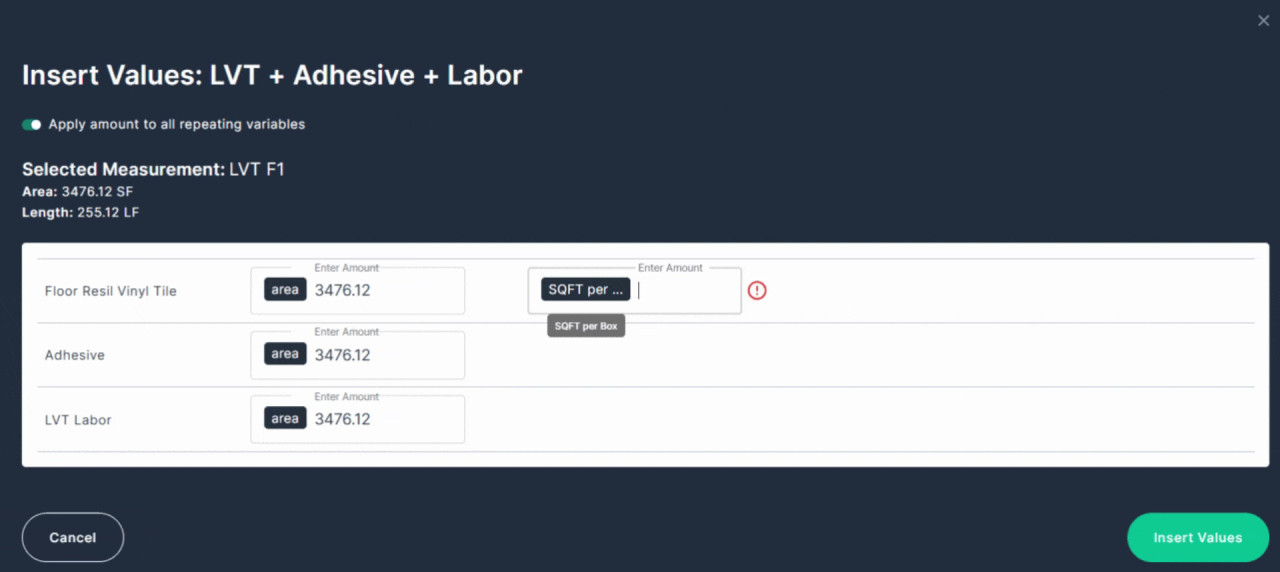
Step 4.5: Insert Values
The Insert Values box will come up, review the generated information, make any changes, fill in any blank boxes, and then click Insert Values.
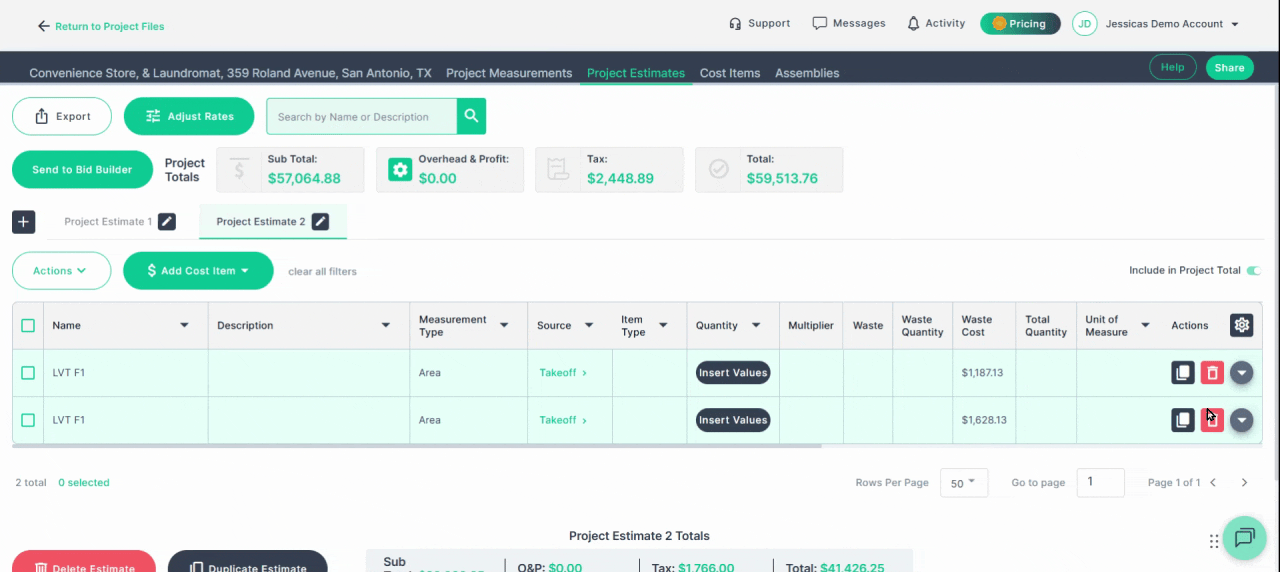
Step 4.3: Check Results
Check your project estimates to view the results.
You’ll see quantities and estimated costs for all the materials and labor included in your assembly.
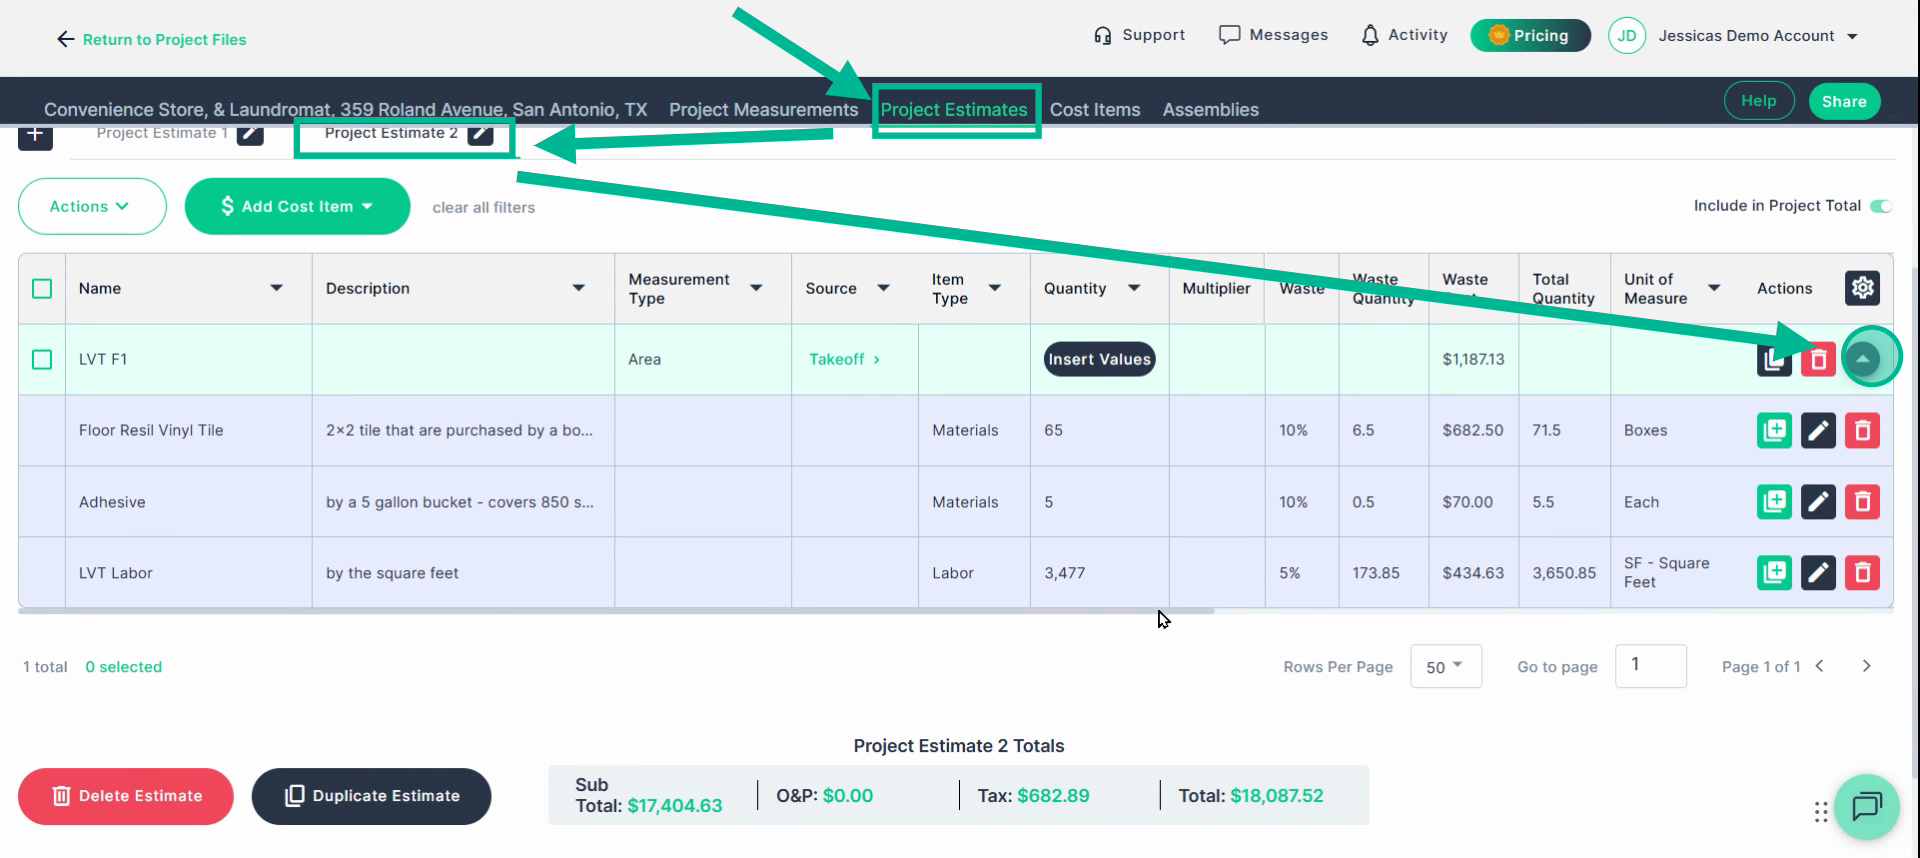
If these numbers look correct, then you are done!
The Assembly you created will be available to you and your team to use on all future Takeoffs, unless deleted by the creator.
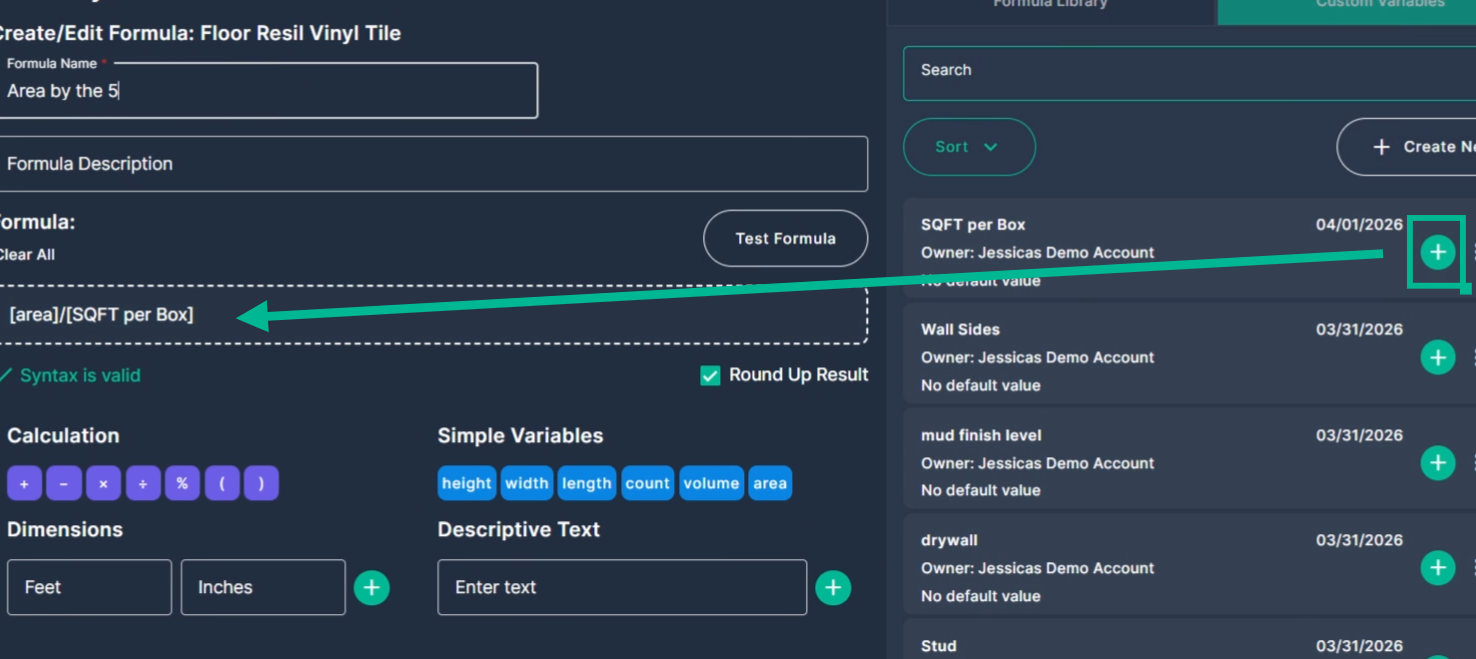
Implement Custom Variables in Formulas for Dynamic Coverage Rates
If your material coverage rate isn’t always the same, update the formula to use a custom variable.
For example, flooring is commonly purchased in a wide variety of square feet per box. Custom Variables allow you to enter the unique coverage rate for an item when utilizing an assembly on a measurement.
Complete Steps 1 and 2 of Creating an Assembly or Edit an existing assembly
Step 1: Edit the Assembly and Formula
Go back to the Assemblies tab and find your assembly. Click the Edit icon.
Step 1.1: Open Formula Builder
Open the formula builder for the relevant cost item that is purchased at a variable coverage rate.
Click Custom Variables on the right, then Create New.
Name and Save your new custom variable.
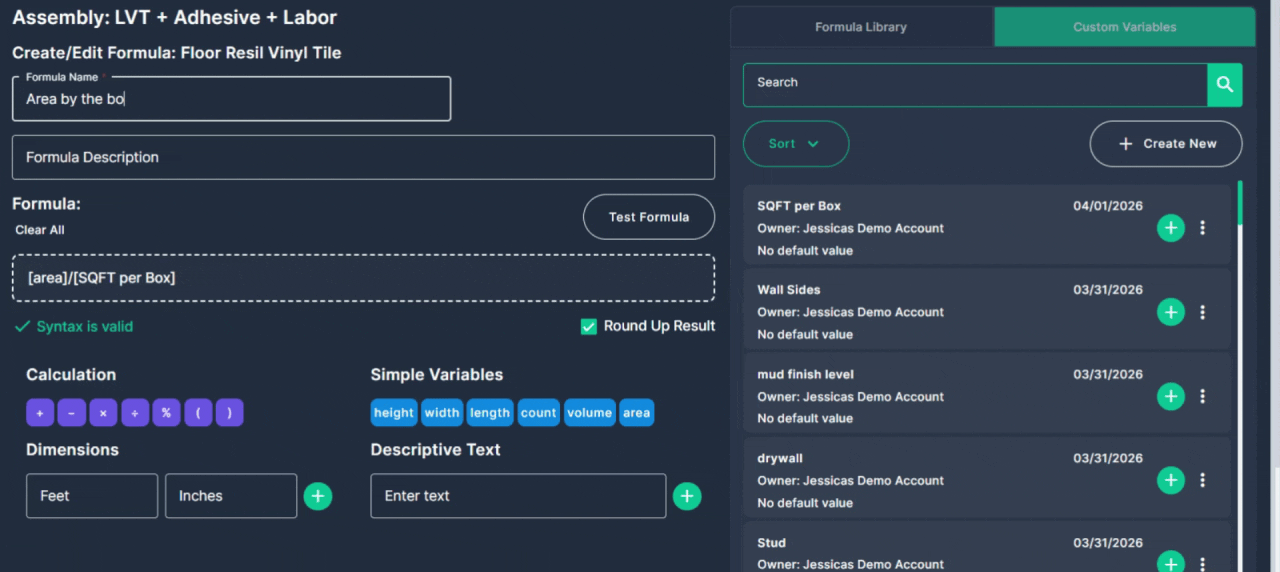
Step 1.2: Use the Custom Variable
Replace the hard number (like 54) in your formula with the new variable by clicking the green plus sign on the customer variable to the left.

Step 1.2: Update Name, Save, and Apply
Update the formula name if needed and save the changes. Apply to the cost item and save your assembly.
Step 2: Test the Updated Assembly
Follow the normal testing steps by sending the measurement into the assembly
Note: When you get to the Insert Values box, the Custom Variable we created is empty; enter the squarefoot coverage per box for the current product on this project. Then click Insert Values.
This lets you adapt your calculations for variability in your supplies and coverage rate.

Step 3: Check your results
Go to your Project Estimating Page to review the results.
You’ll notice that changing the coverage rate automatically updates the quantity needed for each item, making your estimate as accurate as possible.
Conclusion
Assemblies save you time and ensure accuracy—build them once, then reuse across projects for fast, consistent estimating. Start building your assemblies to streamline your workflow and improve every estimate.